
Summer calls for fresh nail looks that capture the season’s bright spirit. Pink nails remain a timeless choice that works for any occasion. From beach days to evening events, the right pink manicure adds polish to your style.
This guide features 40 simple pink summer nail designs that anyone can try. Each look showcases different shades pink and creative touches. You’ll discover ideas ranging from classic hot pink to soft pastel finishes.
These designs prove you don’t need salon skills to achieve stunning results. Simple techniques and smart color choices make each style achievable at home. Get ready to find your next favorite pink nail look.
Table of Contents
Classic Hot Pink Nail Designs for Bold Summer Style
Hot pink nails make a statement that demands attention. This vibrant shade captures summer energy perfectly. The color works beautifully on any nail length or shape.
Bold hot pink creates instant impact without requiring complex nail art. A simple glossy finish delivers maximum effect. This shade complements tanned skin and bright summer wardrobes.
Design 1: Glossy Hot Pink Perfection

A glossy hot pink base creates the ultimate summer manicure. This look requires just one vibrant polish shade. The high-shine finish reflects light beautifully and makes nails appear longer.
Apply two thin coats for even coverage. Top with a glossy topcoat to seal the color. This simple design suits any summer occasion from casual to dressy.
Design 2: Hot Pink with Gold Accent Stripe

Add a thin gold stripe down each nail center for elegant detail. This design elevates basic hot pink nails effortlessly. The metallic touch catches light and adds sophistication.
Use striping tape or a fine brush to create clean lines. The gold accent complements the warm undertones in hot pink. This look transitions easily from day to night.
Design 3: Hot Pink Ombré Fade

Create dimension with a hot pink ombré that fades toward the tips. This gradient effect adds visual interest to your manicure. The technique makes nails appear longer and more slender.
Use a makeup sponge to blend different shades pink seamlessly. Start with hot pink at the base and lighten toward the tip. The soft transition creates a modern, artistic finish.
Design 4: Hot Pink with White Dot Accents
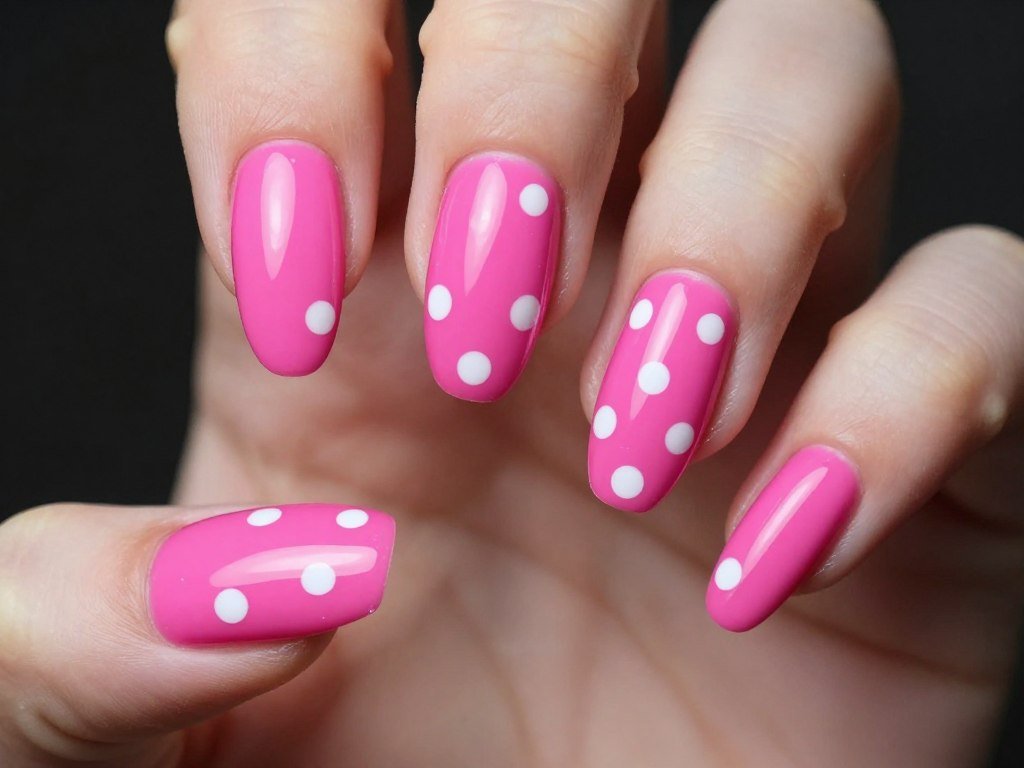
Scatter white dots across hot pink base for playful charm. This retro-inspired design brings fun to your summer look. The contrast between hot pink and white creates eye-catching appeal.
Use a dotting tool to place dots randomly or in patterns. Vary dot sizes for added interest. This design captures carefree summer vibes perfectly.
Design 5: Neon Hot Pink Matte Finish
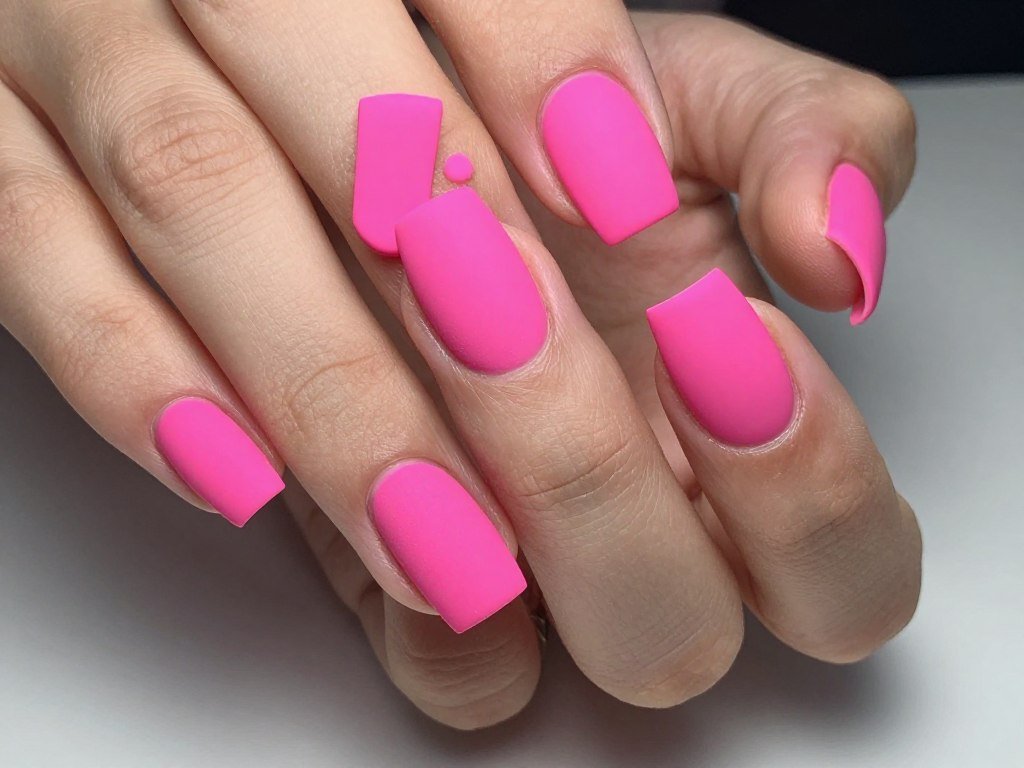
Transform hot pink with a matte topcoat for modern edge. The flat finish gives this bright shade a sophisticated twist. Matte pink chrome nails create striking contrast against glossy summer accessories.
Apply your hot pink base as usual, then seal with matte topcoat. The finish softens the color intensity slightly while maintaining vibrancy. This look feels fresh and contemporary.
Design 6: Hot Pink with Silver Glitter Tips

Add silver glitter to your nail tips for sparkly glamour. This design combines hot pink base with dazzling finish. The glitter catches light beautifully in summer sun.
Paint hot pink on most of the nail, leaving tips bare. Apply silver glitter polish to create french tips with sparkle. This look works perfectly for summer parties and special events.
Design 7: Hot Pink Negative Space Design
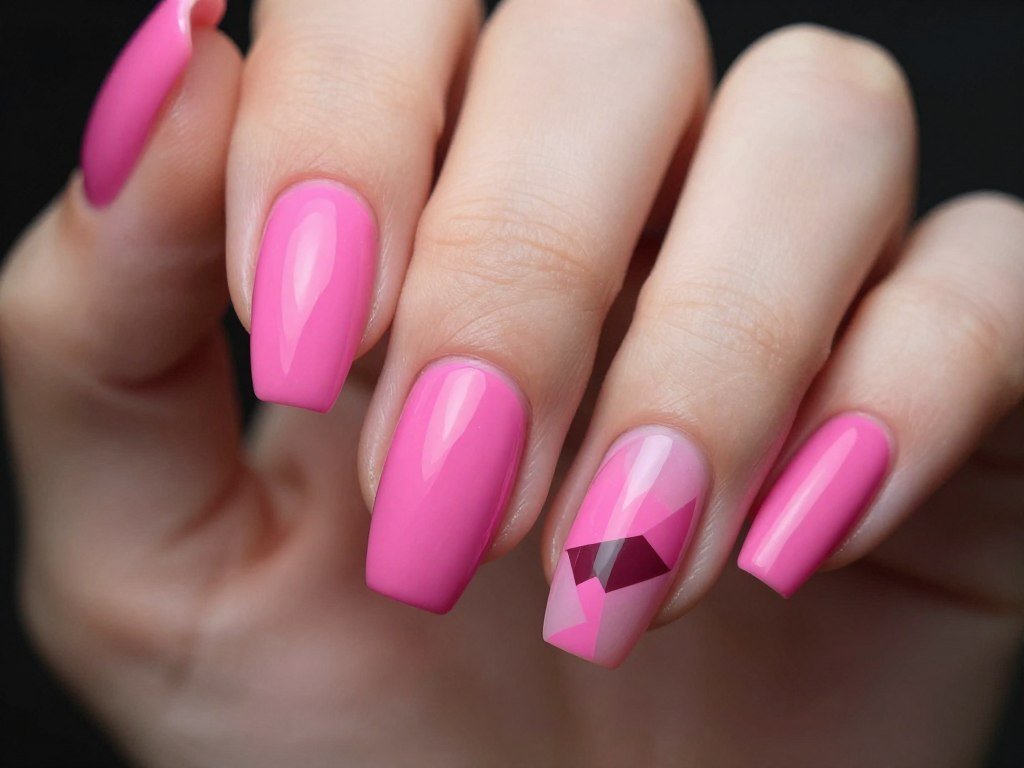
Leave strategic areas unpainted to create negative space nail art. This modern technique shows glimpses of natural nail through hot pink. The design feels artistic and contemporary.
Use tape to block off geometric sections before painting. Remove tape while polish is slightly wet for clean edges. The contrast between hot pink and natural nail creates striking visual impact.
Design 8: Hot Pink with Black Thin Lines
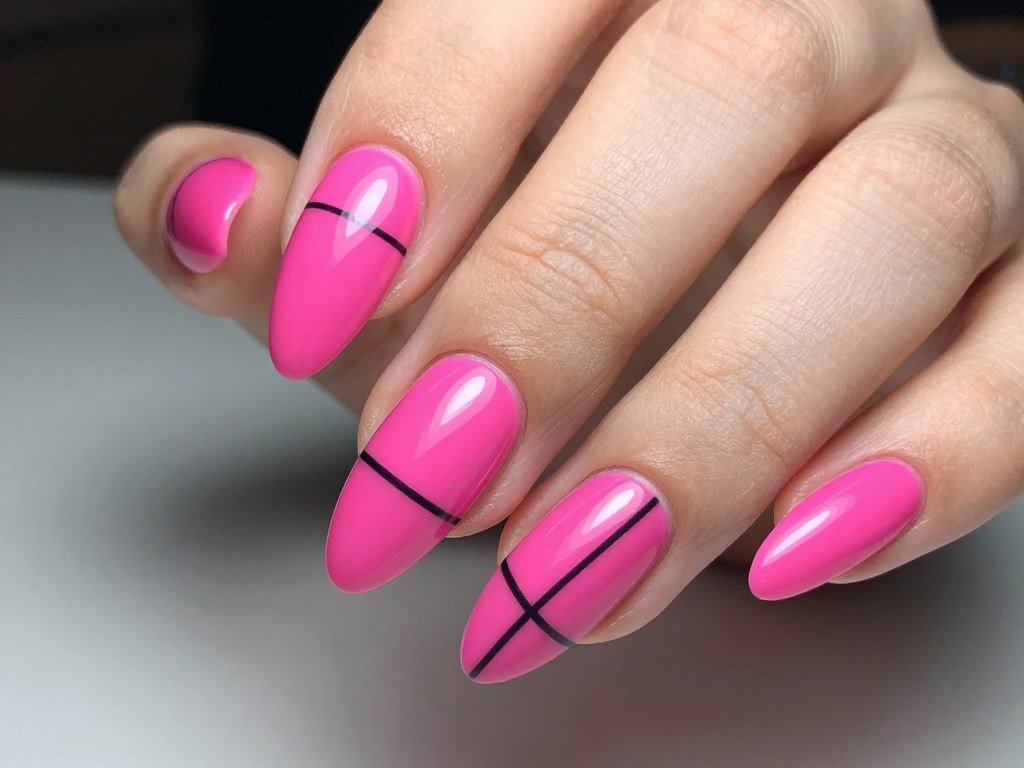
Draw thin black lines over hot pink for graphic appeal. This design adds artistic flair without overwhelming the base color. The black lines create definition and visual interest.
Use a fine nail art brush or striping tool for precise lines. Create geometric patterns, abstract designs, or simple stripes. This look channels modern art gallery vibes.
Design 9: Hot Pink Color Block Design
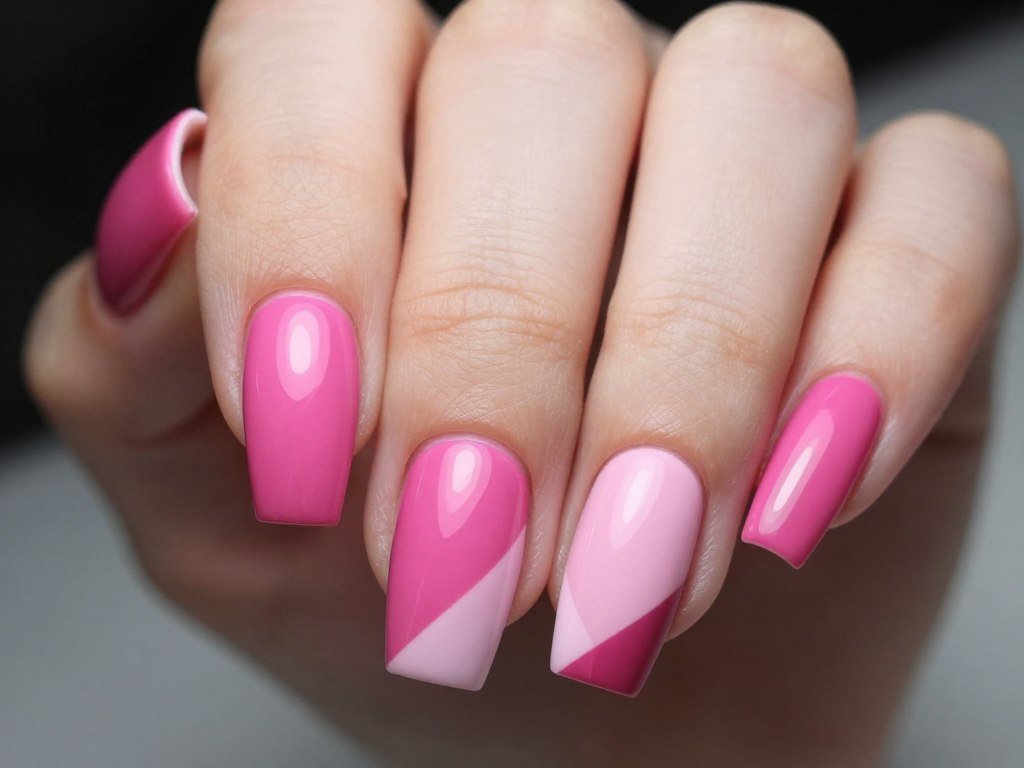
Divide nails into color-blocked sections using different shades pink. This design creates dynamic visual interest on each nail. The technique showcases your favorite pink tones together.
Use tape to create clean divisions between colors. Alternate between hot pink, baby pink, and medium pink shades. Each nail becomes a mini work of art with this approach.
Design 10: Hot Pink with Rhinestone Accent Nail

Embellish one accent nail with rhinestones for added glamour. This design keeps most nails simple while creating one showstopper. The sparkle adds special occasion appeal to your manicure.
Apply hot pink to all nails, then decorate one ring finger with rhinestones. Use nail glue to secure stones in decorative patterns. This look brings red carpet style to summer events.
Get the Perfect Hot Pink Shade

Finding the right hot pink makes all the difference. Quality polish delivers better color payoff and longer wear. Look for formulas with built-in shine for that glossy finish.
The best hot pink polishes apply smoothly and dry quickly. They should provide full coverage in two coats. Choose brands known for chip-resistant formulas to extend your manicure life.
Soft Pink Nail Designs for Elegant Summer Looks
Soft pink nails offer understated elegance perfect for any setting. These gentle shades work beautifully for professional environments and special occasions. Baby pink and light pink tones create feminine, sophisticated manicures.
These colors complement all skin tones and outfit choices. The subtle nature of soft pink allows for creative nail art without overwhelming your look. These designs prove that simple can be absolutely stunning.
Design 11: Baby Pink Classic Manicure

Baby pink creates the quintessential elegant manicure. This soft shade flatters every skin tone beautifully. The color reads as polished and put-together in any situation.
Apply this delicate shade in two or three thin coats for opacity. The sheer quality of baby pink requires patient layering. Finish with glossy topcoat to enhance the pink base and add shine.
Design 12: Soft Pink with Pearl Finish
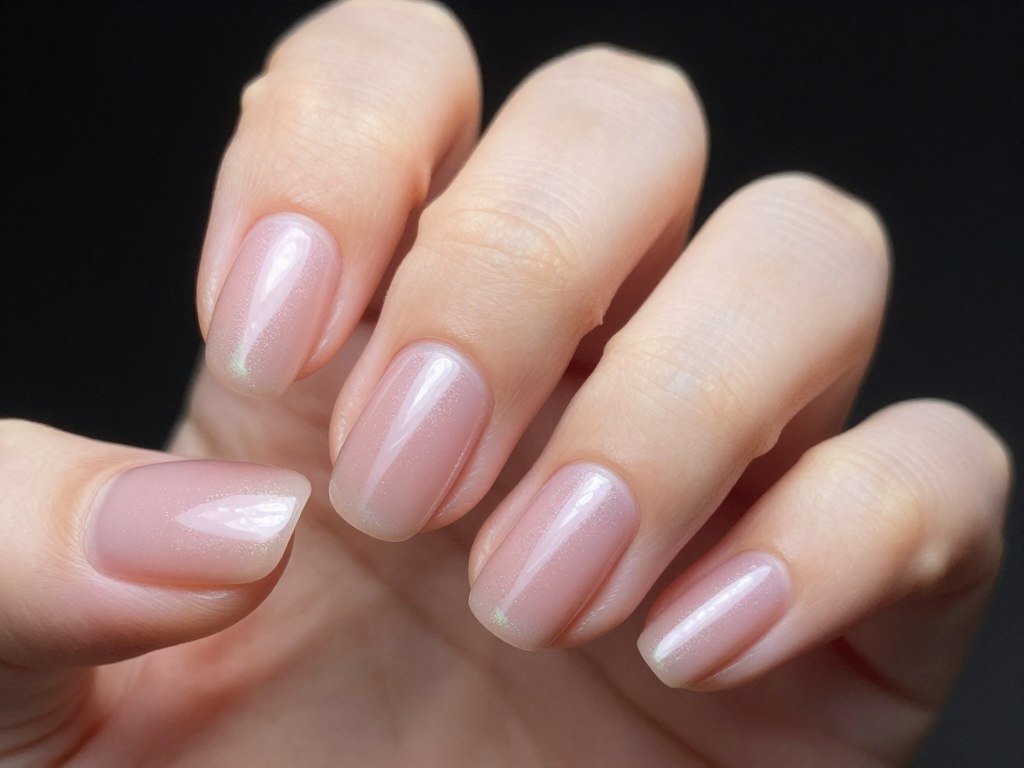
Add pearl shimmer to soft pink for luminous elegance. This finish creates subtle dimension that catches light beautifully. The iridescent quality elevates a simple pink base into something special.
Choose polishes with fine pearl particles for sophisticated shimmer. The effect should be subtle rather than glittery. This design suits weddings, formal events, and professional settings perfectly.
Design 13: Light Pink French Tips
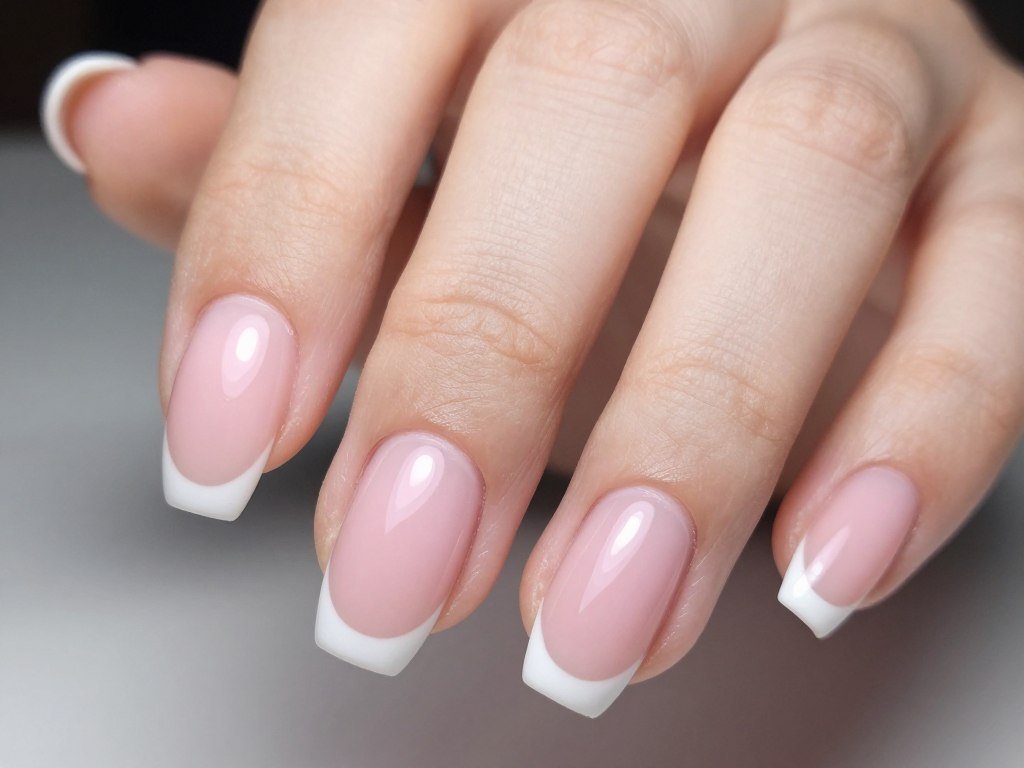
Pink french tips offer a fresh take on the classic manicure. Using soft pink as base creates warmth compared to traditional nude. The white tips pop beautifully against this colored base.
Paint nails with baby pink, then add white tips using guides or freehand technique. Keep tip lines thin and curved for elegant proportions. This timeless design never goes out of style.
Design 14: Soft Pink with Floral Accent
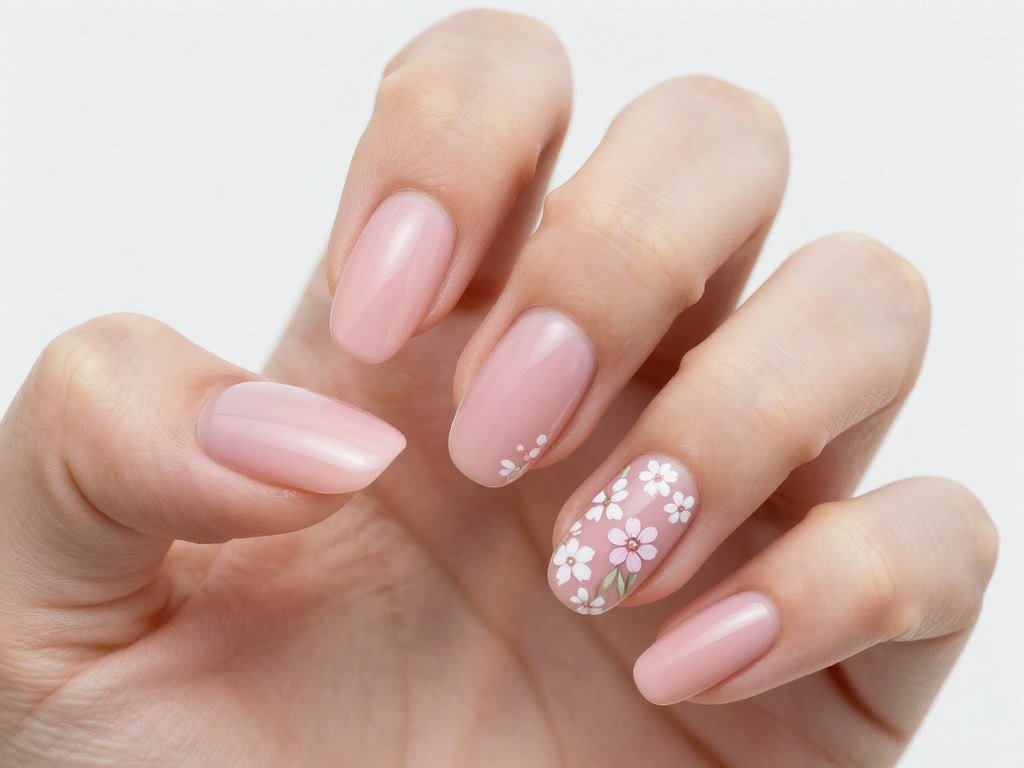
Paint tiny white flowers on one accent nail for romantic charm. This design adds artistic touch to an otherwise simple manicure. The floral element feels perfect for summer garden parties and outdoor events.
Use a fine detail brush to create small flower petals and leaves. Keep designs delicate and small for sophisticated effect. This nail art showcases your creative side while maintaining elegance.
Design 15: Blush Pink Gradient
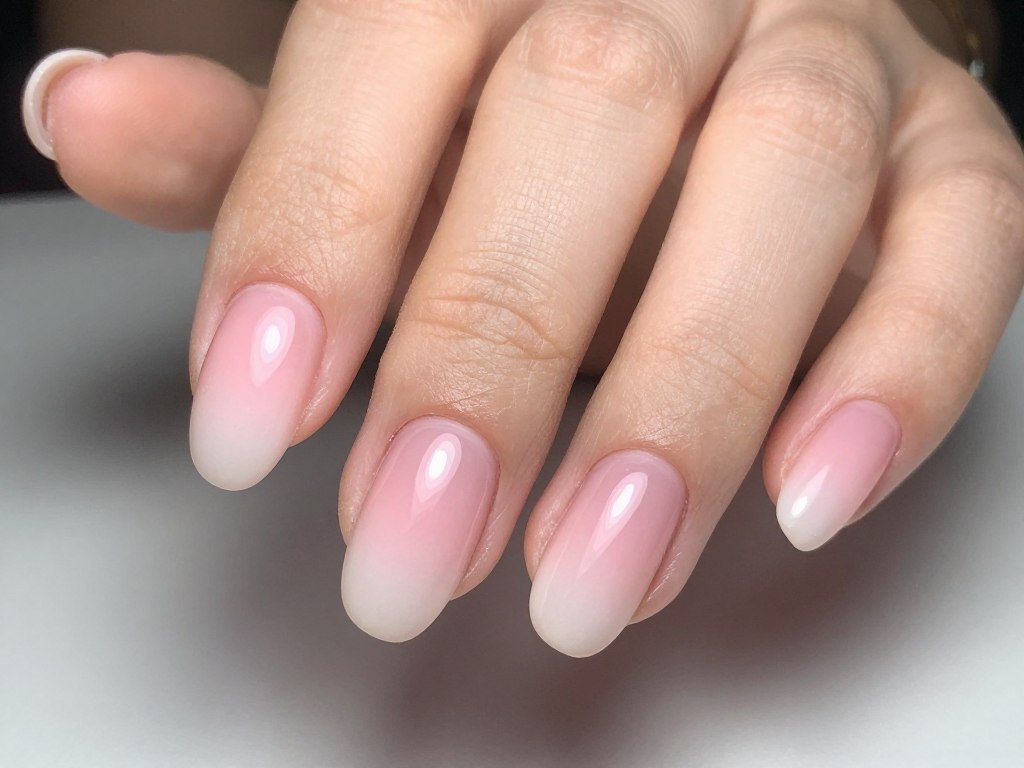
Create a gentle gradient from blush pink to nearly white. This soft ombré effect adds dimension without bold contrast. The subtle color shift creates visual interest while maintaining elegance.
Blend different shades pink using a makeup sponge for seamless transition. Work quickly while polish remains workable. The finished look appears delicate and refined.
Design 16: Soft Pink with Gold Foil Accent

Press small pieces of gold foil onto soft pink base for luxe detail. This technique adds richness without overwhelming the delicate pink shade. The metallic touch brings warmth and sophistication.
Apply foil pieces while base coat is tacky for best adhesion. Seal everything with clear topcoat to smooth the surface. This design feels expensive and refined.
Design 17: Light Pink with White Stripes
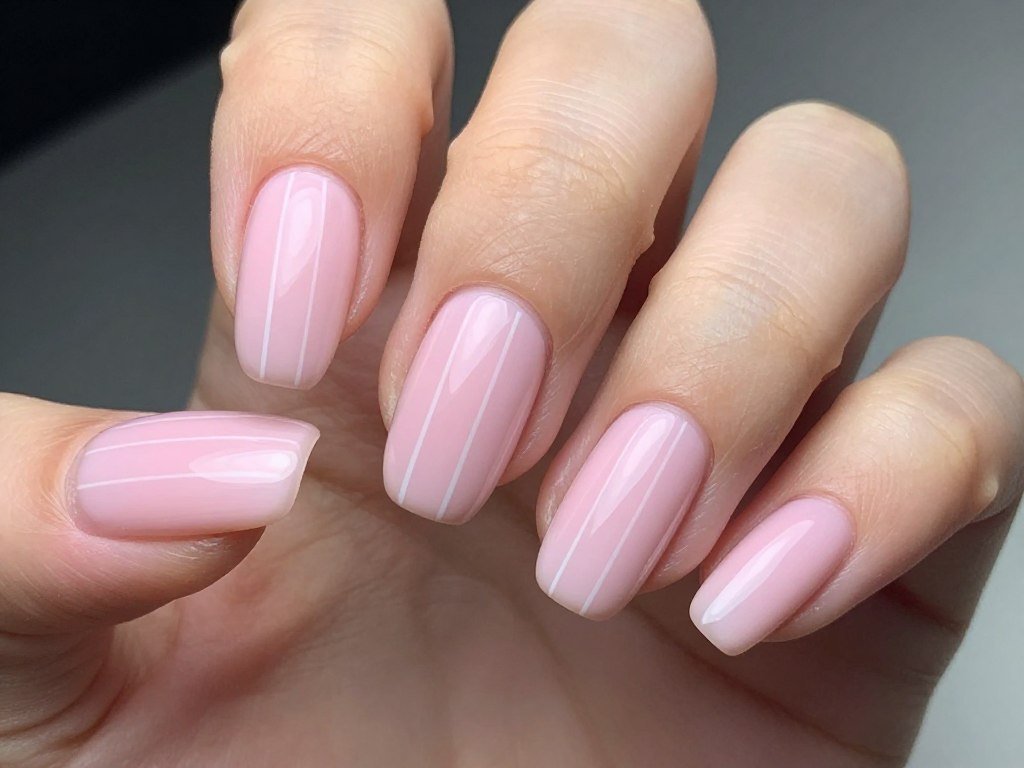
Add thin white vertical stripes to light pink nails for elongating effect. This simple nail art creates the illusion of longer, more slender fingers. The stripes add visual interest to a soft pink base.
Use striping tape or a fine brush to create evenly spaced lines. Keep stripes thin for sophisticated look rather than bold graphic effect. This design suits professional settings beautifully.
Design 18: Baby Pink with Subtle Glitter
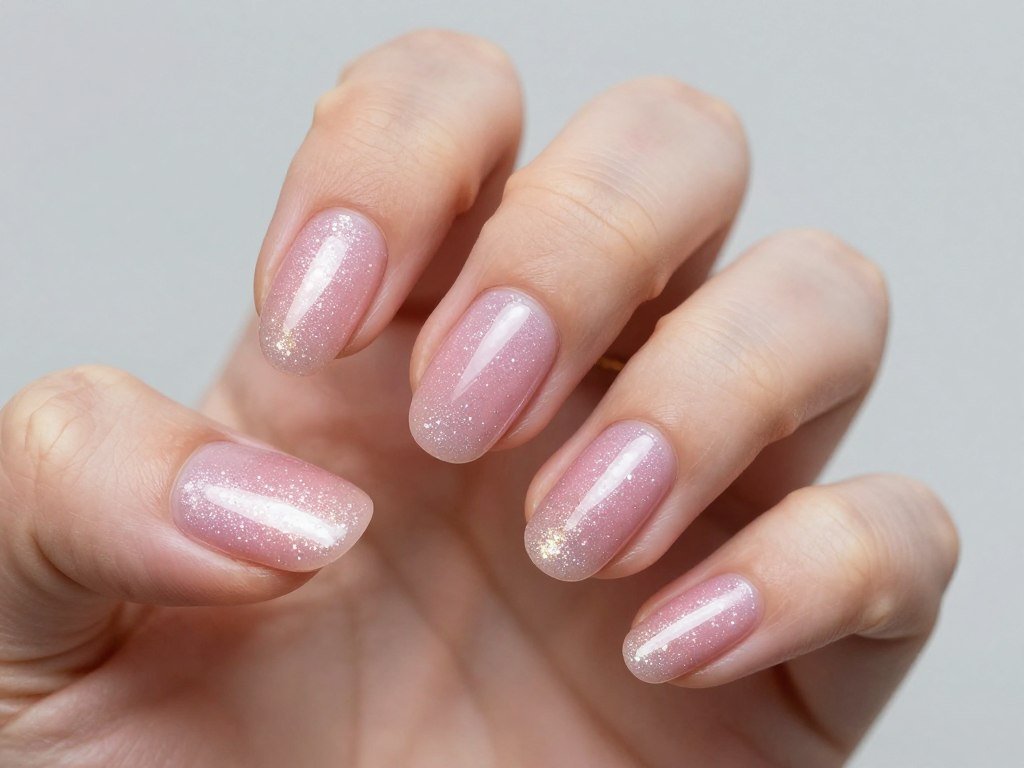
Mix fine glitter into baby pink for gentle sparkle. This approach adds dimension without looking too flashy. The subtle shimmer catches light beautifully during summer activities.
Choose ultra-fine glitter particles that blend into the pink base. The effect should be barely-there sparkle rather than obvious glitter. This finish adds special touch to everyday wear.
Design 19: Soft Pink Half-Moon Design

Create white half-moons at the nail base for vintage-inspired elegance. This reverse french manicure style feels both retro and modern. The design showcases precise technique and attention to detail.
Use reinforcement stickers to create perfect curved lines. Paint soft pink over most of the nail, leaving the base area for white. This look channels old Hollywood glamour.
Design 20: Light Pink Minimalist Line Art
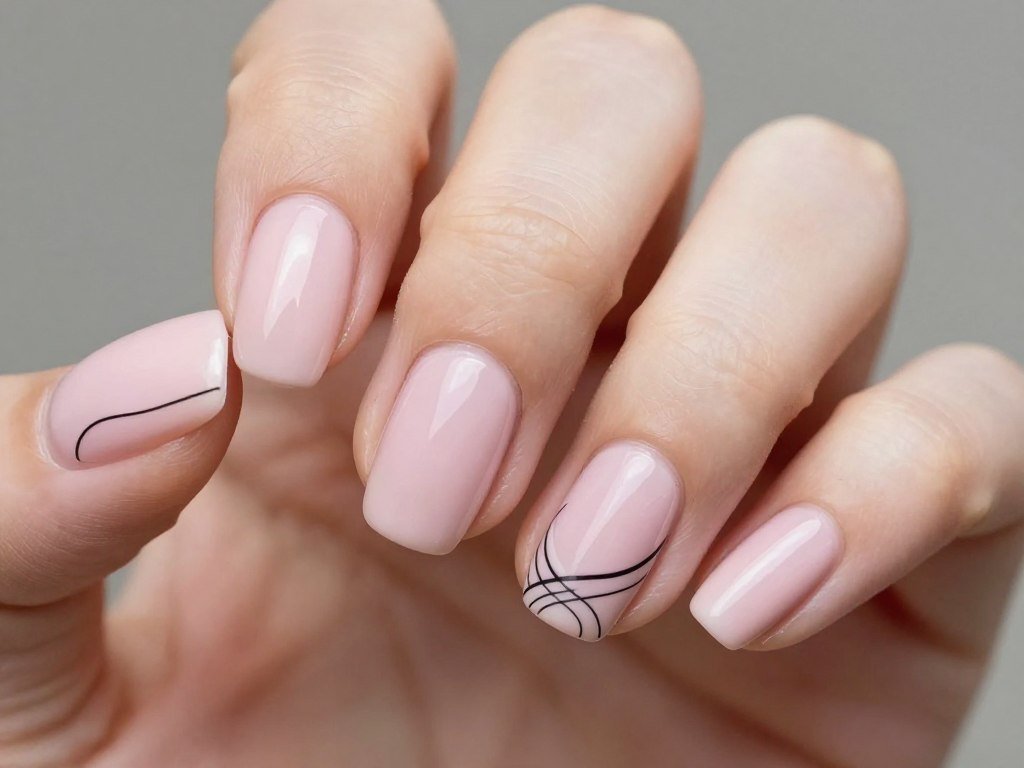
Draw simple line art over light pink for modern minimalist style. This design feels artistic and contemporary. The black lines create striking contrast against the soft pink base.
Use a fine nail art brush to create abstract faces, geometric shapes, or simple line drawings. Keep designs minimal for sophisticated effect. This nail art makes a statement through simplicity.
Pink French Tip Designs for Modern Summer Manicures
Pink french tips reinvent the classic french manicure with colorful flair. These designs maintain the elegant french tip concept while incorporating summer’s favorite color. Different shades pink create fresh takes on this timeless nail style.
French tip variations offer endless creative possibilities. You can adjust tip width, color intensity, and decorative elements. These designs suit both professional settings and casual summer outings.
Design 21: Reverse Pink French Tips
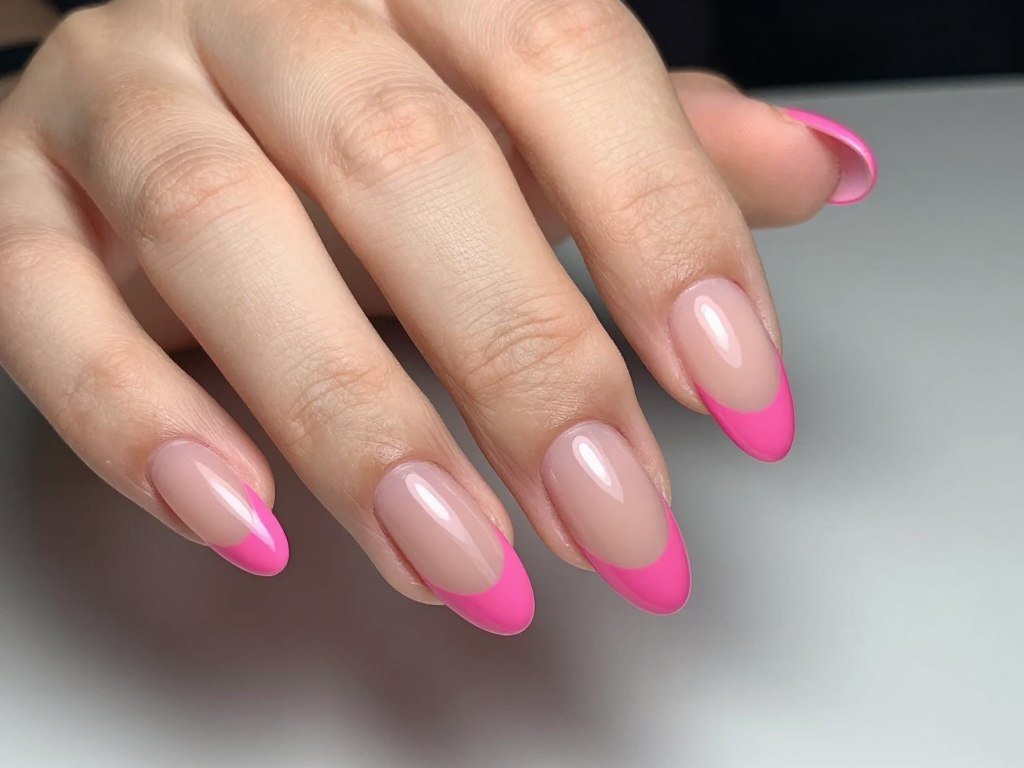
Flip the traditional french manicure by using hot pink for tips instead of white. This modern approach creates bold impact while maintaining classic structure. The pink tips feel fresh and contemporary against a nude base.
Apply nude polish as your base color. Use guides or freehand technique to paint hot pink tips. Adjust tip thickness based on personal preference and nail length.
Design 22: Pink Ombré French Tips

Create gradient french tips that fade from clear to hot pink. This technique combines ombré trend with classic french tip structure. The result feels modern and dimensional.
Use a makeup sponge to blend pink gradually toward tips. Build color intensity in layers for smooth transition. This design requires patience but delivers stunning results.
Design 23: Double Pink French Tips
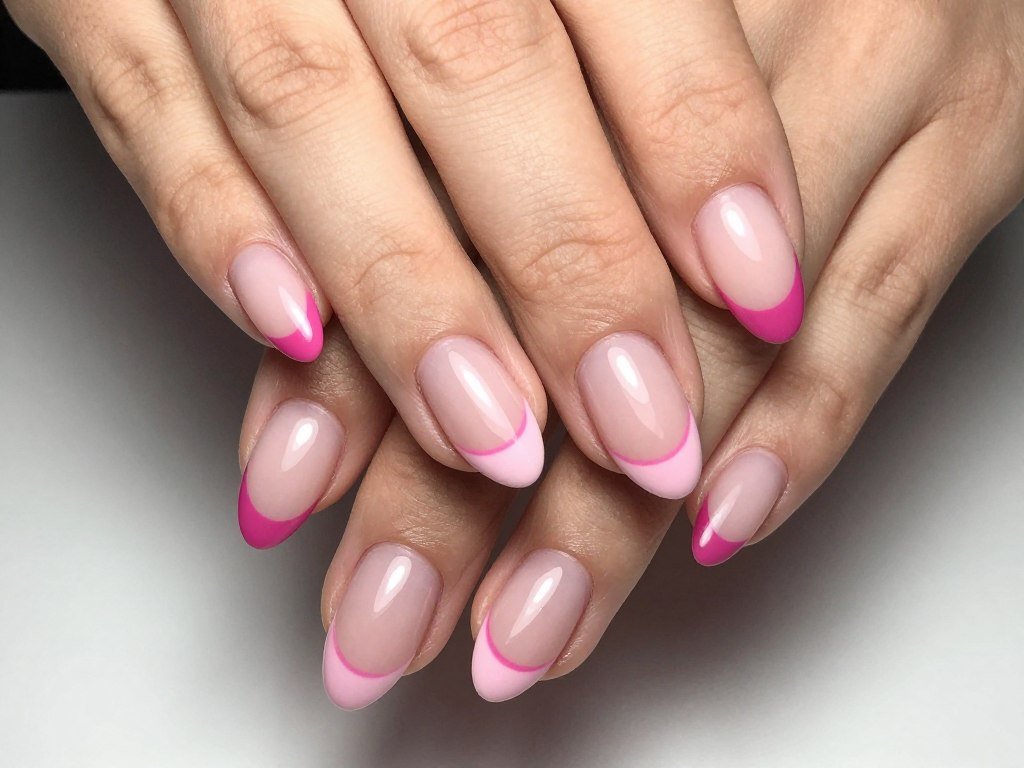
Paint two parallel french tip lines in different shades pink. This design adds visual interest to the classic french manicure. The dual lines create modern graphic appeal.
Use light pink for the first tip line, then add hot pink above it. Keep lines thin and evenly spaced for polished look. This variation stands out from standard french tips.
Design 24: Pink French Tips with Glitter Line
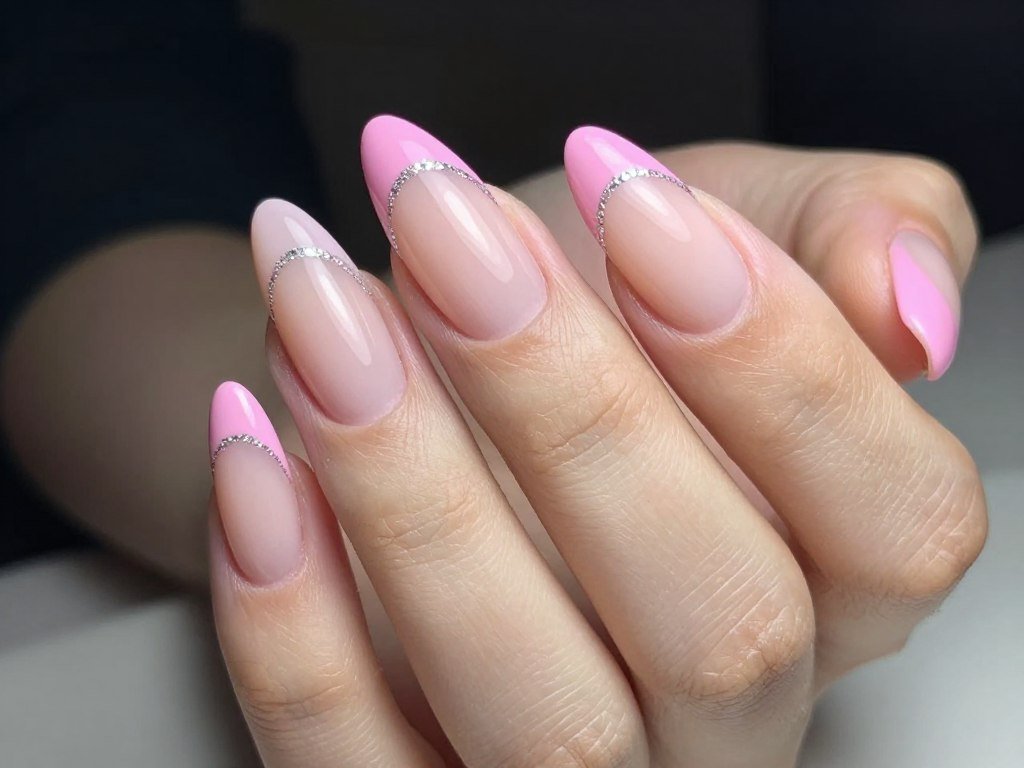
Add a thin glitter line between pink french tips and base color. This detail adds sparkle and defines the tip line beautifully. The glitter catches light and creates eye-catching dimension.
Paint your french tips first, then apply glitter polish along the separation line. Use a fine brush for precision. This extra touch elevates basic french tips significantly.
Design 25: Diagonal Pink French Tips
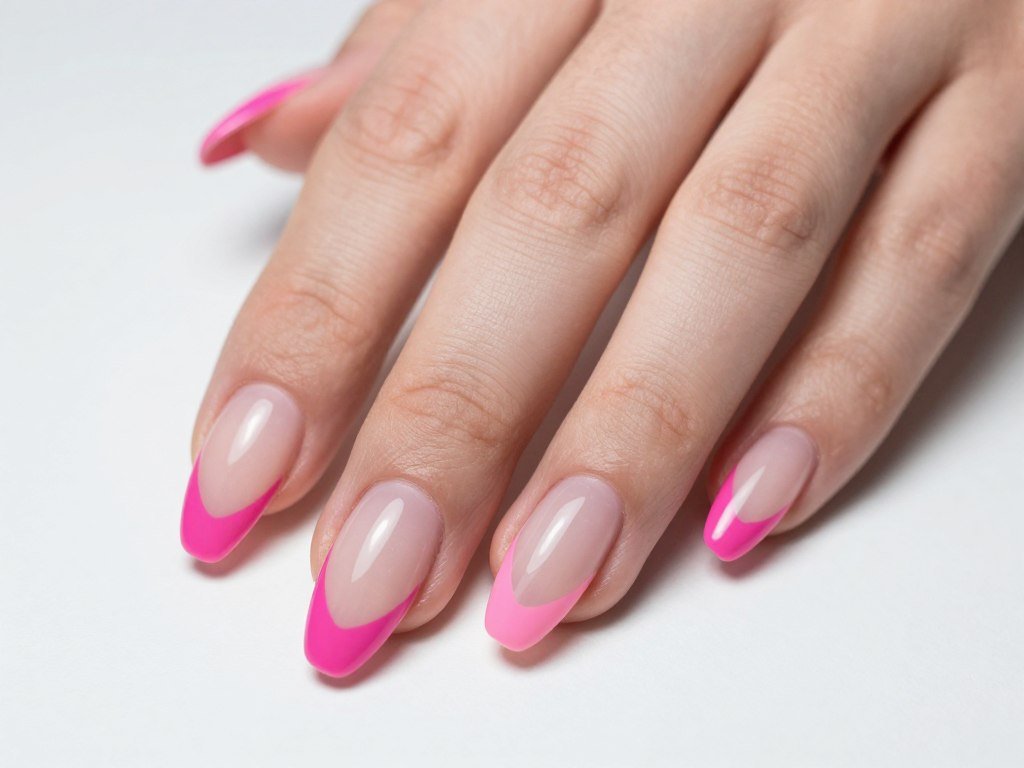
Angle your french tips diagonally for contemporary twist. This geometric approach to french tips feels modern and artistic. The diagonal line creates visual interest and elongates nails.
Use tape to create clean diagonal lines across nails. Paint pink on the tip side of the tape. This design works especially well on almond or stiletto nail shapes.
Design 26: Thin Pink French Tips
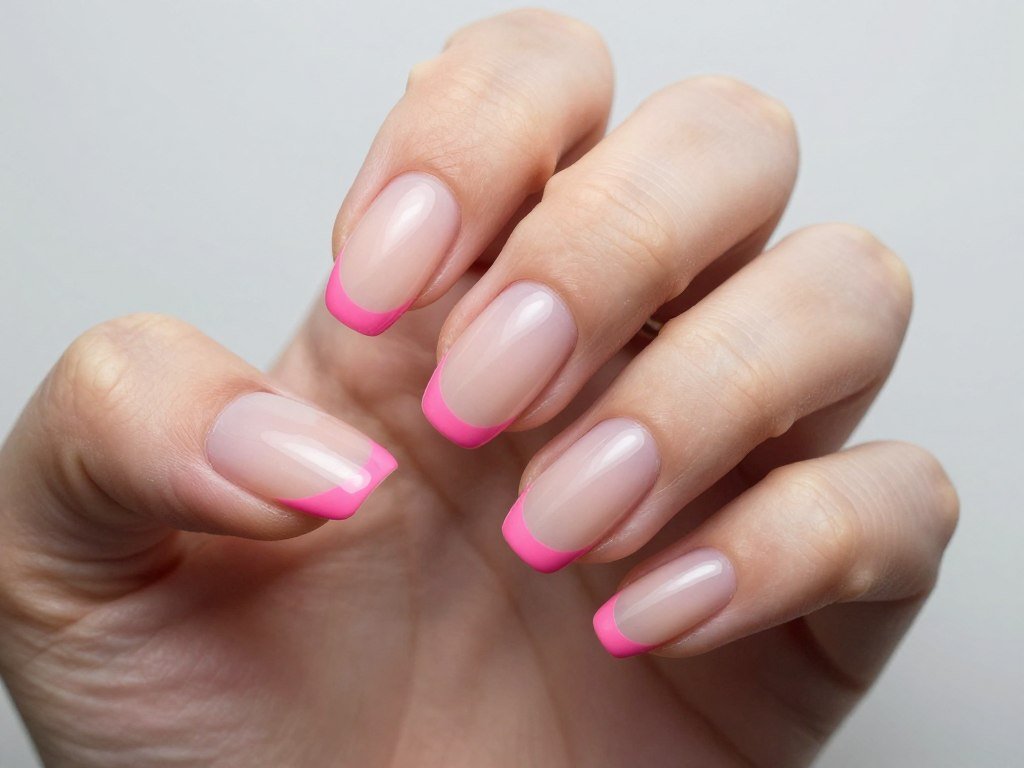
Create ultra-thin pink french tips for delicate elegance. This minimalist approach keeps tips subtle yet colorful. The thin line of hot pink adds just enough color without overwhelming.
Use a fine detail brush or striping tool for precise thin lines. Keep tip width consistent across all nails. This design suits professional settings while maintaining personality.
Design 27: Pink French Tips with Negative Space
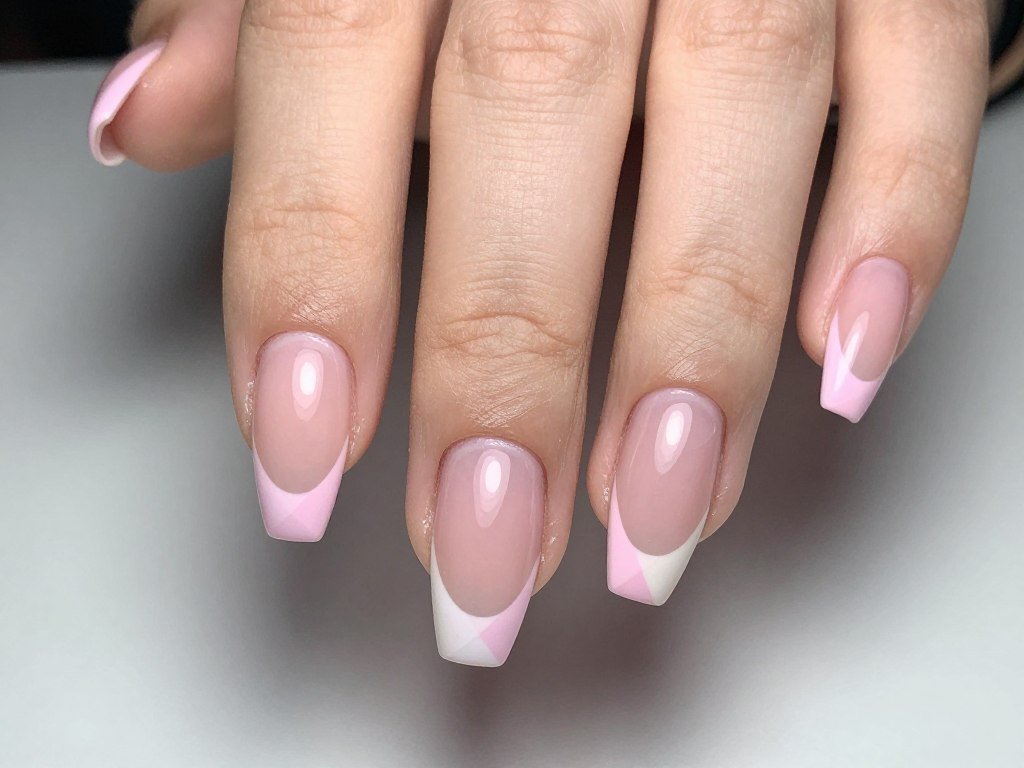
Incorporate negative space into pink french tips for artistic flair. This design shows glimpses of natural nail through strategic cutouts. The combination of french tips and negative space feels fashion-forward.
Paint pink french tips, then remove small geometric sections before polish dries. Use tape or vinyl cutouts to create clean shapes. This advanced technique creates gallery-worthy nail art.
Design 28: V-Shaped Pink French Tips
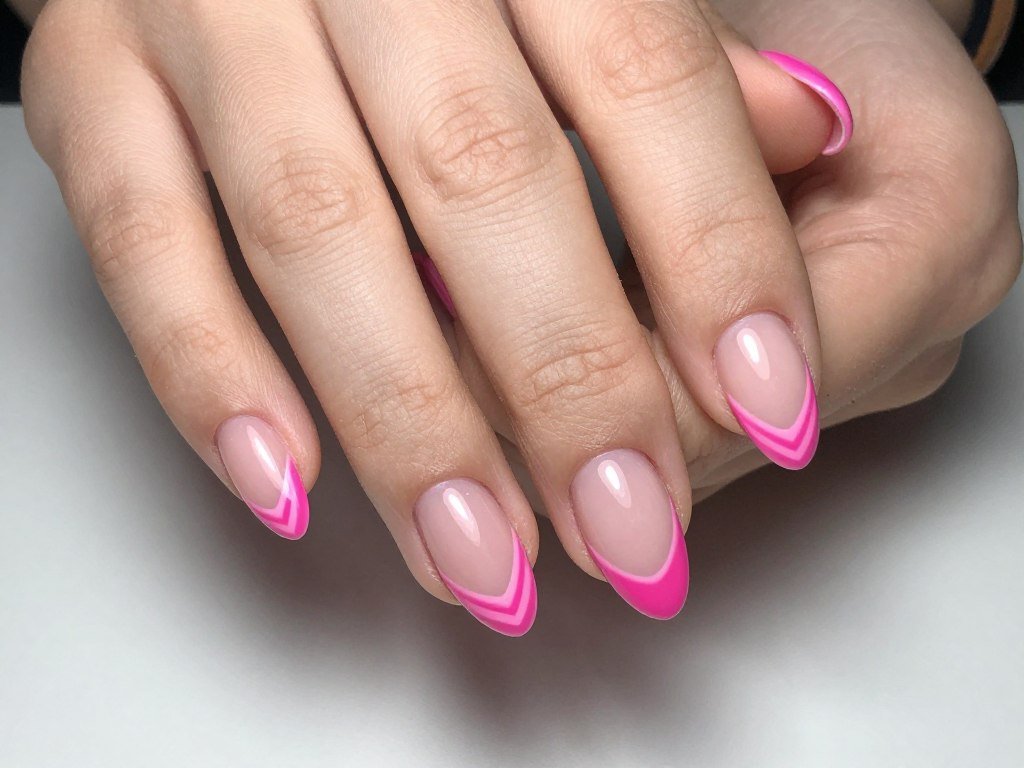
Form V-shaped french tips for geometric appeal. This chevron variation adds modern edge to traditional french manicure. The pointed shape draws eyes to fingertips.
Use tape to create symmetrical V shapes at tips. Paint hot pink inside the taped area. This design requires precision but delivers striking results.
Design 29: Pink French Tips with Dot Detail
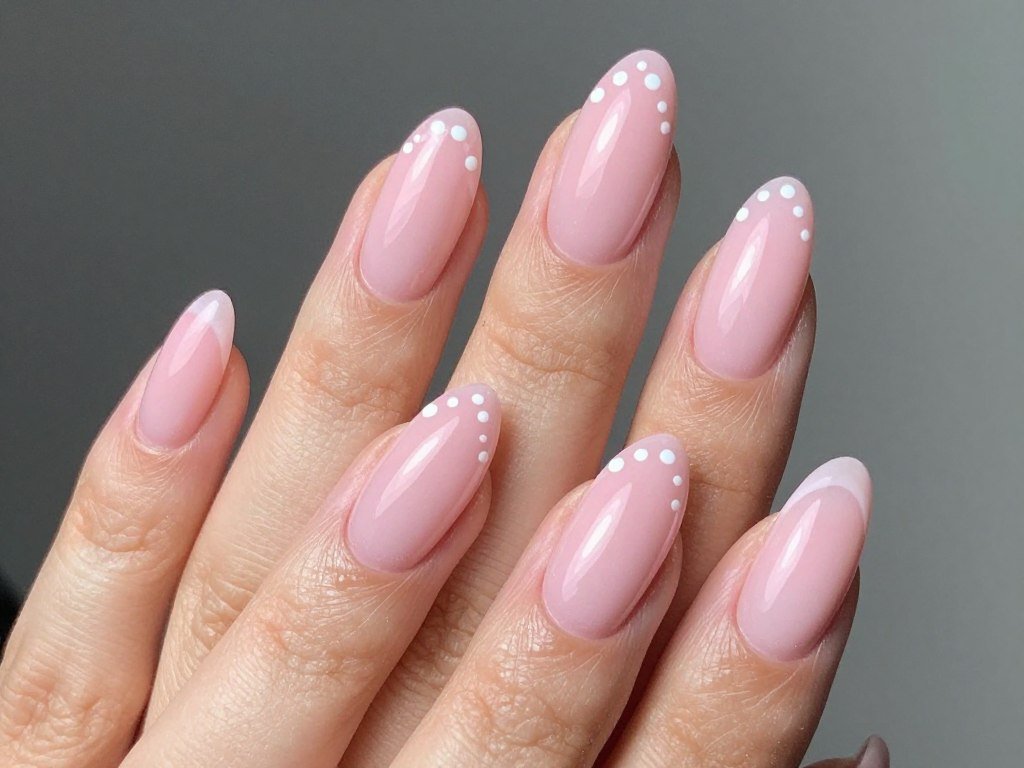
Line pink french tips with tiny white dots for playful detail. This simple addition transforms basic french tips into something special. The dots add texture and visual interest.
Create pink french tips first, then use a dotting tool to place white dots along the tip line. Space dots evenly for polished appearance. This design feels fun without being childish.
Design 30: Curved Pink French Tips
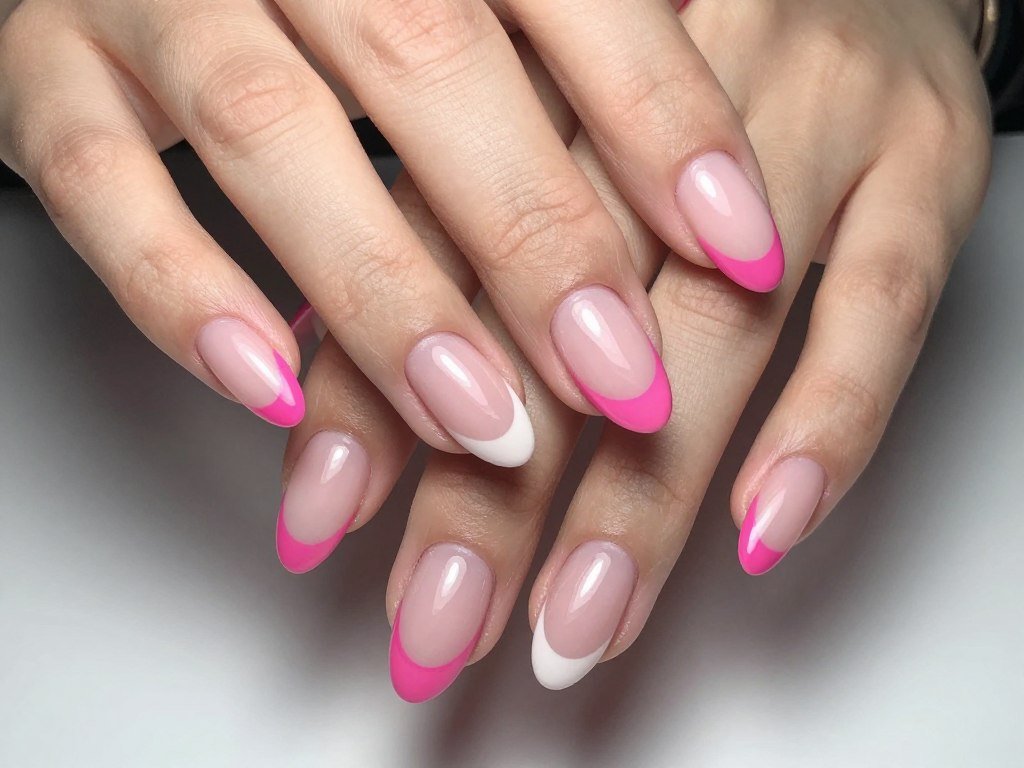
Exaggerate the curve of pink french tips for dramatic effect. This design emphasizes the smile line that defines french manicures. The deep curve creates vintage glamour reminiscent of classic Hollywood.
Paint a more pronounced curve than traditional french tips. The hot pink should dip lower at nail sides and peak at center. This look feels elegant and intentionally retro.
Essential Nail Tools for Perfect Pink Designs

Quality tools make creating these pink summer nail designs much easier. Fine detail brushes allow precise line work and tiny details. Dotting tools create perfect circles every time.
Striping tape helps achieve clean lines and geometric shapes. Nail guides ensure consistent french tips across all fingers. Investing in proper tools elevates your at-home manicure game.
Best Base and Top Coats for Long-Lasting Pink Nails

A quality base coat protects nails and helps color adhere better. Look for formulas that fill ridges and create smooth canvas. Base coats prevent staining from darker pink shades.
Top coats seal your design and add shine or matte finish. Quick-dry formulas speed up the manicure process significantly. UV-protective top coats prevent color fading in summer sun.
Pink Nail Polish Collections Worth Trying

Building a collection of different shades pink opens up design possibilities. Include hot pink, baby pink, neon pink, and dusty rose tones. Having variety lets you create ombré effects and color-blocked designs.
Look for sets that offer complementary pink tones together. Consider both cream and shimmer finishes for versatility. Quality polish applies smoothly and requires fewer coats for opacity.
Pink Chrome and Glitter Nail Designs for Maximum Glamour
Pink chrome nails and glitter designs bring extra sparkle to summer manicures. These eye-catching finishes reflect light beautifully and create statement nails. Chrome and glitter transform simple pink base colors into show-stopping looks.
These glamorous finishes suit special occasions and nights out. They add dimension and luxury to your manicure. The metallic and sparkly effects catch attention wherever you go.
Design 31: Rose Gold Chrome Nails
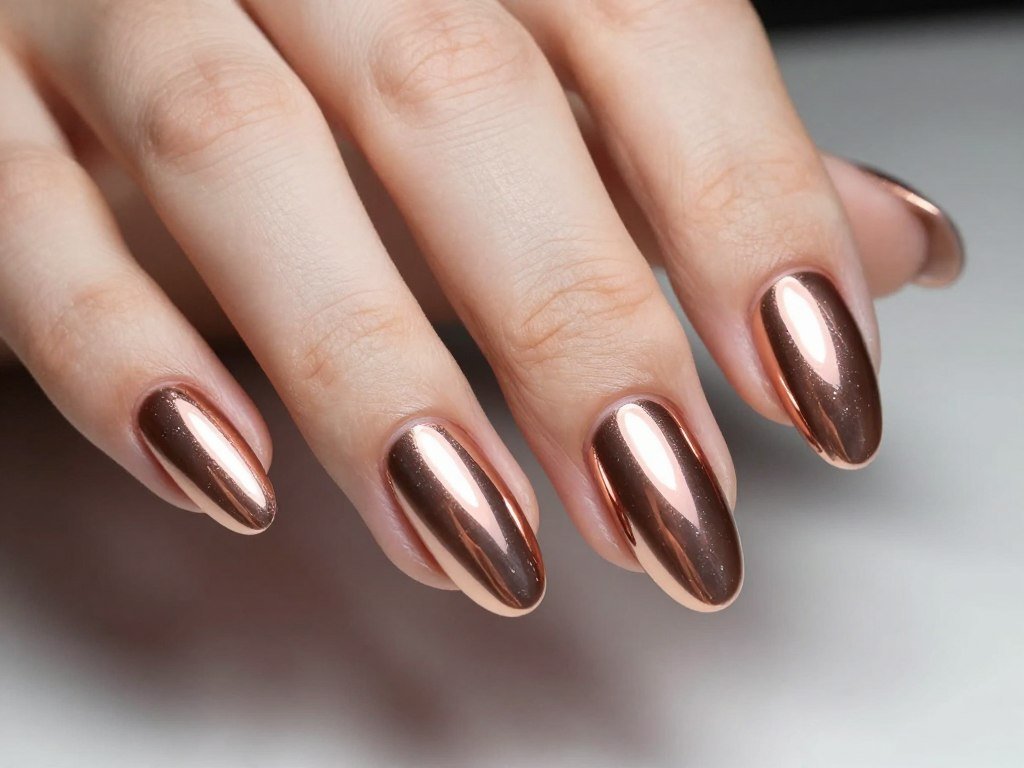
Rose gold chrome creates a luxurious mirror-like finish on nails. This metallic look combines pink undertones with reflective chrome shine. The effect appears expensive and attention-grabbing.
Apply chrome powder over a pink base for best results. Buff the powder into tacky gel topcoat to create that mirror finish. Rose gold chrome suits both warm and cool skin tones beautifully.
Design 32: Pink Glitter Gradient
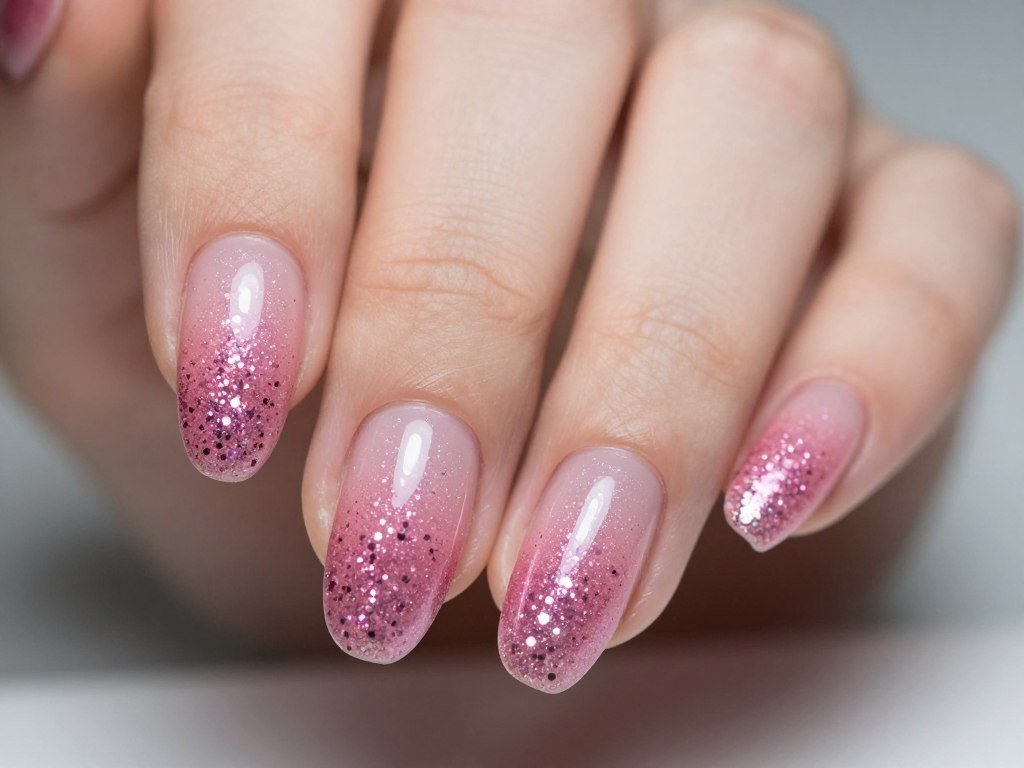
Create a glitter gradient that concentrates at nail tips and disperses toward base. This technique adds sparkle without overwhelming the entire nail. The effect creates dimension and catches light beautifully.
Start with pink base, then apply glitter polish heavily at tips. Dab glitter progressively lighter toward cuticles. This design works for everyday wear with special touch of glamour.
Design 33: Hot Pink with Silver Chrome Accent Nail
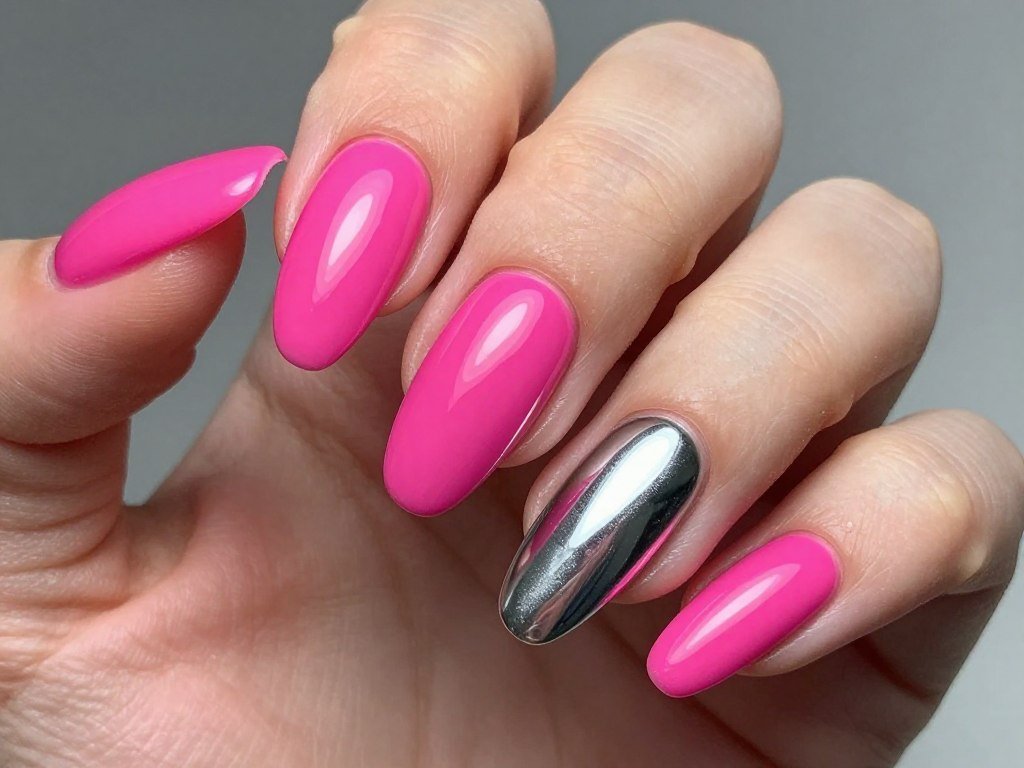
Combine hot pink nails with one silver chrome accent nail for striking contrast. This design mixes bold color with metallic shine. The chrome accent draws eyes and creates focal point.
Paint most nails hot pink, then apply silver chrome to ring fingers. The contrast between matte color and reflective chrome creates dynamic visual interest. This look transitions well from day to evening.
Design 34: Pink Holographic Nails
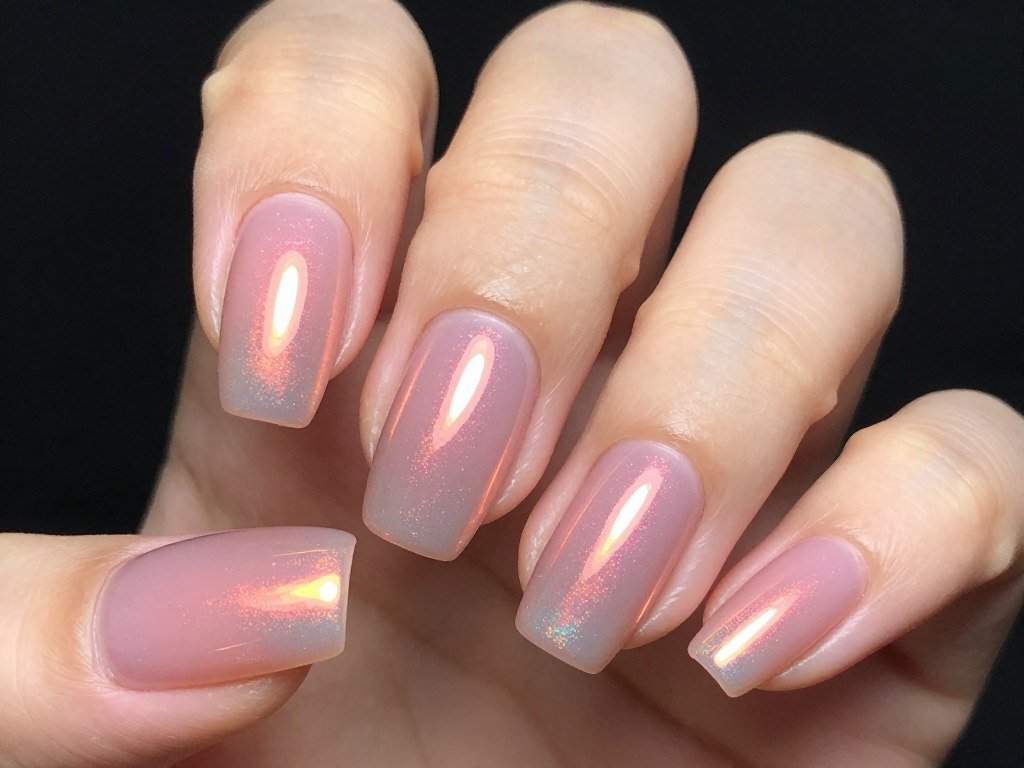
Holographic pink polish creates rainbow shimmer across nails. This finish shifts colors as you move your hands. The multi-dimensional effect feels magical and perfect for summer.
Choose holographic topcoats to layer over pink base or opt for pre-mixed holographic pink polish. The rainbow effect appears strongest in direct light. This design guarantees compliments wherever you go.
Design 35: Pink and Gold Glitter Mix
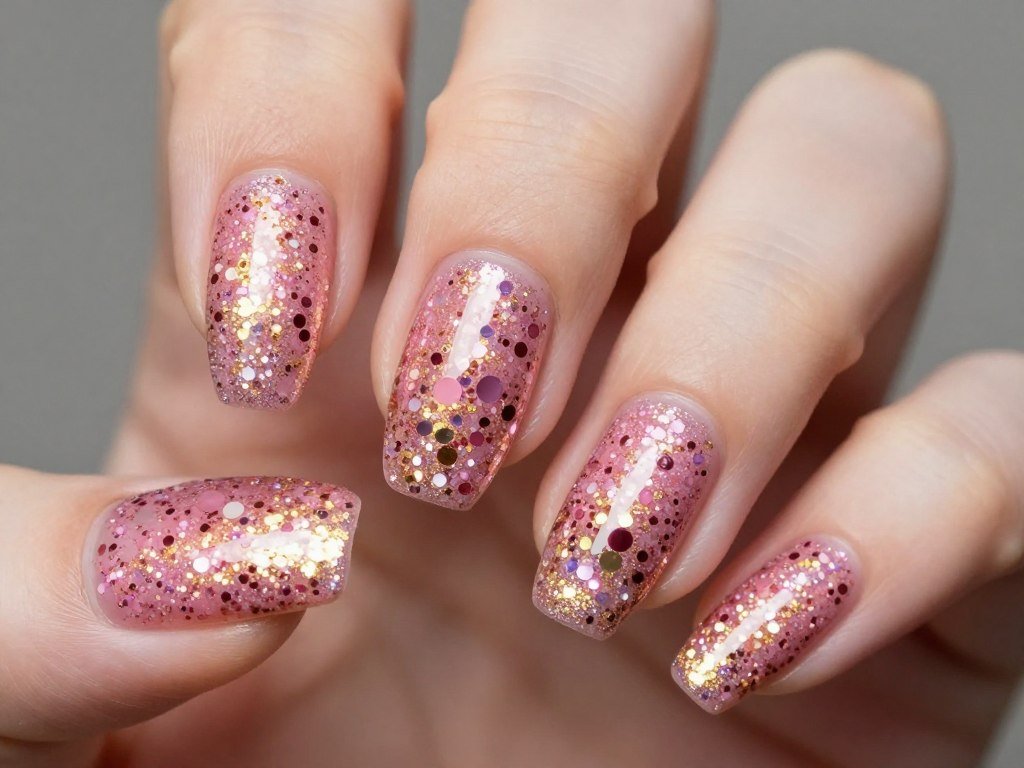
Mix pink and gold glitter over pink base for rich sparkle. This combination creates warm, luxurious effect. The varied glitter sizes add texture and dimension to manicure.
Apply pink base color, then dab mixed glitter polish on top. Concentrate glitter at tips or spread evenly across nails. This design feels celebratory and festive for summer parties.
Design 36: Soft Pink Chrome with Matte Topcoat
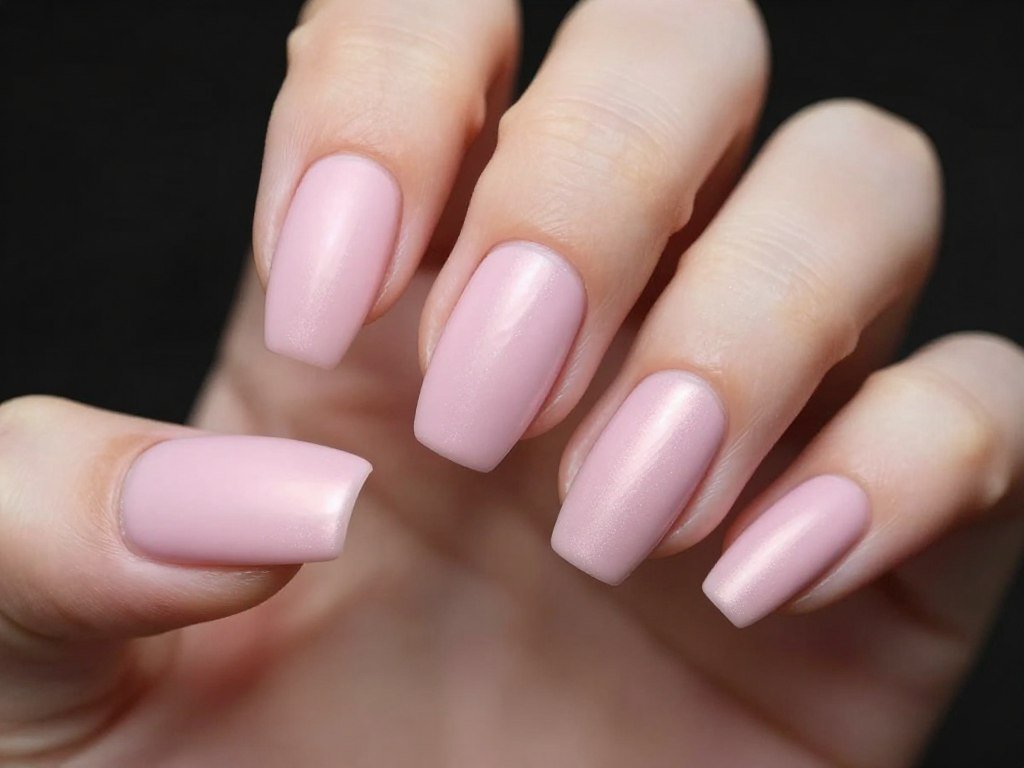
Apply matte topcoat over pink chrome for unique satin finish. This unexpected combination creates sophisticated metallic look without high shine. The matte chrome effect feels modern and editorial.
Create pink chrome base first, then seal with matte topcoat. The chrome sheen shows through the matte finish subtly. This design bridges the gap between bold and understated styles.
Design 37: Chunky Pink Glitter Accent Nails

Cover accent nails in chunky pink glitter for textured glamour. This design keeps most nails simple while creating statement accent nails. The large glitter pieces catch light dramatically.
Apply baby pink to most nails, then pack chunky glitter onto ring fingers. Use clear polish as glue to secure large glitter pieces. This look works perfectly for special summer events.
Design 38: Pink Chrome French Tips
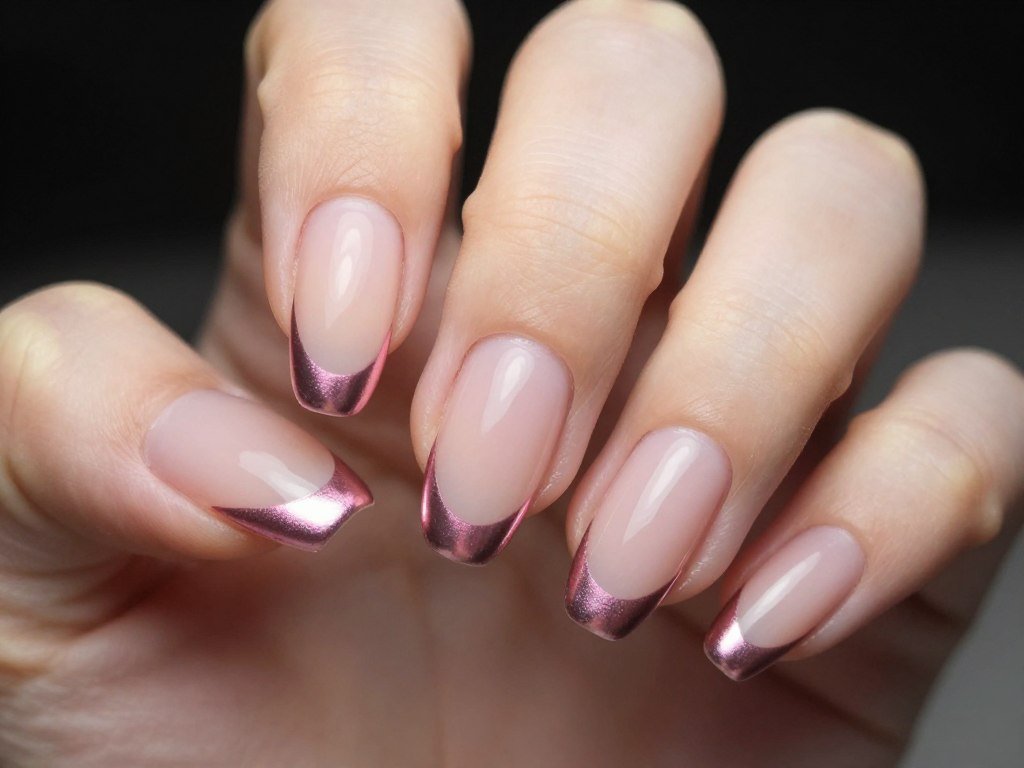
Create french tips using pink chrome instead of white. This modern twist combines classic french structure with trendy chrome finish. The metallic tips create eye-catching contrast against nude base.
Apply nude base color, then add pink chrome powder to tips only. The reflective tips draw attention to fingertips beautifully. This design feels both timeless and contemporary.
Design 39: Neon Pink with Iridescent Glitter
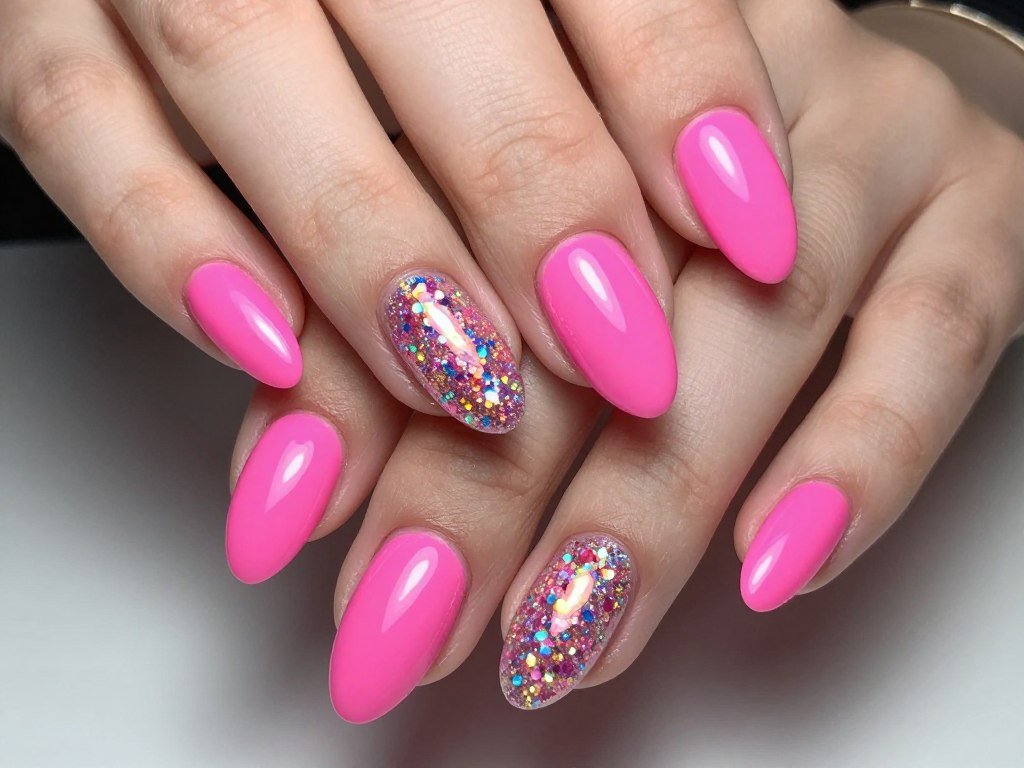
Layer iridescent glitter over neon pink for multi-dimensional sparkle. This combination creates vibrant, playful manicure perfect for summer festivals. The glitter adds rainbow shimmer to already bold pink.
Apply neon pink base in two coats for full opacity. Add iridescent glitter topcoat while base is still slightly tacky. The result delivers maximum impact and festive vibes.
Design 40: Pink Chrome Ombré

Blend pink chrome into silver chrome for metallic ombré effect. This advanced technique creates seamless transition between two chrome shades. The gradient effect adds dimension to mirror-like finish.
Apply both chrome powders using sponge to blend where they meet. Work quickly for smooth transition between colors. This design represents the ultimate in chrome nail artistry and makes a bold statement.
Expert Tips for Achieving Perfect Pink Summer Nails
Creating beautiful pink nails at home requires proper technique and quality products. These expert tips help you achieve salon-quality results. Understanding key principles makes every manicure more successful.
Preparation and application methods significantly impact how your manicure looks and lasts. Small details make the difference between good and great nail art. Follow these professional strategies for best results.
Nail Preparation Makes All the Difference
Proper nail preparation creates the foundation for lasting manicures. Start by removing old polish completely using acetone-free remover. Shape nails with a fine-grit file, moving in one direction to prevent splitting.
Push back cuticles gently using cuticle pusher after soaking in warm water. Never cut cuticles as this can lead to infection and damage. Apply cuticle oil to nourish the nail bed area.
Buff nail surface lightly to remove shine and create better polish adhesion. Wipe nails with rubbing alcohol to remove oils and debris. Clean, prepared nails allow polish to bond properly and last longer.
Application Techniques for Smooth Finish
Always apply thin coats of polish rather than thick ones. Thin layers dry faster and appear smoother without streaks. Build color gradually with two or three coats instead of one heavy application.
Start with a stripe down the nail center, then fill sides. This method ensures even coverage and prevents polish from flooding cuticles. Leave a tiny gap between polish and cuticle to prevent lifting.
Cap the free edge by running polish along nail tip. This seals the tip and prevents chipping at the most vulnerable spot. Wait two minutes between coats to allow proper drying.
Color Selection for Your Skin Tone
Different shades pink complement various skin tones uniquely. Cool-toned skin looks beautiful with blue-based pinks like fuchsia and cool rose shades. Warm-toned skin glows with coral pinks and peachy pink hues.
Test polish against your skin before committing to ensure flattering match. Consider undertones in your skin when choosing between different shades pink. The right shade enhances your natural coloring beautifully.
Neutral and olive skin tones have flexibility to wear most pink shades successfully. Experiment with various pink tones to discover your most flattering options. Don’t be afraid to try unexpected shades that catch your eye.
Making Your Pink Manicure Last Longer
Always use quality base coat before applying color polish. Base coat prevents staining and helps color adhere better to nails. Choose formulas that address your specific nail concerns like ridges or peeling.
Seal everything with robust topcoat that resists chipping. Reapply topcoat every two to three days to refresh shine and protection. This simple step extends manicure life significantly without full reapplication.
Wear gloves when doing dishes or cleaning to protect manicure from harsh chemicals. Avoid using nails as tools which causes chips and breaks. Moisturize hands and cuticles daily to maintain healthy nails and polish flexibility.
Working with Different Pink Finishes
Cream finish polishes provide classic, smooth coverage perfect for simple designs. These work-horse formulas form the base for most nail art. Choose high-quality cream polishes for best opacity and application.
Shimmer and metallic finishes add dimension without requiring special application techniques. These polishes contain fine particles that reflect light beautifully. They work well alone or layered over cream base colors.
Chrome and special effect finishes require specific application methods. Follow product instructions carefully for best results. These advanced finishes create dramatic effects worth the extra effort required.
Troubleshooting Common Pink Nail Issues
Streaky application often results from thick polish or old formula. Thin polish slightly with few drops of polish thinner if needed. Replace bottles that have thickened beyond saving for smooth application.
Bubbles in polish come from shaking the bottle vigorously before use. Roll bottles between palms instead to mix without introducing air bubbles. Apply polish in thin, even strokes without going back over wet areas.
Chipping typically occurs when polish layers aren’t properly bonded. Ensure each coat dries adequately before applying the next. Always cap free edges with each coat including base and top coats.
Creating Clean Lines and Designs
Tape serves as your best friend for creating geometric designs and clean edges. Apply tape to completely dry base color to avoid lifting. Remove tape while top layer remains slightly wet for crisp lines.
Fine detail brushes enable precise nail art and tiny designs. Clean brushes immediately after use to maintain their shape and effectiveness. Invest in quality brushes that hold their form through multiple uses.
Dotting tools create perfect circles and dots every time. Use different end sizes for varied dot dimensions in your designs. These inexpensive tools expand your nail art possibilities significantly.
Seasonal Considerations for Summer Pink Nails
Summer heat can affect polish drying time and durability. Work in cool, air-conditioned space when possible for best results. Allow extra drying time in humid conditions before activities.
Sun exposure can fade certain pink shades over time. UV-protective topcoats help preserve color vibrancy throughout summer. Reapply topcoat more frequently if spending lots of time outdoors.
Pool chlorine and salt water can damage manicures quickly. Rinse hands thoroughly after swimming to minimize chemical exposure. Consider applying extra topcoat before beach or pool days for added protection.
Building Your Pink Nail Polish Collection
Start with versatile pink shades that work for multiple occasions. Include hot pink, baby pink, and medium pink in your basic collection. These three colors provide foundation for countless design possibilities.
Add specialty finishes like chrome, glitter, and matte topcoats gradually. These extend your design options without requiring numerous additional polish bottles. One glitter topcoat transforms any base color instantly.
Invest in quality over quantity when building your collection. Well-formulated polishes apply better and last longer than cheaper alternatives. A small collection of excellent polishes beats a large collection of poor-quality options.
Nail Health Underneath Pink Polish
Give nails occasional breaks from polish to breathe and recover. Even quality products can stress nails with constant wear. Take a week off every few months to assess nail health.
Keep nails and cuticles moisturized even when wearing polish. Cuticle oil penetrates through polish to nourish nail beds. Healthy nails provide better canvas for beautiful manicures.
Address nail problems like peeling or brittleness with targeted treatments. Use strengthening base coats if nails bend or break easily. Healthy nails hold polish better and look more beautiful overall.
Embrace Pink Summer Nail Designs with Confidence
These 40 pink summer nail designs offer endless inspiration for your warm-weather manicures. From soft pink elegance to bold hot pink statements, you’ve discovered looks for every style preference. Each design brings its own charm and personality to your fingertips.
Simple techniques and creative color combinations make these designs achievable at home. You don’t need professional training to create beautiful pink nails this summer. With practice and patience, your skills will improve with each manicure.
Pink nails remain timelessly chic while feeling perfectly on-trend for summer. The versatility of different shades pink ensures you’ll find options for every occasion. Whether heading to the beach or attending formal events, pink summer nail designs deliver style and sophistication.
Start experimenting with these designs using the tips and techniques shared throughout this guide. Build your pink polish collection gradually and practice various nail art methods. Your perfect pink summer nails await, so grab your favorite shade and get creative.