
Your bedroom deserves a stunning focal point. Yet designer headboards cost hundreds or even thousands of dollars. The good news? You can create a beautiful headboard yourself for a fraction of the price.
These 20 DIY headboard ideas transform ordinary bedrooms into personalized retreats. Each project uses affordable materials and simple techniques. Whether you have an afternoon or a weekend, you’ll find the perfect headboard idea for your space and skill level.
From reclaimed wood to fabric panels, these headboard ideas work with any decor style. Most projects cost under fifty dollars. Some require just basic tools you already own. Others need a bit more effort but deliver dramatic results.
Table of Contents
Essential Materials and Tools for Your DIY Headboard Project
Before starting your headboard project, gather the right supplies. Most DIY headboard ideas use common materials available at home improvement stores. Having everything ready saves time and prevents frustration.
Basic Tools You’ll Need
- Drill with basic bit set
- Level for straight installation
- Measuring tape and pencil
- Saw (hand saw or power saw)
- Sandpaper in various grits
- Paintbrushes and rollers
- Staple gun for fabric projects
Common Materials
- Wood boards or plywood sheets
- Fabric and batting for upholstery
- Paint and wood stain
- Wood glue and construction adhesive
- Screws and wall anchors
- Decorative trim and molding
- Foam padding for comfort

Choosing the Right Headboard Style for Your Space
Your headboard should complement your bedroom design. Consider your existing decor, wall color, and overall aesthetic. The right style creates harmony in your space.
Think about functionality too. Some headboards provide storage. Others offer a soft surface for reading in bed. Your lifestyle matters as much as your design preferences.
Modern Minimalist
Clean lines and simple shapes define this style. These headboards use neutral colors and geometric patterns. Perfect for contemporary spaces.
- Floating wood panels
- Metal frame designs
- Painted accent walls
Rustic Farmhouse
Natural wood textures bring warmth. These designs celebrate imperfections and vintage charm. Great for cozy bedroom atmospheres.
- Reclaimed barn wood
- Distressed finishes
- Shiplap installations
Bohemian Eclectic
Mix patterns and textures freely. These headboards make bold statements. Ideal for creative personalities.
- Woven tapestries
- Macramé panels
- Colorful fabric combinations

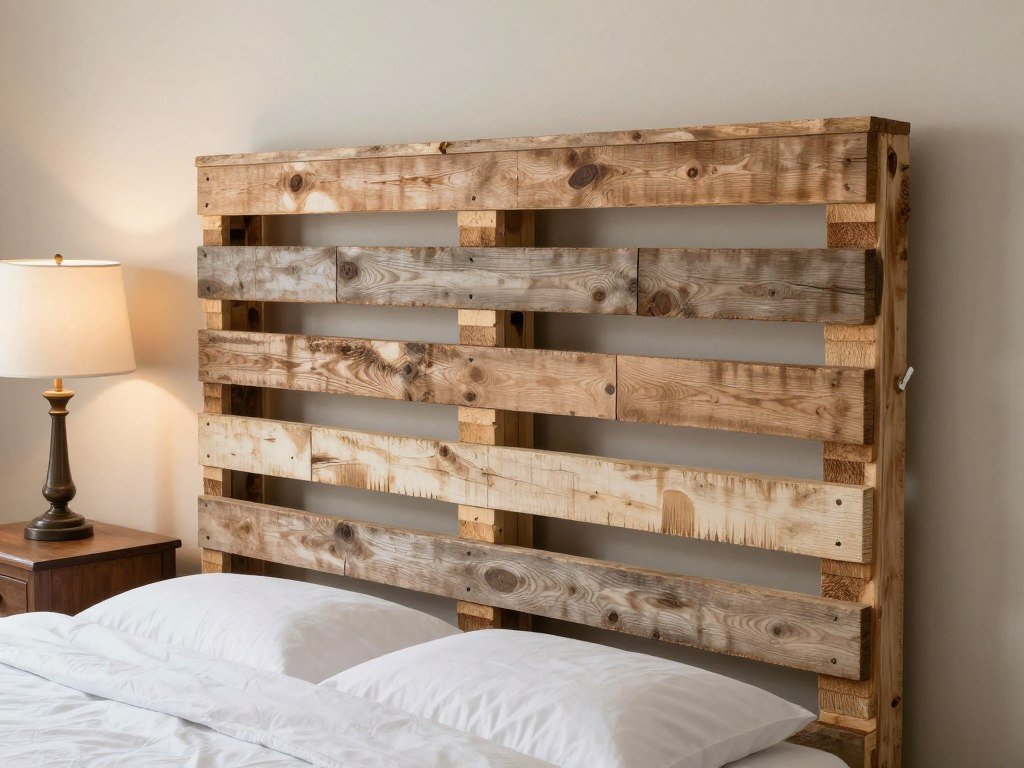
1. Rustic Pallet Wood Headboard
Wooden pallets create stunning rustic headboards. This project costs almost nothing if you find free pallets. The weathered wood adds character and warmth to any bedroom.
Materials Needed
- 2-3 wooden pallets
- Sandpaper (80 and 120 grit)
- Wood stain or paint
- Mounting hardware
- Polyurethane sealer
Step-by-Step Instructions
- Disassemble pallets carefully, removing all nails
- Sand each board smooth to prevent splinters
- Arrange boards in desired pattern on floor
- Apply wood stain or paint as preferred
- Seal with polyurethane for protection
- Attach boards together using wood glue
- Mount securely to wall behind bed
Difficulty Level: Beginner
Estimated Cost: $15-30
Time Required: 4-6 hours
This wood headboard works beautifully in farmhouse or industrial bedroom designs. The natural texture of pallet wood creates visual interest. Each piece tells a story through its unique grain pattern and color variations.
2. Plush Upholstered Fabric Headboard
An upholstered headboard adds luxury and comfort. This DIY project rivals expensive designer pieces. Choose fabric that matches your bedroom color scheme.

Materials and Supplies
- Plywood sheet cut to size
- High-density foam (2-3 inches thick)
- Batting for smooth finish
- Upholstery fabric (add 12 inches extra)
- Staple gun with staples
- Spray adhesive
- Decorative upholstery nails (optional)
- D-ring hangers for mounting
Construction Process
- Cut plywood to desired headboard dimensions
- Attach foam to plywood using spray adhesive
- Layer batting over foam smoothly
- Pull fabric taut and staple to back
- Fold corners neatly like wrapping a gift
- Add decorative nails if desired
- Install D-rings and mount to wall

Pro Tip: Choose performance fabric for easier cleaning. Velvet, linen, and canvas work exceptionally well. Avoid delicate materials that stain easily.
This headboard idea suits master bedrooms and guest room spaces. The padded surface provides comfort for reading or watching television in bed. Customization options are endless with thousands of fabric choices available.
Difficulty Level: Intermediate
Estimated Cost: $60-120
Time Required: 3-4 hours
3. Bold Painted Wall Headboard
Paint creates a headboard without any construction. This budget-friendly idea transforms your bedroom wall. Choose a shape that complements your bed frame and room dimensions.
Design Options
- Arched shape for romantic feel
- Geometric pattern for modern style
- Scalloped edge for whimsy
- Rectangular block for simplicity
- Asymmetrical design for drama
Painting Steps
- Measure and mark headboard outline on wall
- Use painter’s tape to create clean edges
- Apply primer if changing color dramatically
- Paint two coats for solid coverage
- Remove tape carefully while paint is slightly damp
- Touch up any imperfections
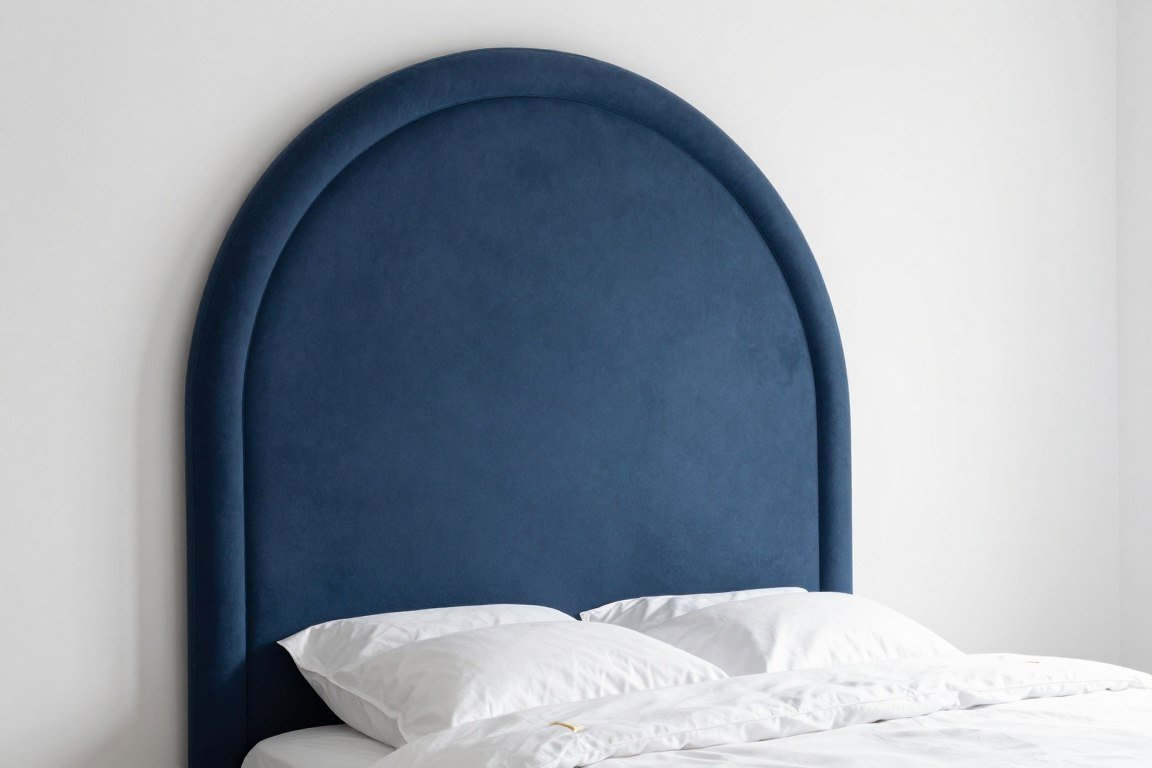
This approach works perfectly for renters using removable wall decals. It also suits homeowners wanting flexibility. Change your headboard design as often as you change paint color.
Difficulty Level: Beginner
Estimated Cost: $20-40
Time Required: 2-3 hours plus drying time
4. Vintage Door Headboard
Old doors bring architectural character to bedrooms. This headboard idea works with single or double doors. Vintage doors add instant charm and conversation-starting appeal.

Finding the Perfect Door
Search architectural salvage yards for unique doors. Flea markets and estate sales also offer options. Look for solid wood doors with interesting details. Original hardware adds authentic character.
Preparation Steps
- Clean door thoroughly removing dirt
- Sand rough areas gently
- Fill holes if needed
- Apply fresh paint or leave weathered
- Seal with protective finish
Installation Tips
- Use heavy-duty wall anchors
- Mount to studs when possible
- Center door behind bed frame
- Leave space between bed and door
- Secure top and bottom for stability
These headboard ideas suit cottage and farmhouse bedroom styles. The doors can stand vertically or horizontally. Paint them to match your decor or embrace their vintage patina.
Difficulty Level: Intermediate
Estimated Cost: $30-80
Time Required: 3-5 hours
5. Functional Pegboard Headboard
Pegboard combines style with practical storage. This headboard idea maximizes small bedroom space. Hang items you need within easy reach.

Paint pegboard to match your bedroom walls. Add wooden pegs in metallic finishes for modern appeal. This design works especially well for small spaces and studio apartments.
What to Hang on Your Pegboard
- Reading lights
- Small plants
- Books and magazines
- Charging cables
- Photos and art
- Jewelry organizers
- Decorative baskets
- Eyeglasses holder
- Wall pocket planters
Difficulty Level: Beginner
Estimated Cost: $25-45
Time Required: 2-3 hours
6. Floating Shelf Headboard
Floating shelves create a headboard with display space. This design adds depth and dimension to bedroom walls. Style shelves with books, plants, and decorative objects.
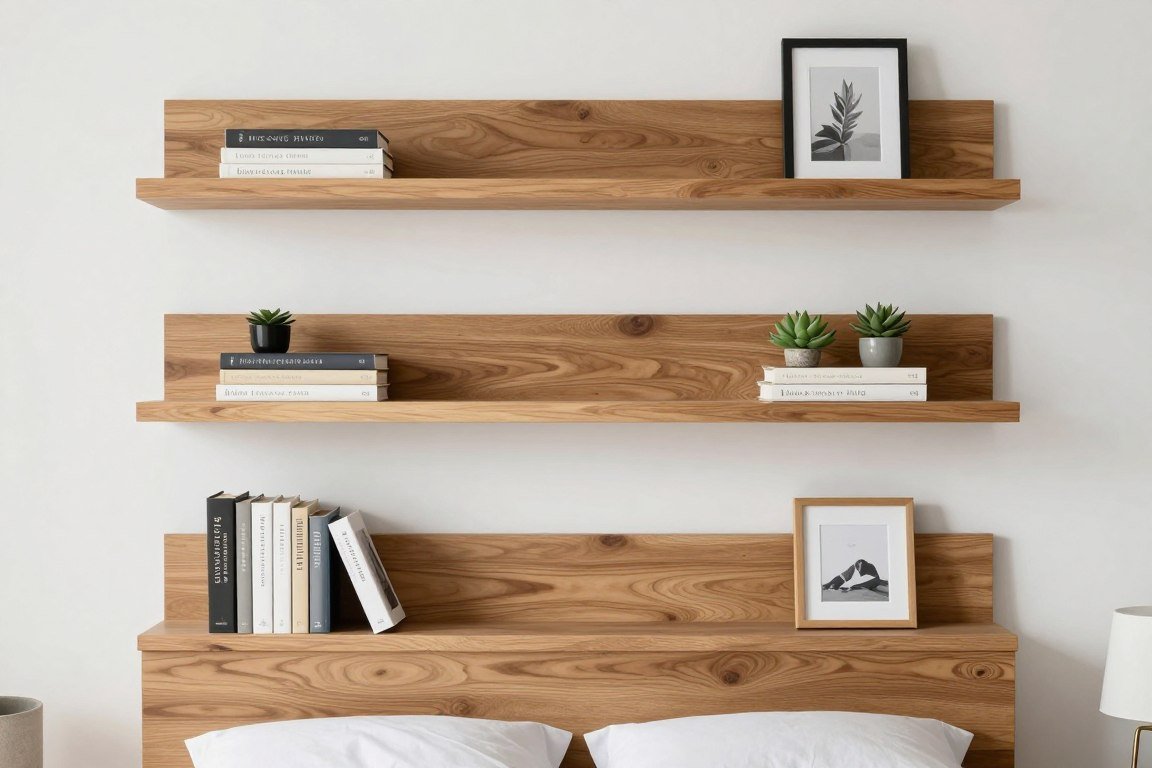
Installation Guide
- Mark shelf positions on wall with level
- Locate wall studs using finder
- Install heavy-duty shelf brackets
- Mount shelves securely to brackets
- Test weight capacity before styling
- Arrange items symmetrically or organically
Styling Recommendations
- Use varying heights for visual interest
- Mix books with decorative objects
- Add small plants for life
- Include personal photos in frames
- Keep frequently used items accessible
This headboard works beautifully in modern and contemporary bedrooms. The open design keeps rooms feeling spacious. Change your display seasonally to refresh the room look.
Difficulty Level: Intermediate
Estimated Cost: $40-70
Time Required: 2-4 hours
7. Bohemian Macramé Headboard
Macramé brings texture and softness to bedroom walls. This headboard idea creates a bohemian focal point. The woven patterns add handmade charm and artistic flair.

Purchase ready-made macramé panels or create your own. Large wall hangings work perfectly behind beds. Combine multiple smaller pieces for a gallery wall effect.
Macramé Selection Tips
- Choose size wider than bed frame
- Select natural cotton rope for authentic look
- Consider pattern complexity and room style
- Ensure colors complement bedroom palette
- Check weight for wall mounting safety
Difficulty Level: Beginner (if purchasing) / Advanced (if making)
Estimated Cost: $35-90
Time Required: 1 hour installation / 10+ hours to create
8. Classic Shiplap Wall Headboard
Shiplap creates timeless farmhouse style. This headboard idea covers the entire wall behind your bed. The horizontal wood planks add architectural interest and texture.

Installation Process
- Locate and mark wall studs across entire wall
- Cut first board to wall width
- Install bottom board level using spacers
- Add subsequent boards working upward
- Use nickel spacers between boards for gaps
- Fill nail holes with wood filler
- Sand smooth and apply paint or stain
Material Options
- Traditional tongue-and-groove boards
- Budget-friendly plywood strips
- Pre-finished shiplap panels
- Reclaimed wood for character
Finish Ideas
- Classic white paint
- Natural wood stain
- Weathered gray wash
- Two-tone color blocking
This wood headboard makes a dramatic statement in any bedroom. It works equally well in master suites and guest room spaces. The installation requires patience but delivers professional results.
Difficulty Level: Intermediate to Advanced
Estimated Cost: $100-200
Time Required: 8-12 hours
9. Fabric Panel Headboard
Fabric panels offer color and pattern without permanent installation. This headboard idea provides flexibility for renters. Change panels seasonally or whenever you want a new look.

Creating Your Panels
- Cut plywood or foam core to desired panel sizes
- Wrap each panel with coordinating fabric
- Staple or glue fabric to back securely
- Add sawtooth hangers to backs
- Arrange panels on wall in desired configuration
- Hang using picture hanging strips or nails
Mix patterns and textures for visual interest. Use three to five panels for standard beds. This approach allows you to create custom arrangements that fit your bedroom space perfectly.
Difficulty Level: Beginner
Estimated Cost: $45-75
Time Required: 3-4 hours
10. Vintage Window Frame Headboard
Old window frames bring architectural salvage charm. This headboard idea works with multi-pane windows. The divided glass adds dimension and reflects light beautifully.
Preparation Steps
- Clean window frame thoroughly
- Remove or secure loose glass panes
- Sand frame to smooth rough edges
- Paint or stain as desired
- Add backing board behind glass if needed
- Seal with protective topcoat
Safety Note: Ensure glass is secure or replace with acrylic sheets. Use extra mounting support for heavy frames.
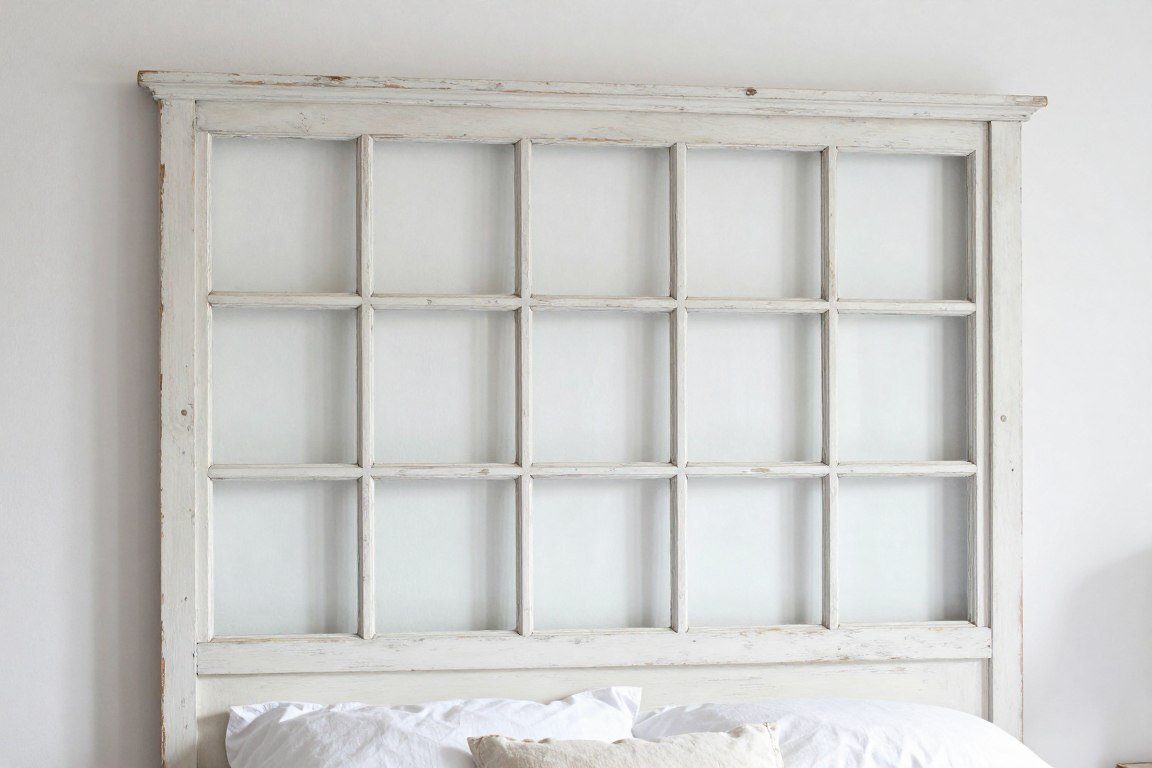
These vintage pieces add instant character to bedrooms. The window frame creates the illusion of architectural detail. This design works beautifully in cottage, farmhouse, and shabby chic bedroom styles.
Difficulty Level: Intermediate
Estimated Cost: $35-100
Time Required: 3-5 hours
11. Industrial Metal Pipe Headboard
Metal pipes create an edgy industrial headboard. This design suits loft spaces and modern bedrooms. The framework provides structure without blocking wall space.

Pipe Configuration Ideas
Simple Grid
Horizontal and vertical pipes create a basic grid pattern. Clean lines suit minimalist spaces.
Geometric Frame
Angular pipes form interesting shapes. Perfect for contemporary bedroom design.
Shelf Integration
Add wood shelves between pipe sections. Combines function with industrial style.
Assembly Instructions
- Design your pipe layout on paper first
- Purchase pipes and fittings at hardware store
- Assemble frame sections on floor
- Tighten all connections securely
- Apply black spray paint if desired
- Mount to wall using floor flanges
- Attach flanges to wall studs with screws
This headboard idea costs more than some options but delivers unique style. The metal pipes provide durability. Customize dimensions to fit any bed frame size.
Difficulty Level: Intermediate
Estimated Cost: $75-150
Time Required: 4-6 hours
12. Functional Cork Board Headboard
Cork board combines function with design. This headboard provides a place to pin photos, notes, and memories. The natural material adds warmth and texture to bedroom walls.
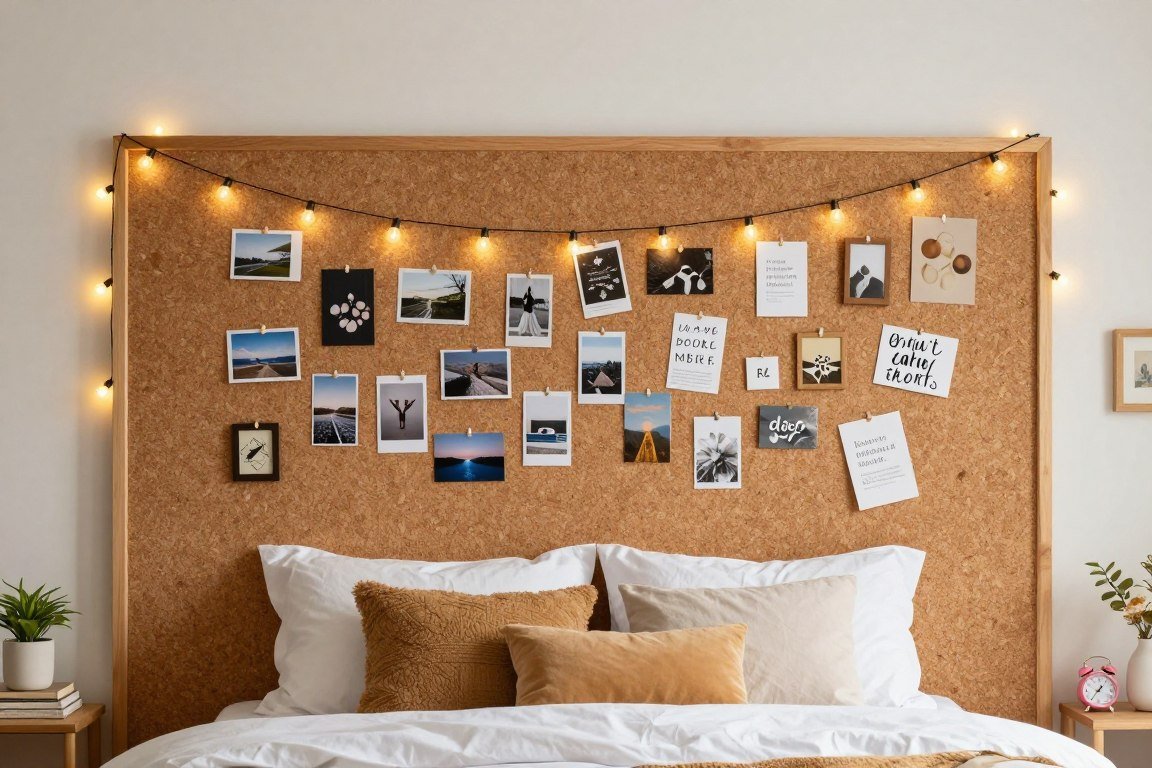
Installation Method
- Purchase large cork sheets or tiles
- Cut to desired headboard shape
- Frame with wood trim for finished look
- Mount to wall with construction adhesive
- Allow 24 hours for adhesive to cure
- Add decorative frame if desired
Styling Suggestions
- Create vision board displays
- Pin travel photos and postcards
- Display inspirational quotes
- Organize to-do lists
- Showcase children’s artwork
This design works especially well in home offices that double as guest rooms. The cork surface makes changing displays effortless. Paint cork tiles before installation for custom colors.
Difficulty Level: Beginner
Estimated Cost: $30-60
Time Required: 2-3 hours
13. Woven Basket Wall Headboard
Decorative baskets create a textured headboard display. This idea brings global-inspired style to bedrooms. The woven patterns add depth and visual interest to walls.

Creating Your Basket Display
- Collect baskets in varying sizes and shapes
- Arrange on floor to plan layout
- Start with largest basket at center
- Fill in with smaller baskets around edges
- Maintain consistent spacing between pieces
- Hang using picture hanging strips or nails
Basket Types to Mix
- African woven platters
- Rattan wall baskets
- Seagrass decorative trays
- Bamboo hanging baskets
Color Combinations
- All natural neutrals
- Black and natural mix
- Colorful painted accents
- Monochromatic white collection
This headboard idea suits bohemian and eclectic bedroom styles. The baskets add three-dimensional texture. Find affordable options at thrift stores and import shops.
Difficulty Level: Beginner
Estimated Cost: $40-90
Time Required: 2-3 hours
14. Sliding Barn Door Headboard
A barn door adds rustic charm and functionality. This headboard can slide to reveal storage or wall space. The hardware becomes a decorative element itself.

Installation Components
- Reclaimed or new barn door
- Barn door hardware kit with track
- Wall mounting brackets
- Door handle or pull
- Floor guide for stability
Mount the track several inches above the bed frame. Ensure the door slides smoothly without obstruction. This headboard works beautifully in farmhouse and country bedroom designs.
Door Finish Options
- Natural weathered wood
- White distressed paint
- Dark walnut stain
- Reclaimed barnwood authentic patina
Hardware Styles
- Classic black metal
- Rustic oil-rubbed bronze
- Modern brushed nickel
- Industrial galvanized steel
Difficulty Level: Advanced
Estimated Cost: $120-250
Time Required: 4-6 hours
15. Colorful Tapestry Headboard
Tapestries bring color and pattern to bedroom walls. This budget-friendly headboard idea requires no construction. Change your tapestry with the seasons or your mood.

Hanging Methods
Curtain Rod
Thread tapestry onto decorative curtain rod. This method allows easy changes and looks polished.
Wooden Dowel
Insert dowel through top hem or fold. Hang dowel from wall with rope or leather straps.
Clip Rings
Use curtain rings with clips. Attach to rod for adjustable gathering effect.
Tapestry Style Options
- Mandala patterns for bohemian rooms
- Geometric designs for modern spaces
- Nature scenes for calm atmosphere
- Abstract art for eclectic style
- Vintage textiles for charm
This headboard idea suits renters and anyone wanting flexibility. Tapestries cost less than many headboard projects. The fabric softens bedroom acoustics while adding color.
Difficulty Level: Beginner
Estimated Cost: $20-60
Time Required: 30 minutes to 1 hour
16. Glamorous Mirror Mosaic Headboard
Mirrors create a glamorous headboard that reflects light. This design makes small bedrooms feel larger. The reflective surface adds sparkle and sophistication.
Materials Required
- Mirror tiles in various sizes
- Plywood backing board
- Mirror adhesive
- Grout (optional for spacing)
- Decorative frame molding
Assembly Steps
- Cut plywood to headboard dimensions
- Arrange mirror tiles in desired pattern
- Apply mirror adhesive to backing
- Press tiles firmly into place
- Allow adhesive to dry completely
- Add frame around edges
- Mount securely to wall
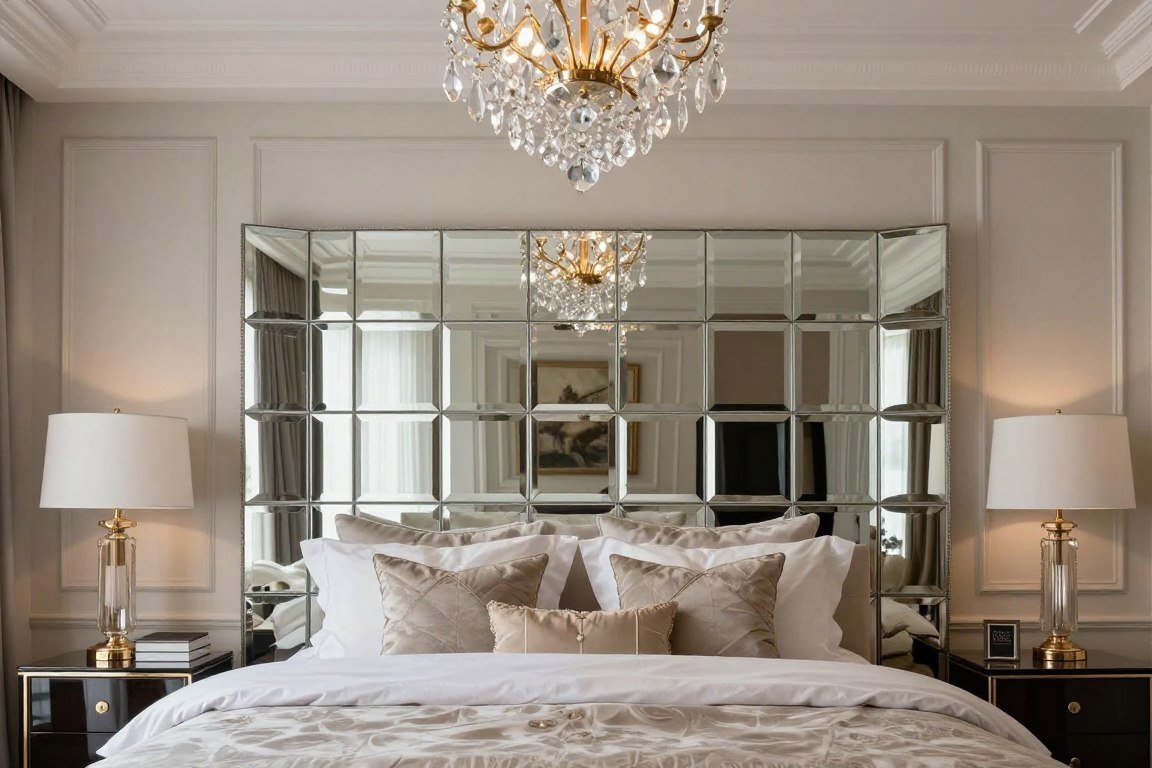
Safety Warning: Mirrors add significant weight. Use appropriate wall anchors and ensure secure mounting to prevent accidents.
This headboard idea suits contemporary and glam bedroom styles. The mirrors catch and reflect bedroom lighting. Choose beveled mirrors for added dimension and sparkle.
Difficulty Level: Intermediate
Estimated Cost: $80-160
Time Required: 5-7 hours
17. Soundproof Acoustic Panel Headboard
Acoustic panels reduce noise while adding modern style. This headboard idea improves sleep quality in noisy environments. The fabric-wrapped panels come in numerous colors and patterns.

Panel Selection and Arrangement
Purchase acoustic panels designed for wall mounting. Arrange in geometric patterns for visual interest. Mix panel sizes to create dynamic compositions.
Panel Benefits
- Reduces room echo and noise
- Improves sleep environment
- Adds texture to walls
- Available in many colors
- Easy to install and rearrange
Design Patterns
- Horizontal brick pattern
- Vertical column arrangement
- Random geometric layout
- Symmetrical grid design
- Graduated size progression
This functional headboard suits urban apartments and homes near busy streets. The panels attach with adhesive strips or mounting clips. Create custom colors by choosing fabric-wrapped options.
Difficulty Level: Beginner
Estimated Cost: $90-180
Time Required: 2-3 hours
18. Removable Wallpaper Headboard
Removable wallpaper creates a headboard shape without damage. This renter-friendly idea offers unlimited pattern options. Change your headboard design as easily as peeling and sticking.

Application Process
- Measure and mark headboard outline on wall
- Clean wall surface thoroughly for adhesion
- Cut wallpaper pieces slightly larger than needed
- Peel backing and apply from top down
- Smooth out bubbles with squeegee tool
- Trim excess along marked lines with sharp blade
- Press edges firmly for secure adhesion
Popular Wallpaper Patterns
- Geometric shapes
- Floral designs
- Tropical leaves
- Marble textures
- Wood grain patterns
- Abstract art
- Moroccan tiles
- Striped patterns
- Textured grasscloth
This headboard idea works perfectly in apartments and rental homes. The wallpaper removes cleanly without wall damage. Experiment with bold patterns you might hesitate to use on entire walls.
Difficulty Level: Beginner
Estimated Cost: $35-70
Time Required: 2-3 hours
19. Decorative Folding Screen Headboard
Folding screens create instant headboards with vintage charm. This portable option requires no wall mounting. The screen panels add height and drama behind beds.

Screen Selection Tips
- Choose height taller than mattress
- Match screen width to bed size
- Consider panel material and style
- Check stability when fully extended
- Look for solid construction
Customization Ideas
- Paint frames to match bedroom
- Replace panels with new fabric
- Add decorative trim or molding
- Attach wallpaper to panels
- Decoupage with vintage paper
This headboard works beautifully in guest rooms and studio apartments. The screen folds for easy moving and storage. Find affordable options at thrift stores and estate sales.
Difficulty Level: Beginner
Estimated Cost: $40-120
Time Required: 1-2 hours for setup
20. Personal Photo Gallery Headboard
Create a headboard from meaningful photographs. This personal design tells your story through images. Frame collections create visual impact while preserving memories.

Creating Your Gallery Wall
- Select photos with consistent theme or color palette
- Choose frames in coordinating styles and finishes
- Arrange frames on floor to plan layout
- Mark wall positions using painter’s tape
- Hang largest frames first as anchors
- Fill in with smaller frames around edges
- Maintain consistent spacing between frames
Layout Styles
- Symmetrical grid pattern
- Organic salon-style arrangement
- Linear horizontal rows
- Graduated size progression
Photo Themes
- Family portraits and milestones
- Travel destination memories
- Black and white artistic prints
- Nature and landscape photography
This headboard idea creates a deeply personal bedroom focal point. The photos spark joy and conversation. Update images seasonally or as your life evolves.
Difficulty Level: Beginner to Intermediate
Estimated Cost: $50-150
Time Required: 3-5 hours
Important Design Considerations for Your DIY Headboard
Choosing the right headboard involves more than aesthetics. Consider practical factors that affect functionality and safety. These guidelines help ensure your project succeeds.

Size and Proportions
Your headboard should relate properly to bed frame dimensions. Standard guidelines create balanced proportions. Measure carefully before starting construction.
Height Guidelines
- Standard height: 48-58 inches from floor
- Tall dramatic headboards: 60-72 inches
- Low modern headboards: 36-44 inches
- Measure from floor, not mattress top
Width Guidelines
- Twin bed: 39-45 inches wide minimum
- Full bed: 54-60 inches wide minimum
- Queen bed: 60-66 inches wide minimum
- King bed: 76-82 inches wide minimum
Wall Mounting Safety
Secure mounting prevents accidents and damage. Heavy headboards require proper anchoring. Never compromise on installation safety.
- Always locate wall studs for heavy items
- Use appropriate weight-rated anchors for drywall
- Install French cleats for very heavy headboards
- Leave 2-4 inch gap between bed and headboard
- Ensure headboard won’t tip forward
- Check mounting security after installation
Pro Tip: Create a full-size template using cardboard before building. This helps visualize proportions and avoid costly mistakes with materials.
Finishing Touches That Elevate Your DIY Headboard
Small details transform good headboards into great ones. These finishing techniques add polish and professionalism. Don’t skip these final steps.
Surface Preparation
Proper prep ensures smooth finishes. Sand all wood surfaces progressively. Start with coarse grit and finish with fine.
- Fill holes and gaps with wood filler
- Sand between paint coats
- Wipe away dust before finishing
- Apply primer on raw wood
Paint and Stain Tips
Quality finishes make projects look professional. Use appropriate products for your material. Apply multiple thin coats rather than one thick layer.
- Test stain colors on scrap wood first
- Allow proper drying time between coats
- Use foam rollers for smooth paint application
- Seal painted surfaces with clear topcoat
Decorative Details
Trim and molding add sophistication. These elements frame your headboard beautifully. Choose styles that complement bedroom architecture.
- Add decorative molding to edges
- Install trim to hide raw edges
- Use upholstery nails for texture
- Apply metallic wax for highlights

Styling Your New Headboard for Maximum Impact
Your headboard sets the stage for bedroom styling. Coordinate bedding and decor to create cohesive design. These tips help your headboard shine.
Bedding Coordination
Choose bedding that complements without competing. Neutral linens let bold headboards take center stage. Patterned headboards pair well with solid bedding.
For Bold Headboards
- Use solid color sheets and duvet covers
- Add texture through knit throws and blankets
- Choose pillows in one accent color from headboard
- Keep pattern to minimum on bed
For Neutral Headboards
- Layer patterned sheets and covers
- Mix prints in similar color families
- Add bold accent pillows for color
- Include varied textures and materials

Wall Decor Around Headboard
Consider what goes above and beside your headboard. Some designs need space to breathe. Others benefit from additional wall decor.
- Leave wall space clear above large statement headboards
- Add sconces on either side for reading light
- Hang artwork above low-profile headboards
- Install floating shelves beside narrow headboards
- Use plants to soften hard-edged designs
Lighting Considerations
Proper lighting enhances headboard beauty. Consider both function and ambiance. Layer different light sources for best results.
Task Lighting
- Swing-arm wall sconces
- Clip-on reading lamps
- Built-in LED strips
Ambient Lighting
- String lights across headboard
- Backlit panels for glow
- Table lamps on nightstands
Accent Lighting
- Picture lights above headboard
- Uplights behind headboard
- Candles for soft ambiance
Maintaining Your DIY Headboard for Years of Beauty
Proper care extends headboard life and appearance. Different materials require specific maintenance. Follow these guidelines to keep your headboard looking new.
Wood Headboard Care
- Dust regularly with microfiber cloth
- Clean with slightly damp cloth only
- Avoid harsh chemical cleaners
- Reapply furniture polish annually
- Touch up scratches with matching stain
- Check mounting hardware yearly
Upholstered Headboard Care
- Vacuum weekly with upholstery attachment
- Spot clean stains immediately
- Use fabric protector spray
- Professional cleaning every 2-3 years
- Rotate cushions if removable
- Keep away from direct sunlight

Seasonal Maintenance Checklist
- Inspect all mounting hardware for looseness
- Tighten screws and brackets as needed
- Check for any damage or wear
- Deep clean according to material type
- Refresh paint or stain if needed
- Update styling with seasonal decor
Budget Breakdown: Cost Comparison of DIY Headboard Ideas
Understanding project costs helps with planning. These estimates include materials only. Your actual costs may vary based on location and material choices.
| Headboard Type | Difficulty | Estimated Cost | Time Required | Best For |
| Pallet Wood | Beginner | $15-30 | 4-6 hours | Rustic style |
| Upholstered Fabric | Intermediate | $60-120 | 3-4 hours | Luxury comfort |
| Painted Wall | Beginner | $20-40 | 2-3 hours | Renters |
| Vintage Door | Intermediate | $30-80 | 3-5 hours | Farmhouse decor |
| Pegboard Storage | Beginner | $25-45 | 2-3 hours | Small spaces |
| Floating Shelves | Intermediate | $40-70 | 2-4 hours | Modern style |
| Macramé Panel | Beginner | $35-90 | 1 hour | Boho aesthetic |
| Shiplap Wall | Advanced | $100-200 | 8-12 hours | Full wall impact |
Money-Saving Tip: Check local buy-sell-trade groups for free or cheap materials. Reclaimed wood, old doors, and vintage frames often cost nothing but time to collect.
Common DIY Headboard Mistakes to Avoid
Learning from others’ mistakes saves time and money. These common errors trip up many DIY enthusiasts. Awareness helps you avoid similar problems.
Do These Things
- Measure your bed and wall space accurately before starting
- Account for mattress thickness in height calculations
- Use quality materials that will last years
- Test paint and stain colors on sample boards first
- Secure heavy headboards to wall studs properly
- Allow adequate drying time between finish coats
- Plan electrical routing for built-in lights early
- Sand all wood surfaces smooth before finishing
Avoid These Mistakes
- Skipping measurements and building wrong size
- Mounting headboard too low or too high
- Using cheap materials that warp or fail
- Choosing colors that clash with existing decor
- Inadequate wall anchoring leading to accidents
- Rushing finish work causing drips and runs
- Forgetting about cord management and outlets
- Leaving rough edges that snag bedding
When to Rent Tools Instead of Buying
Some projects require specialized tools. Renting makes sense for one-time use. This saves money and storage space in your home.
Worth Buying
These tools see regular use in home projects. The investment pays off over time.
- Cordless drill and driver
- Basic hand tool set
- Measuring tape and level
- Paintbrushes and rollers
Consider Renting
Specialized equipment costs too much for occasional use. Rental centers offer daily rates.
- Miter saw for angled cuts
- Nail gun for upholstery
- Orbital sander for large surfaces
- Paint sprayer for smooth finish
Borrow or Share
Ask friends and neighbors about tool lending. Many people own items they rarely use.
- Circular saw for lumber
- Stud finder for mounting
- Clamps for gluing
- Brad nailer for trim
Start Your DIY Headboard Project Today
These 20 DIY headboard ideas prove you don’t need a huge budget for beautiful bedroom design. Each project offers a unique way to personalize your space. From simple painted walls to elaborate upholstered pieces, there’s an idea for every skill level.
The best headboard is one that reflects your style and fits your space. Consider your bedroom decor, available time, and budget when choosing a project. Remember that even beginner-friendly ideas create stunning results with care and attention to detail.

Start with proper planning and measurements. Gather quality materials and take your time with each step. The effort you invest creates a custom piece that no store can match. Your DIY headboard becomes a source of pride and a conversation piece for years to come.
Don’t let fear of mistakes hold you back. Every experienced DIYer learned through doing. These projects build skills that serve you in future home improvement adventures. Your bedroom awaits its perfect headboard. Choose your favorite idea and begin creating today.