
Spring arrives with fresh energy, blooming flowers, and the perfect excuse to refresh your nail art. This season brings a palette of pastels, vibrant florals, and playful patterns that capture the essence of renewal.
Whether you prefer soft, romantic looks or bold, statement-making designs, spring offers endless possibilities for creative expression on your nails. From cherry blossoms to abstract art, these 30 designs will inspire your next manicure.
Get ready to transform your nails into miniature works of art that celebrate the most colorful season of the year.
Table of Contents
Pastel Perfection: Soft Spring Nail Designs
Pastel shades define spring nail art. These gentle hues create a fresh, clean base for countless design possibilities. The beauty of pastels lies in their versatility and universal appeal.
1. Baby Blue Cloud Nails
Baby blue serves as the perfect base for dreamy cloud designs. This look captures the essence of spring skies with soft white clouds floating across each nail.
Apply a baby blue base coat and let it dry completely. Use a thin brush with white polish to create fluffy cloud shapes. The key is keeping clouds irregular and organic.
Seal with a glossy top coat to add dimension. This design works beautifully on both short and long nails, making it accessible for everyone.
2. Lavender Gradient Dream
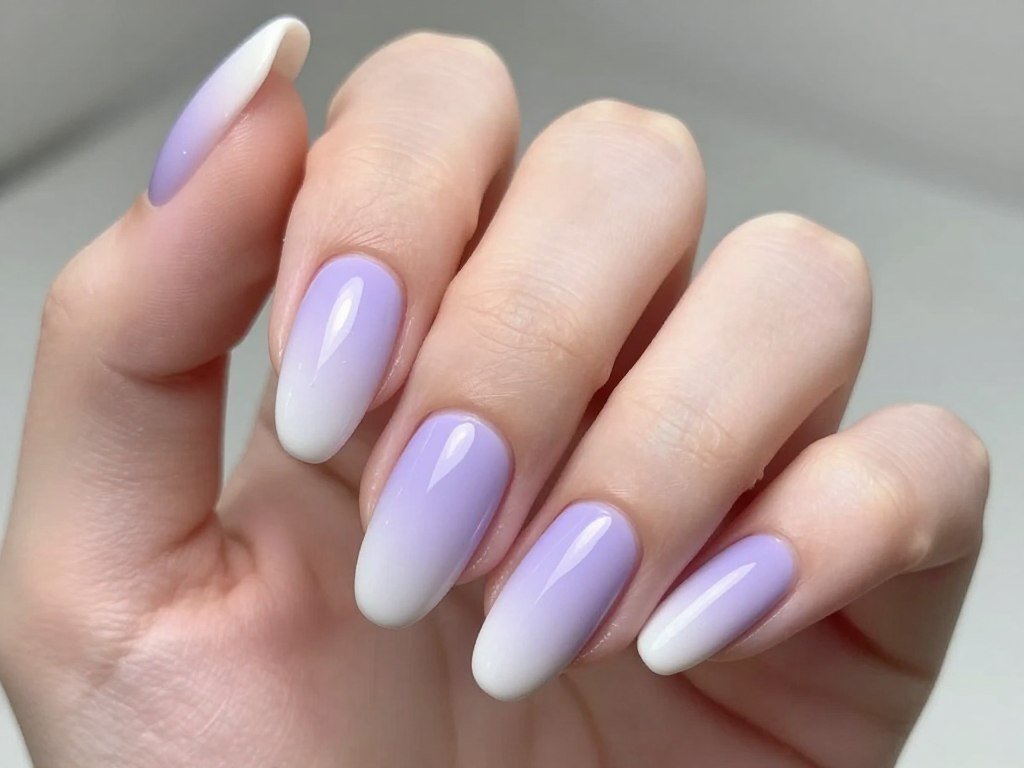
Lavender gradients bring sophistication to spring nails. This technique blends deep lavender at the base into soft white at the tips, creating a seamless ombre effect.
Use a makeup sponge to dab colors together while polish is still wet. Work quickly to blend shades before they dry. Apply thin layers for better control.
The gradient technique takes practice but delivers stunning results. Finish with a top coat to smooth any texture from sponging.
3. Mint Green Minimalist Set
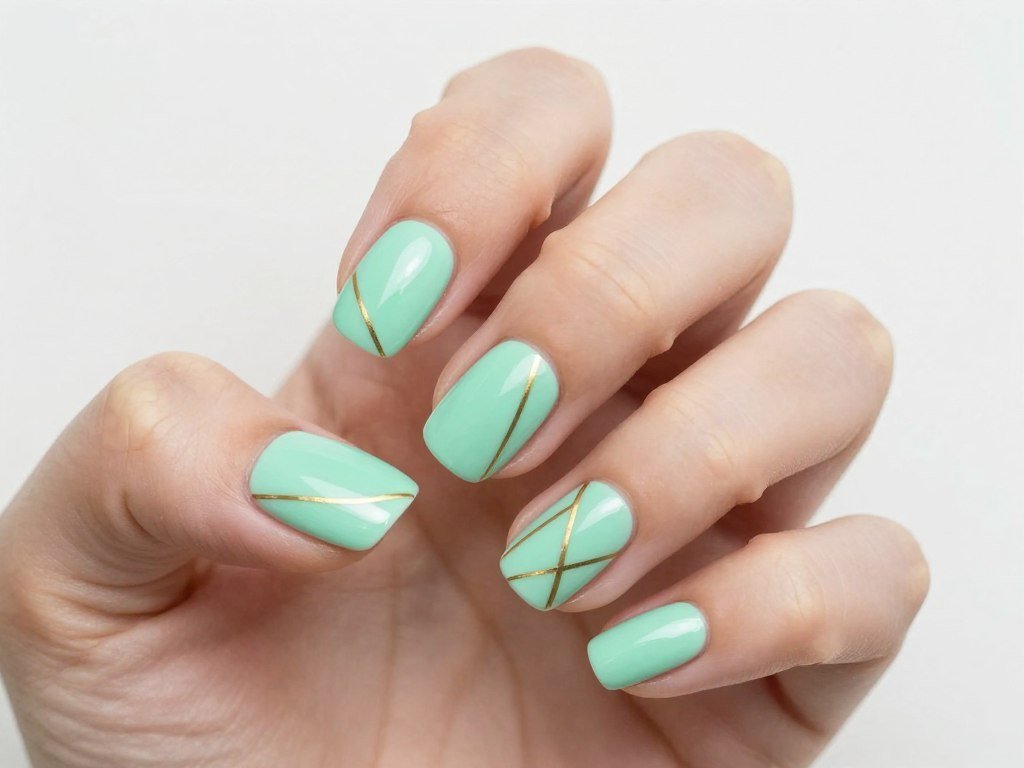
Mint green offers a refreshing spring vibe. Add thin gold lines for a minimalist touch that feels modern and clean.
Apply two coats of mint polish as your base. Once dry, use striping tape or a fine brush to add delicate gold lines across one or two accent nails.
This design proves that simplicity creates impact. The mint and gold combination works for both casual and formal occasions.
4. Peach Cream Swirl

Peach and cream swirls create a marbled effect that looks complex but requires simple techniques. This design brings warmth to spring nail art.
Drop peach and cream polish onto nails while wet. Use a toothpick to swirl colors together in circular motions. Work gently to maintain distinct color sections.
Each nail becomes unique with this method. The organic patterns make every manicure one of a kind.
5. Powder Pink French Manicure
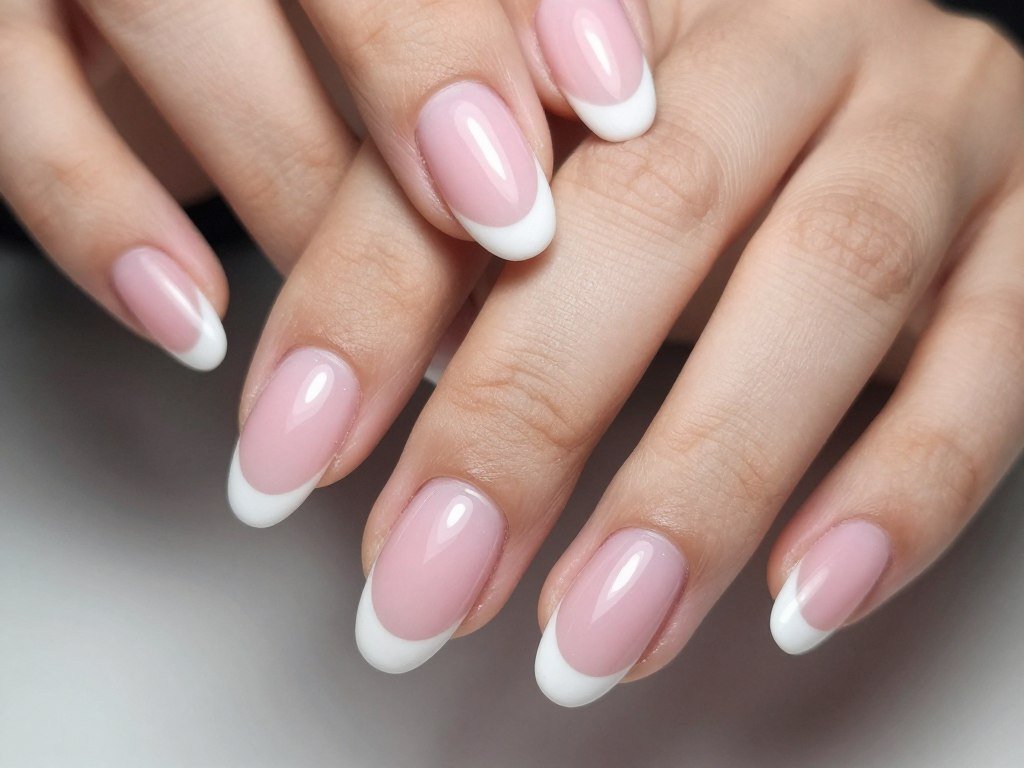
The classic French manicure gets a spring update with powder pink. This timeless design never goes out of style and suits every occasion.
Start with a powder pink base coat. Once dry, carefully paint white tips using a French manicure guide or freehand technique. Keep tips thin for a modern look.
This elegant design works beautifully for weddings, professional settings, or everyday wear. The soft pink adds warmth to traditional French tips.
6. Lilac Shimmer Finish
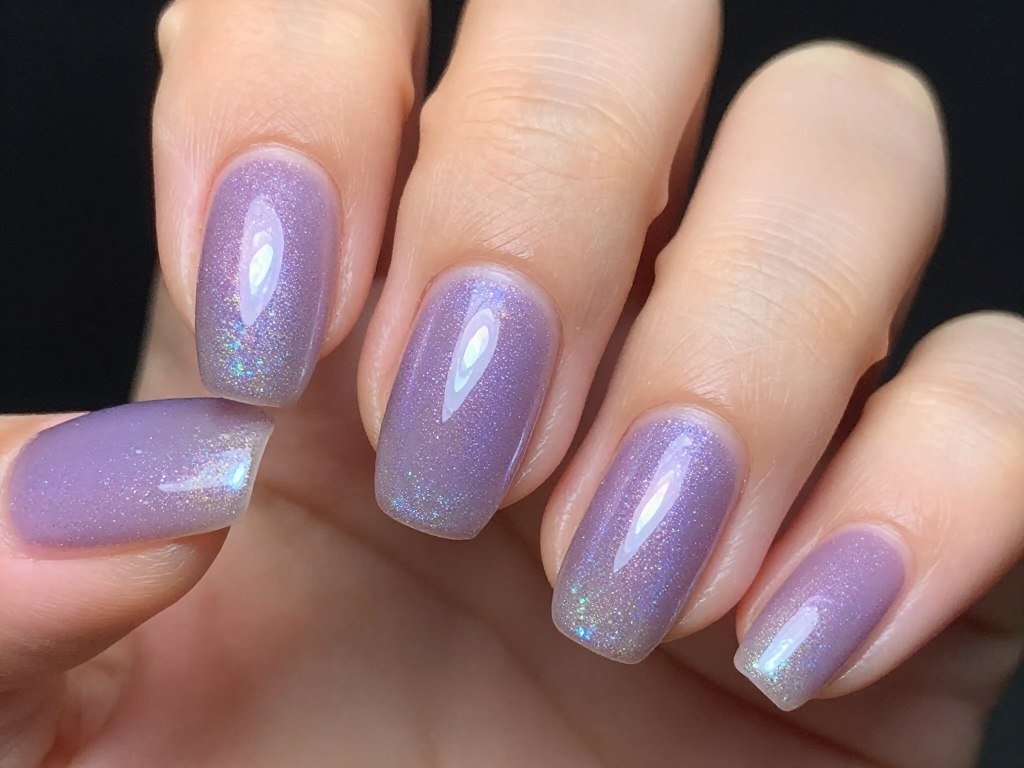
Lilac shimmer polish catches light beautifully. The subtle sparkle adds dimension without overwhelming the soft spring color.
Apply two coats of lilac shimmer polish for full coverage. The shimmer particles distribute evenly when you roll the bottle rather than shake it.
This design requires minimal effort but delivers maximum impact. Perfect for those who want polish without patterns or designs.
Floral Fantasy: Spring Nail Designs with Flowers
Florals define spring more than any other motif. From delicate cherry blossoms to bold sunflowers, flower nail art brings nature to your fingertips. These designs range from simple to intricate, offering options for every skill level.
7. Cherry Blossom Branches
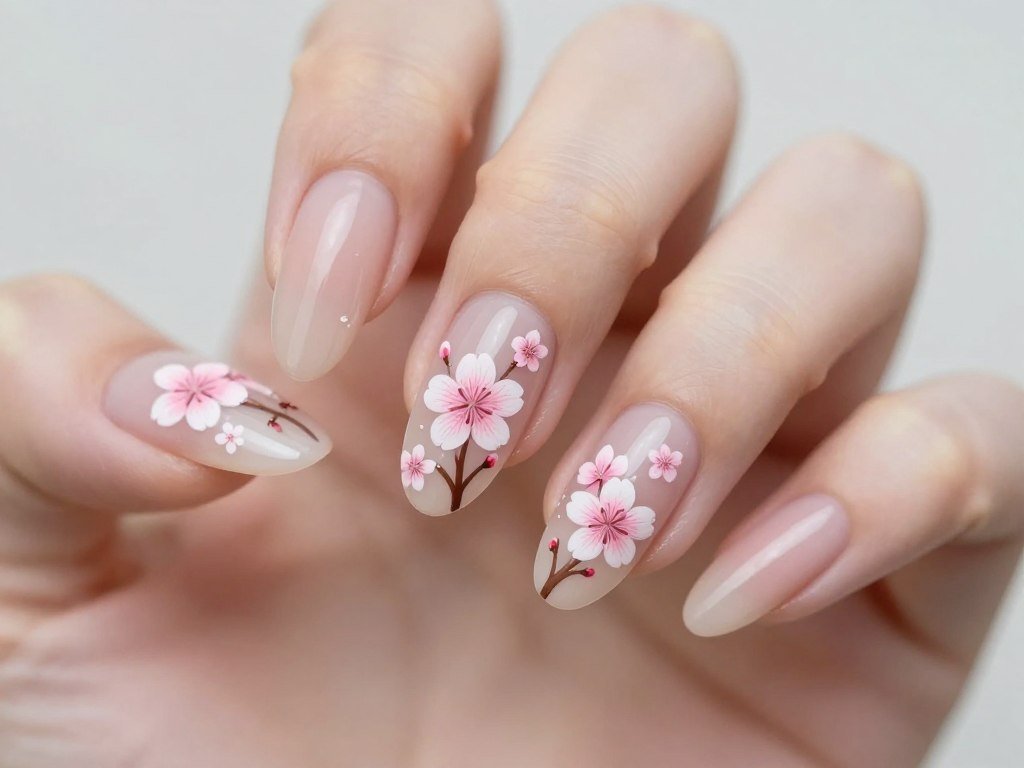
Cherry blossoms symbolize spring renewal. This design features delicate pink flowers on thin brown branches across a nude base.
Start with a nude or sheer pink base. Use a fine detail brush to paint thin brown branches. Add small pink flowers using a dotting tool, placing five dots in a circle for each bloom.
Add tiny white highlights to flower centers. This design works best as an accent on one or two nails per hand.
8. Daisy French Tips
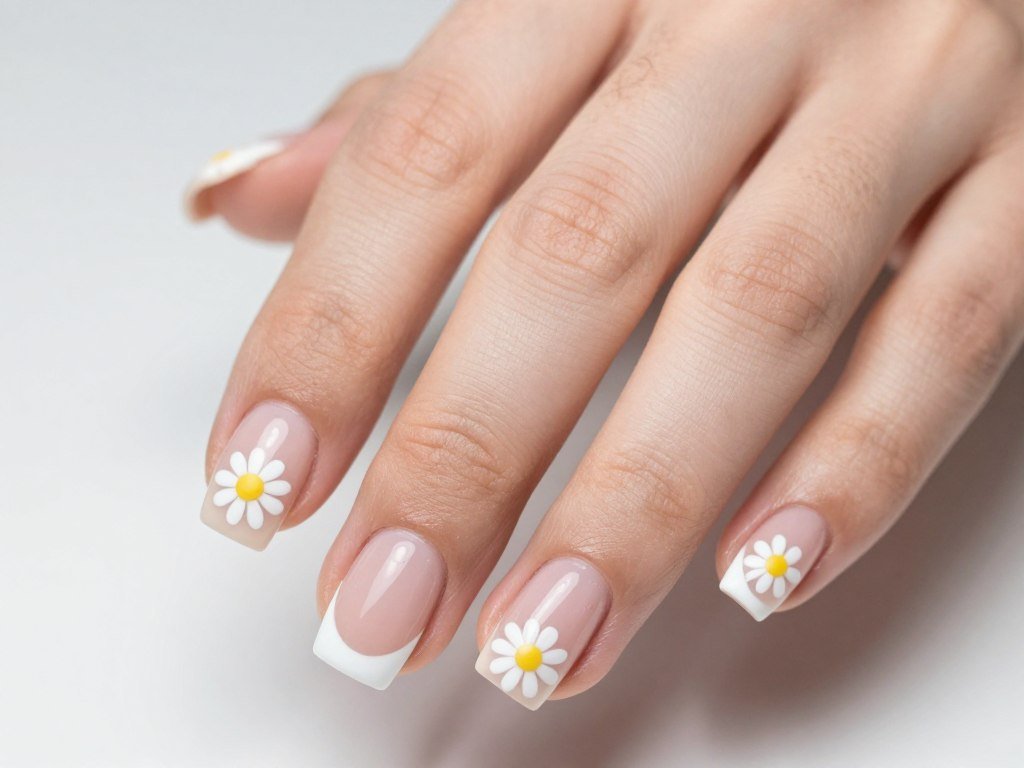
Daisies bring cheerful energy to classic French tips. White petals with yellow centers create a playful spring look.
Apply a classic French manicure with white tips. Once dry, use a fine brush to add small daisy flowers along the tip line. Keep flowers tiny for a delicate effect.
This design combines traditional elegance with seasonal flair. The daisies add personality to a timeless manicure style.
9. Pressed Flower Art
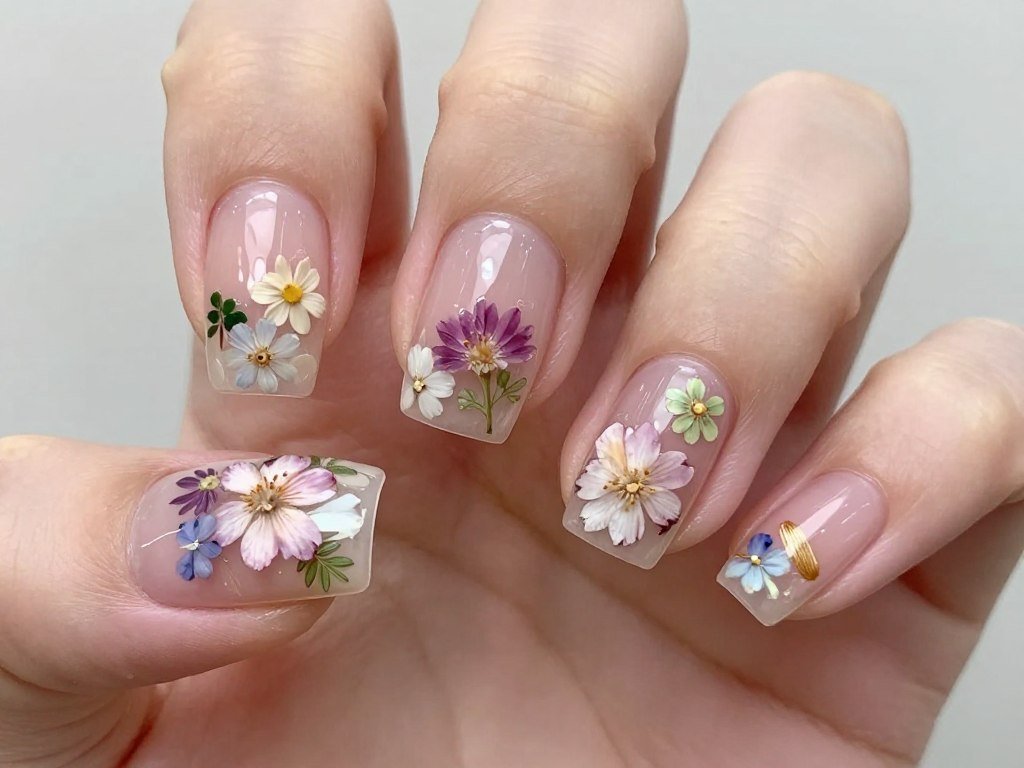
Real pressed flowers create authentic botanical nail art. This technique preserves tiny florals under clear gel for a unique, nature-inspired look.
Apply a clear or nude base. Place tiny pressed flowers on wet top coat using tweezers. Seal with multiple layers of clear gel or top coat.
Each design becomes truly unique with this method. The flowers maintain their natural beauty under the protective coating.
10. Tulip Garden Nails
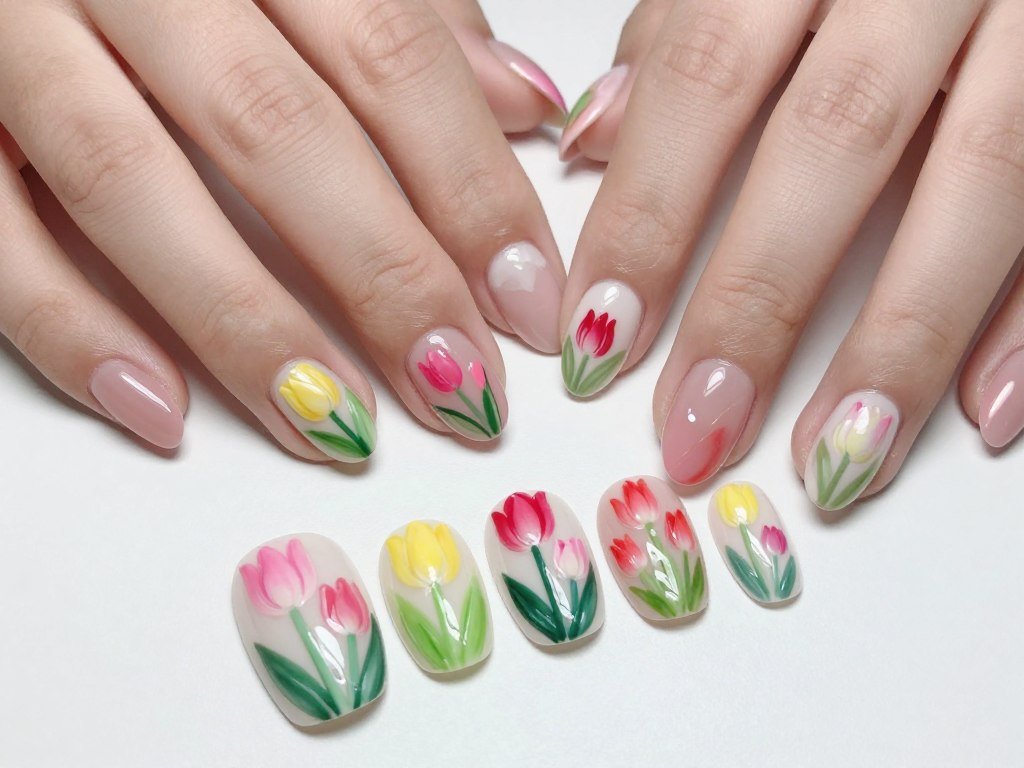
Tulips in various colors create a garden on your nails. This design celebrates spring with bold, recognizable flower shapes in pink, yellow, and red.
Use a white base for maximum color vibrancy. Paint tulip shapes using different spring shades. Add green stems and leaves for dimension.
This design works well on longer nails where you have more space for detailed artwork. Mix and match tulip colors across different nails.
11. Lavender Sprig Design
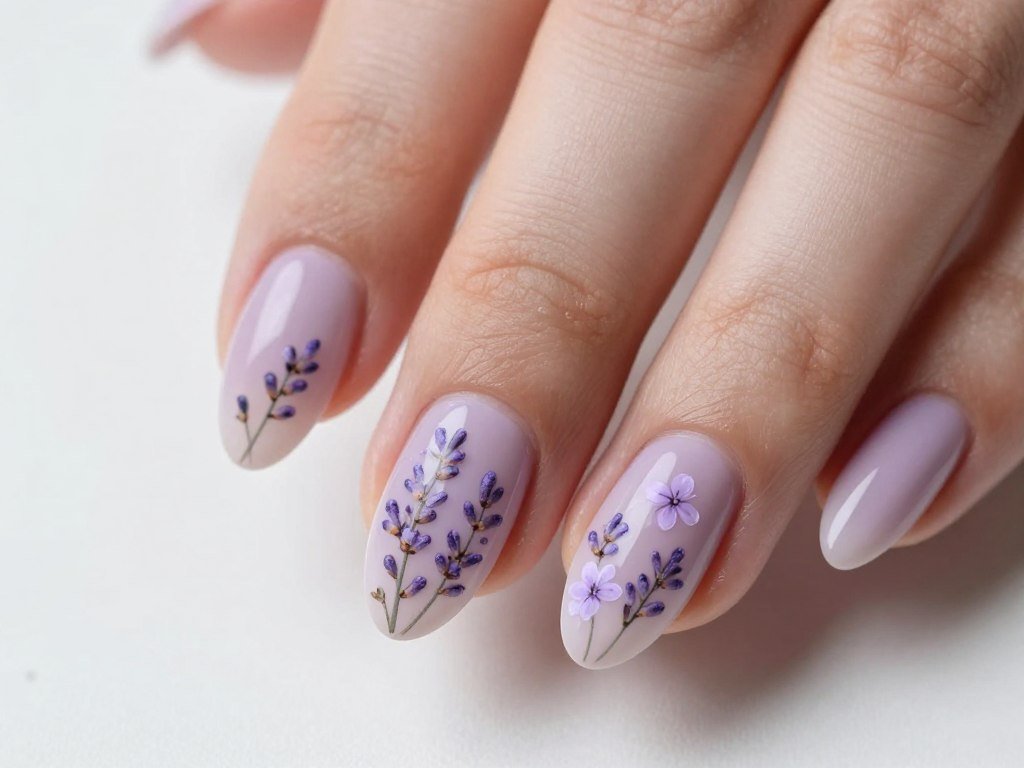
Lavender sprigs bring Mediterranean spring vibes. Paint delicate purple blooms on thin green stems for an elegant, understated look.
Apply a soft purple or white base. Use a thin brush to paint vertical green stems. Add tiny purple dots along each stem to create the lavender flower effect.
This design feels sophisticated and romantic. The vertical pattern elongates the appearance of your nails.
12. Sunflower Accent Nails
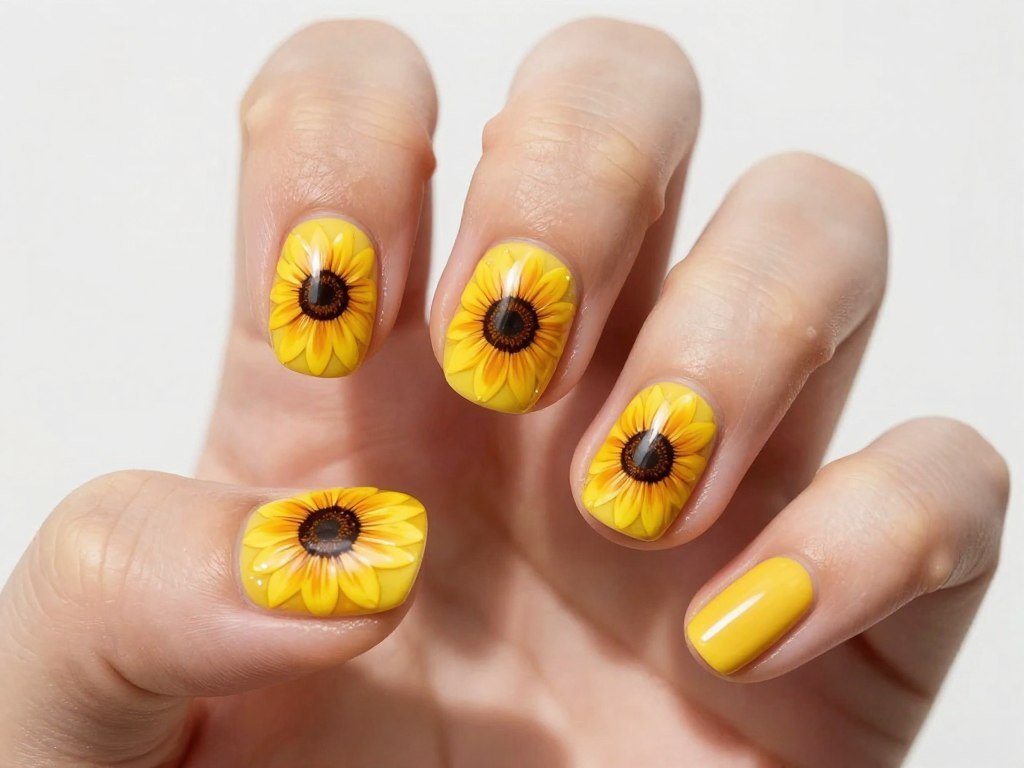
Sunflowers bring sunshine to spring nails. These bold flowers work perfectly as accent nails paired with solid yellow on the remaining fingers.
Paint most nails with bright yellow polish. On accent nails, create a dark brown circle in the center. Add yellow petals around the circle using curved strokes.
Add texture to the center with tiny dots or crosshatch lines. This design radiates positivity and warmth.
Bold and Bright: Vibrant Spring Nail Art Designs
Spring isn’t just pastels. Bold, saturated colors celebrate the season’s energy. These designs use bright shades to make strong statements that capture attention.
13. Rainbow Tips
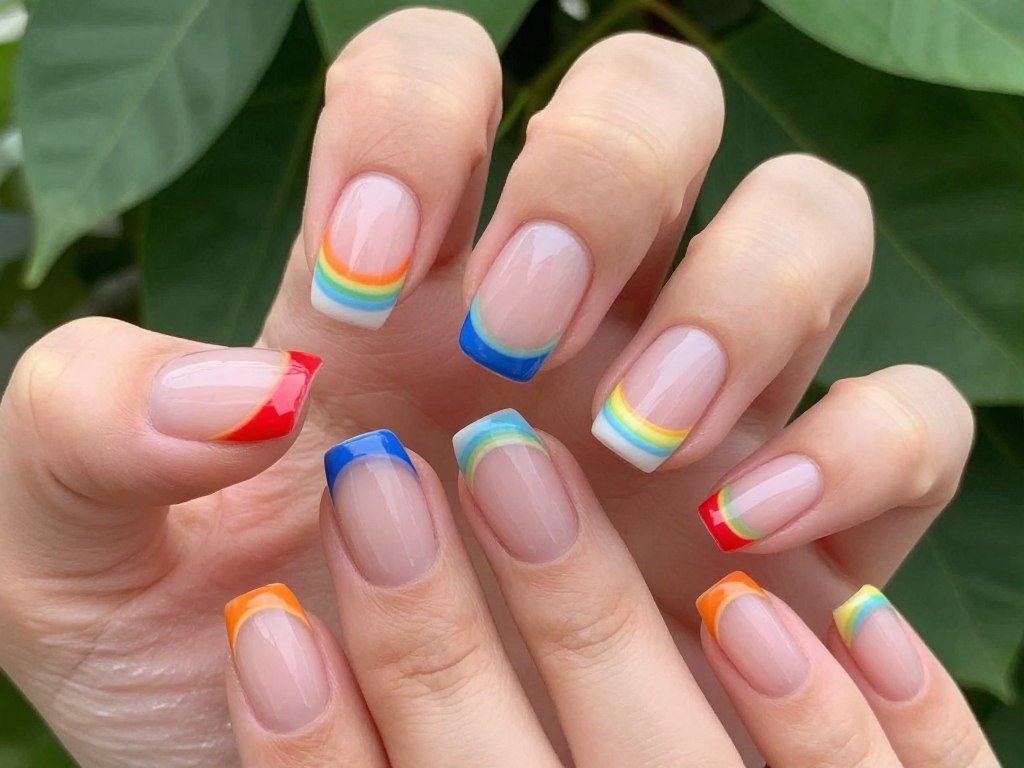
Rainbow French tips bring playful energy to a classic style. Each nail features a different bright color at the tip for maximum impact.
Apply a nude or white base. Paint each tip with a different rainbow color – red, orange, yellow, green, blue, purple. Keep tips thin and precise.
This design works especially well for festivals, parties, or anyone who loves color. The variety keeps the look interesting.
14. Neon Geometric Patterns
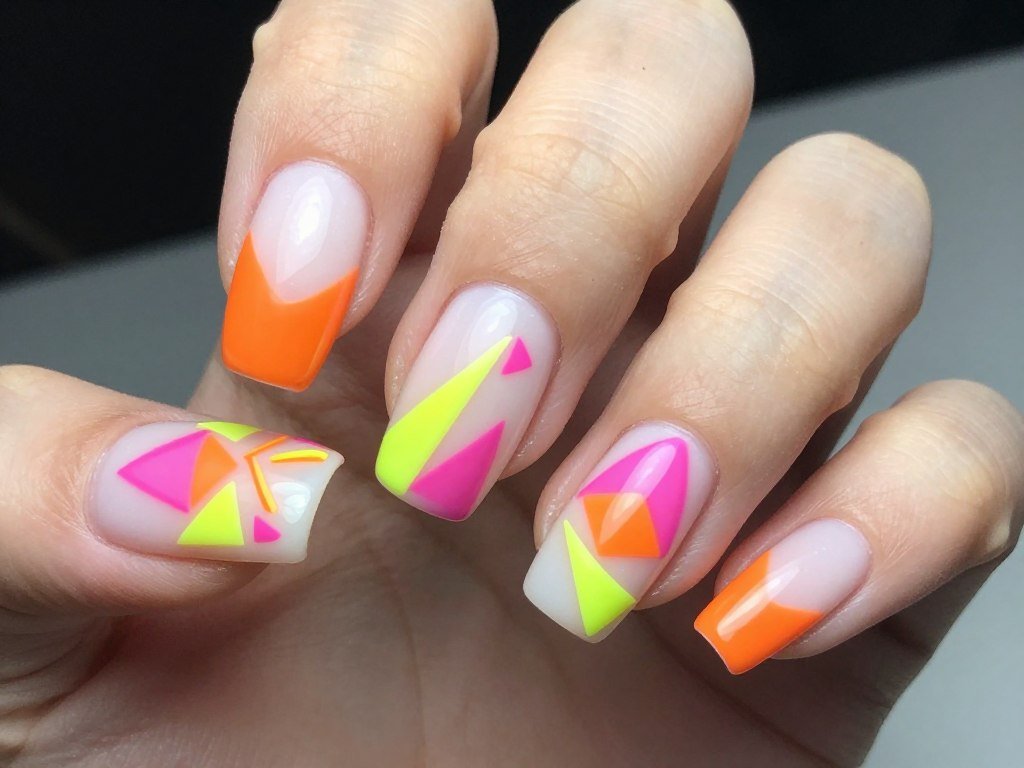
Neon geometric shapes create modern, eye-catching nail art. Combine triangles, lines, and blocks in hot pink, orange, and yellow.
Start with a white base for neon colors to pop. Use striping tape to create clean lines and shapes. Fill sections with different neon shades.
This design feels fresh and contemporary. The graphic quality makes it perfect for fashion-forward individuals.
15. Citrus Slice Art
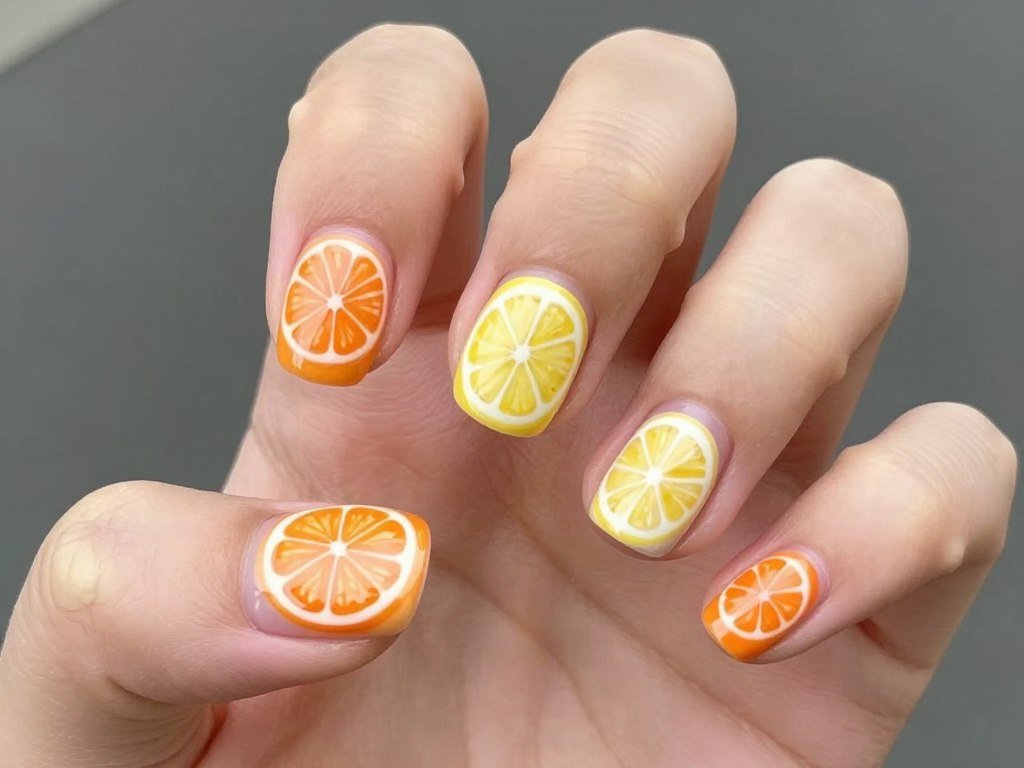
Citrus slices bring fruity fun to spring nails. Paint orange and lemon cross-sections for a refreshing, summery vibe.
Use a white or yellow base. Paint circular sections in orange or yellow. Add white segments radiating from the center. Include small seeds for detail.
This playful design captures spring and summer energy. The fruit theme feels fresh and fun.
16. Hot Pink Animal Print
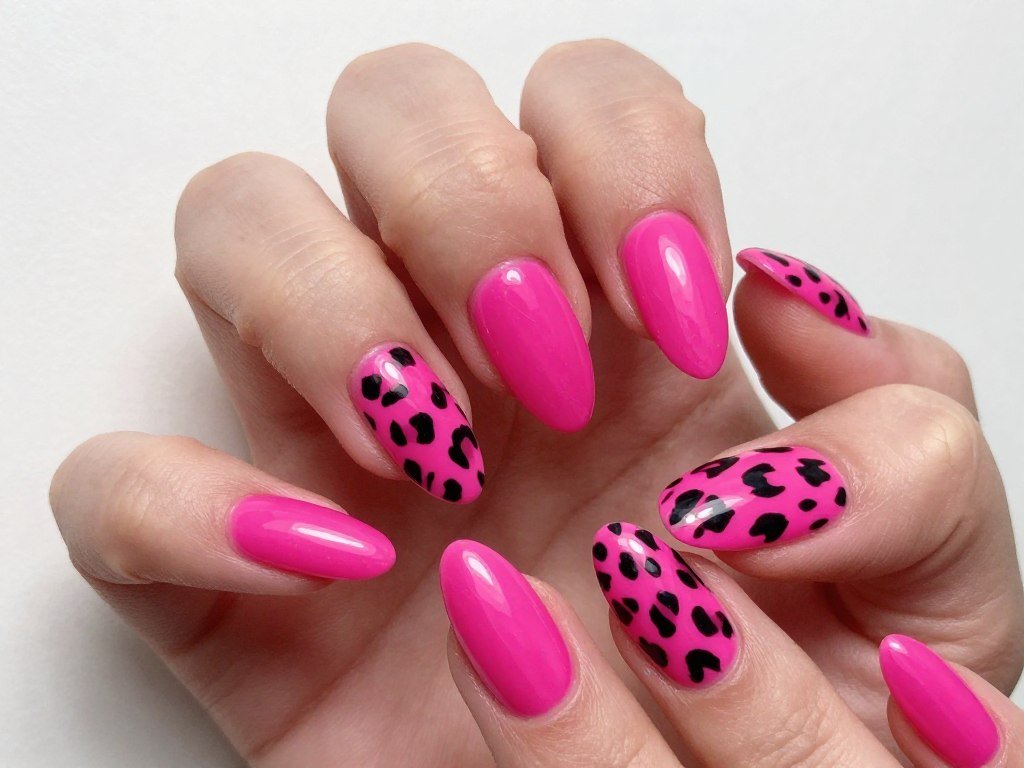
Hot pink leopard print makes a fierce statement. This design combines animal patterns with spring’s favorite bright shade.
Apply hot pink base coat. Once dry, use a dotting tool with black polish to create irregular leopard spots. Outline spots with a thin brush.
This bold look works for confident personalities. The pink softens the edgy animal print pattern.
17. Electric Blue Waves
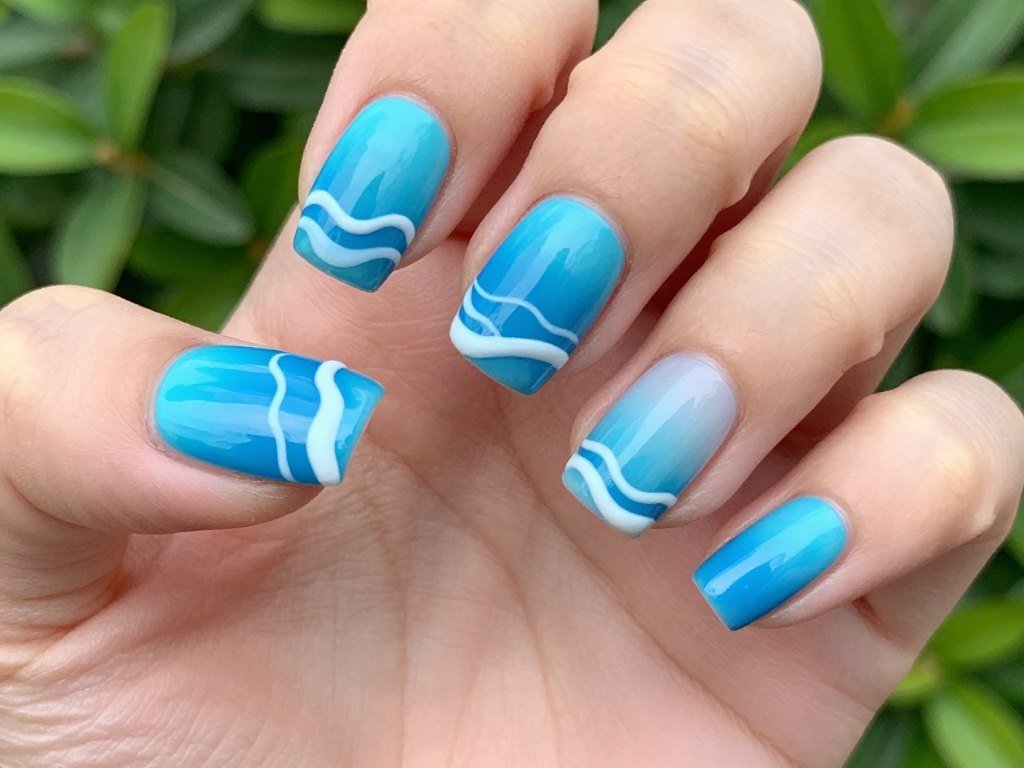
Electric blue waves capture ocean energy. Wavy lines in different blue shades create movement and depth.
Start with a light blue base. Use darker blues to paint curved, flowing wave lines. Add white foam details at wave crests.
This design brings coastal vibes to spring nails. The movement in the pattern keeps eyes engaged.
18. Mix Match Bright Set
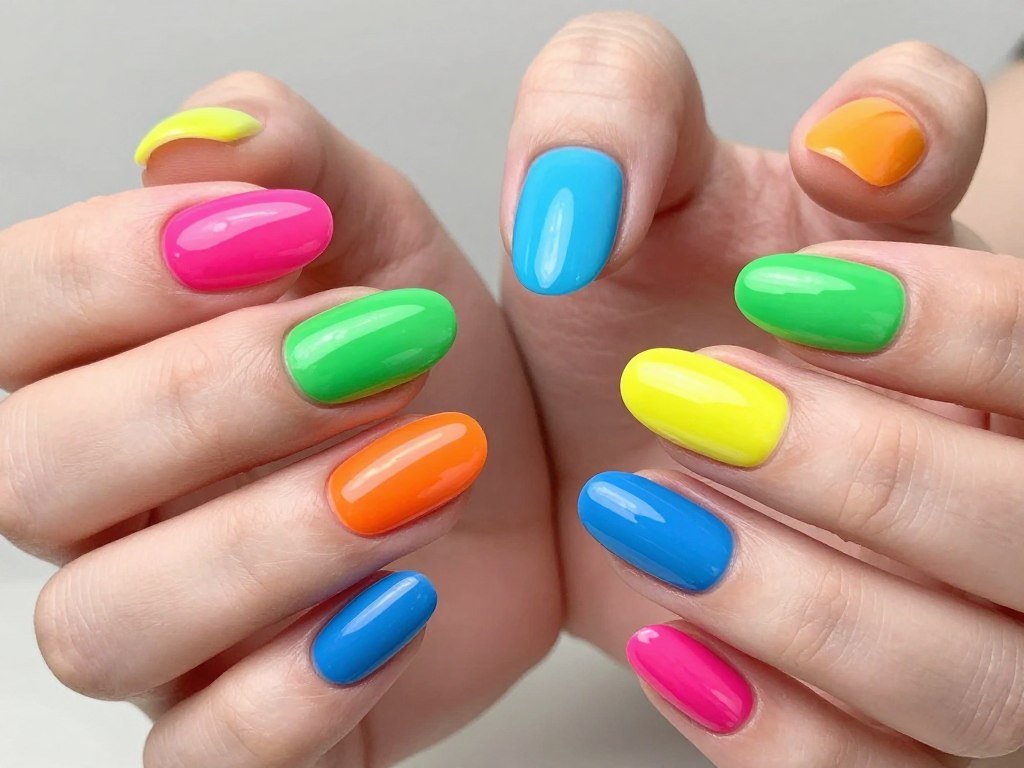
Mix match bright colors on each nail for maximum vibrancy. This approach celebrates spring’s colorful diversity.
Choose five to ten different bright shades. Paint each nail a different color, creating a rainbow effect across your hands.
This fun design requires no artistic skill, just bold color choices. The variety keeps the look dynamic and interesting.
Essential Products for Spring Nail Art Designs
Creating stunning spring nail designs requires quality products. These must-have items help achieve professional results at home.
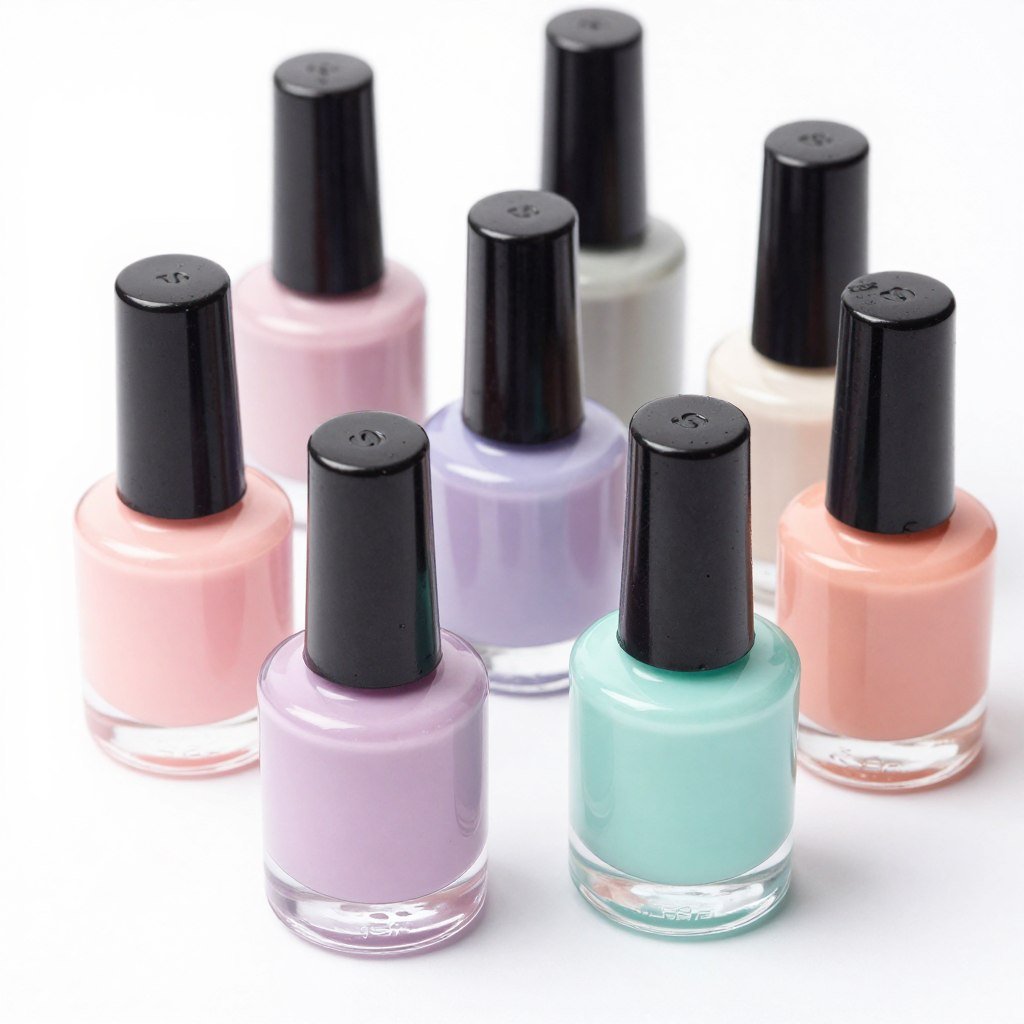
Spring Pastel Polish Set
This curated collection includes eight essential spring shades. Baby blue, lavender, mint, peach, and powder pink create the perfect pastel palette.
Each polish features a long-lasting formula that resists chipping. The smooth application makes it easy to achieve salon-quality results at home.
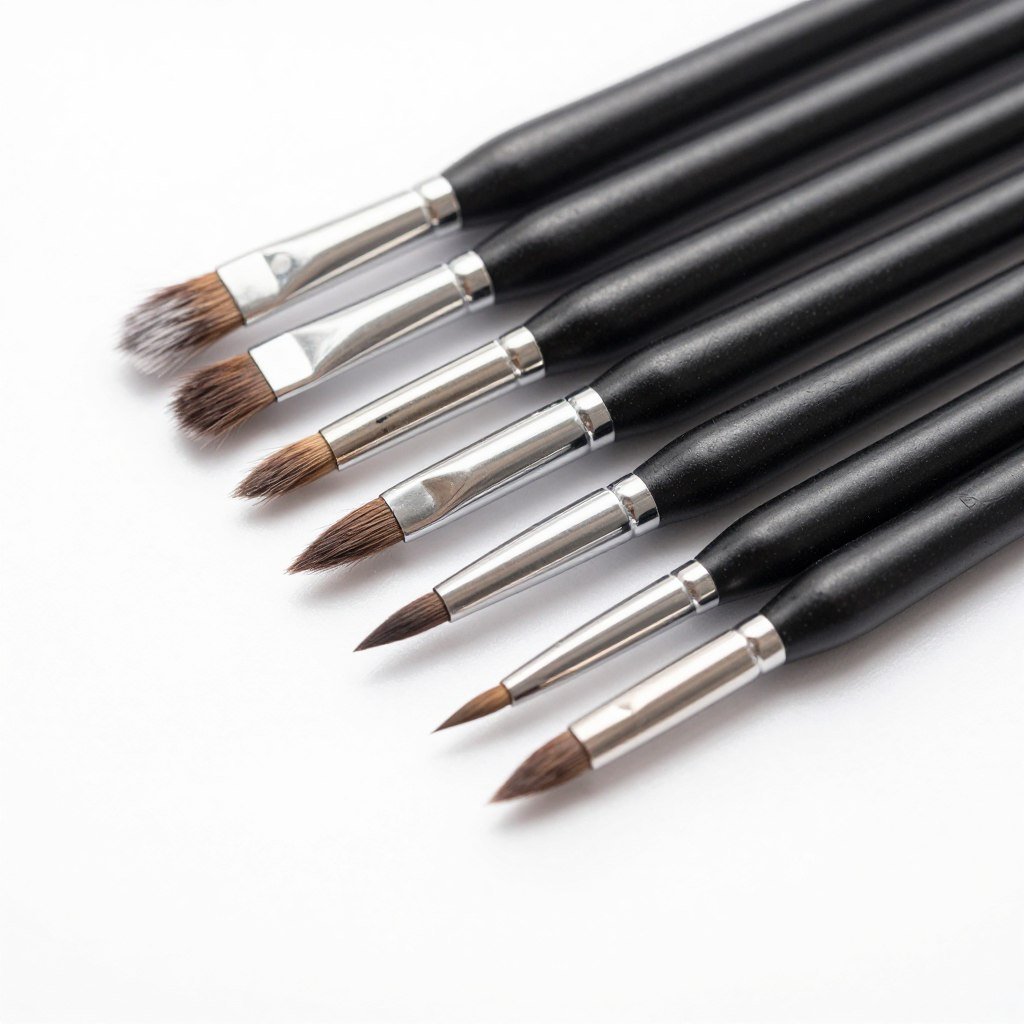
Detail Brush Collection
Fine detail brushes make floral designs possible. This set includes various brush sizes for different artistic techniques.
The synthetic bristles hold shape well and clean easily. Perfect for creating cherry blossoms, geometric patterns, and intricate nail art designs.
Quick-Dry Top Coat
A quality top coat protects your nail art and adds brilliant shine. This fast-drying formula sets in minutes, preventing smudges.
The glossy finish enhances colors and extends manicure life. Essential for sealing detailed designs and maintaining professional appearance.
Nature-Inspired Spring Nail Designs
Nature provides endless inspiration for spring nail art. These designs capture butterflies, leaves, and natural elements that define the season.
19. Butterfly Wing Details
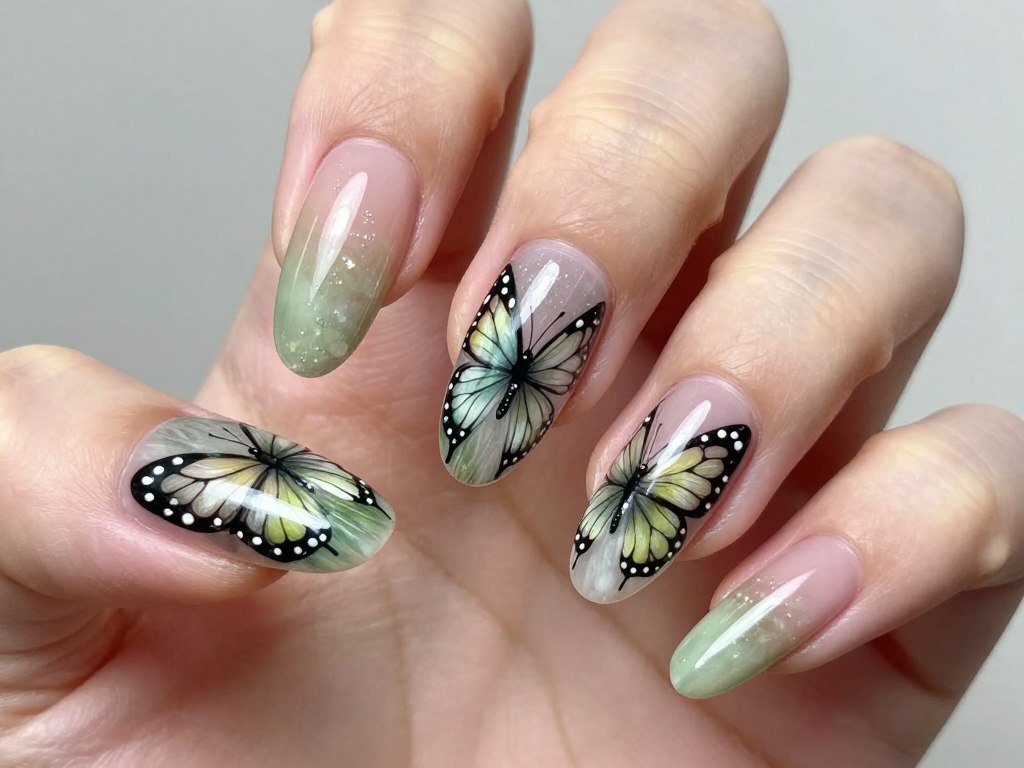
Butterfly wings showcase spring’s transformation. Paint detailed wing patterns with vibrant colors and delicate black outlines.
Start with a light base color. Sketch butterfly wing shapes with a thin brush. Fill with colors like orange, blue, or pink. Add black outline details and patterns.
This design requires patience but creates stunning results. Each wing becomes a miniature work of art.
20. Green Leaf Patterns
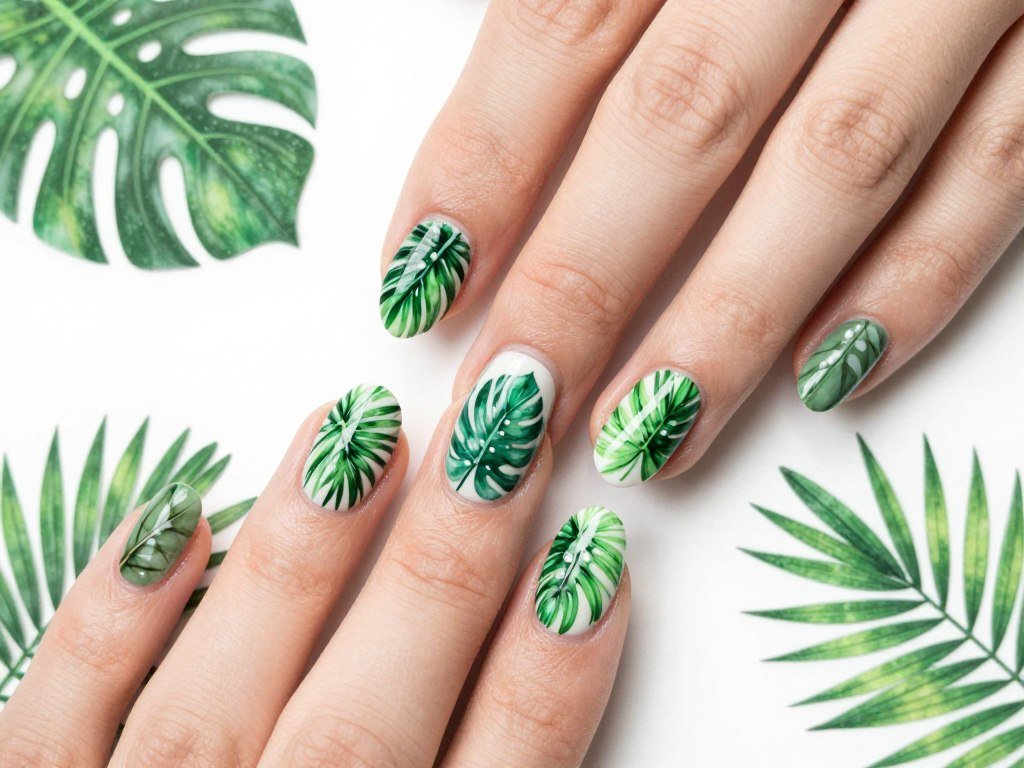
Green leaves represent spring growth. Paint tropical or simple leaves in various green shades for a fresh, botanical look.
Use a white or nude base. Paint leaf shapes in different green tones. Add vein details with darker green or white for dimension.
This design brings indoor garden vibes to your manicure. The green shades feel refreshing and natural.
21. Bee and Honeycomb Set
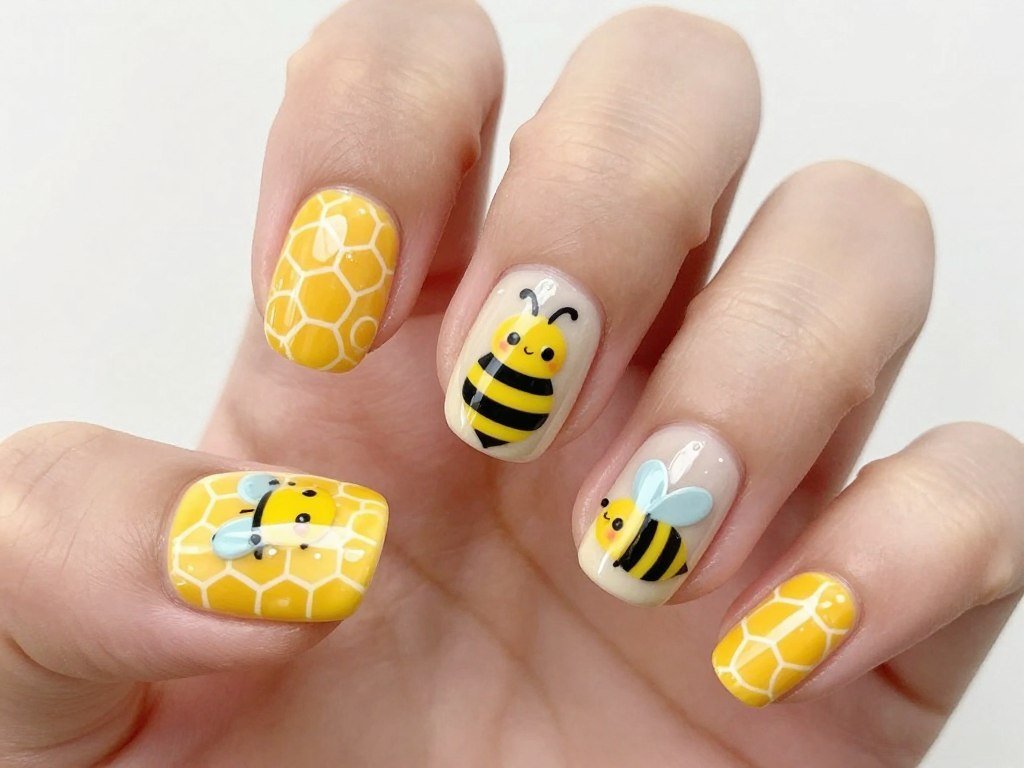
Bees and honeycombs celebrate spring pollinators. This playful design combines geometric honeycomb patterns with cute bee illustrations.
Create honeycomb patterns using striping tape on yellow base. Paint small bees with black and yellow stripes on accent nails. Add tiny wings with white polish.
This whimsical design works for nature lovers. The combination of geometric and illustrated elements creates visual interest.
22. Raindrop and Cloud Art
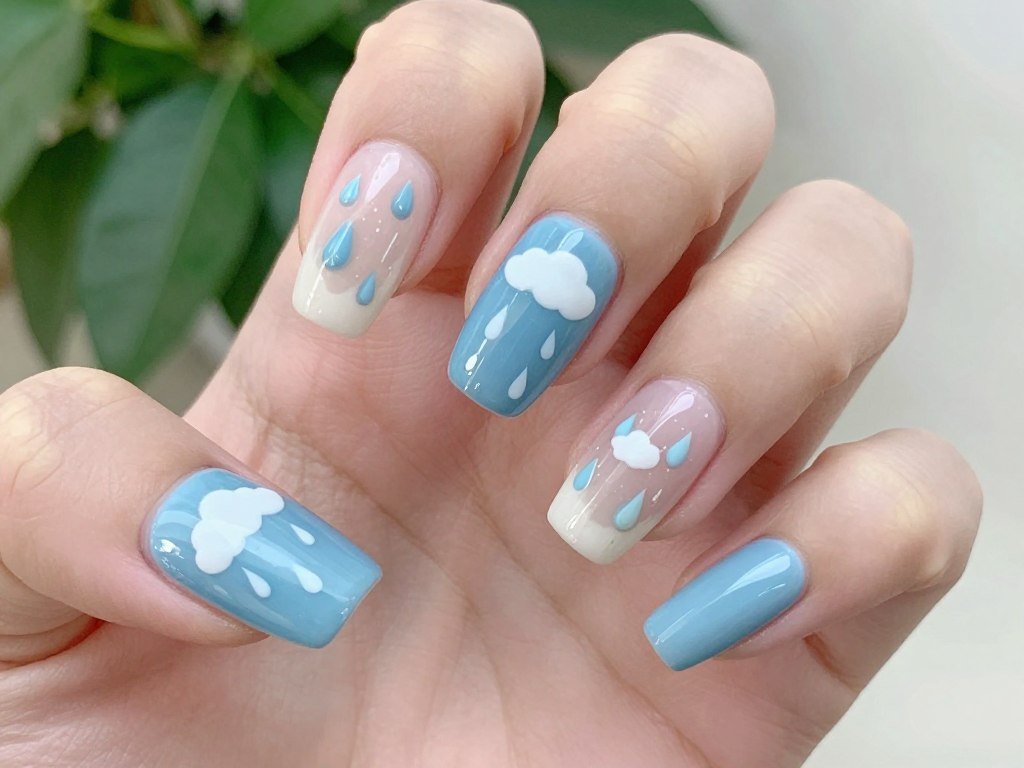
Spring showers inspire this design. Clouds and raindrops create a cute, weather-themed manicure.
Paint a light blue or gray base. Add white fluffy clouds. Use a dotting tool to create falling raindrop shapes in darker blue.
This design captures April showers bringing May flowers. The simple shapes make it accessible for beginners.
23. Garden Bug Collection
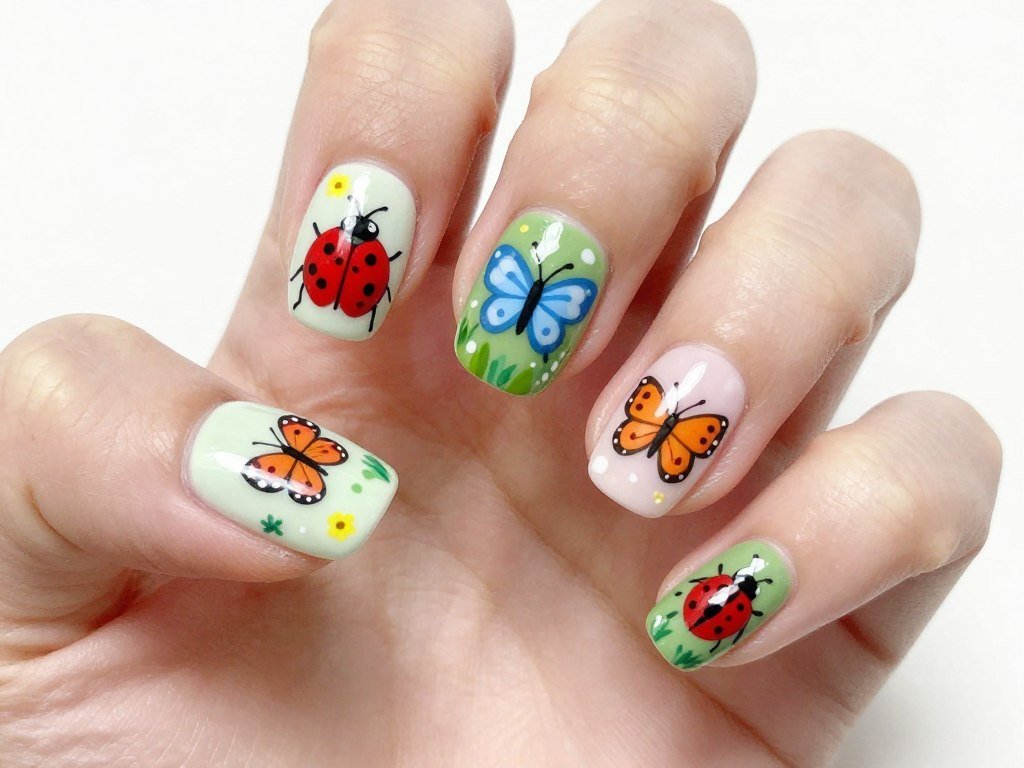
Garden bugs bring playful charm. Paint tiny ladybugs, beetles, and other insects for a nature-inspired collection.
Use different base colors on each nail. Add small bug illustrations using fine detail brushes. Ladybugs work especially well with red base and black spots.
This design celebrates spring’s outdoor life. The variety of bugs keeps each nail unique and interesting.
24. Wheat and Grain Stalks
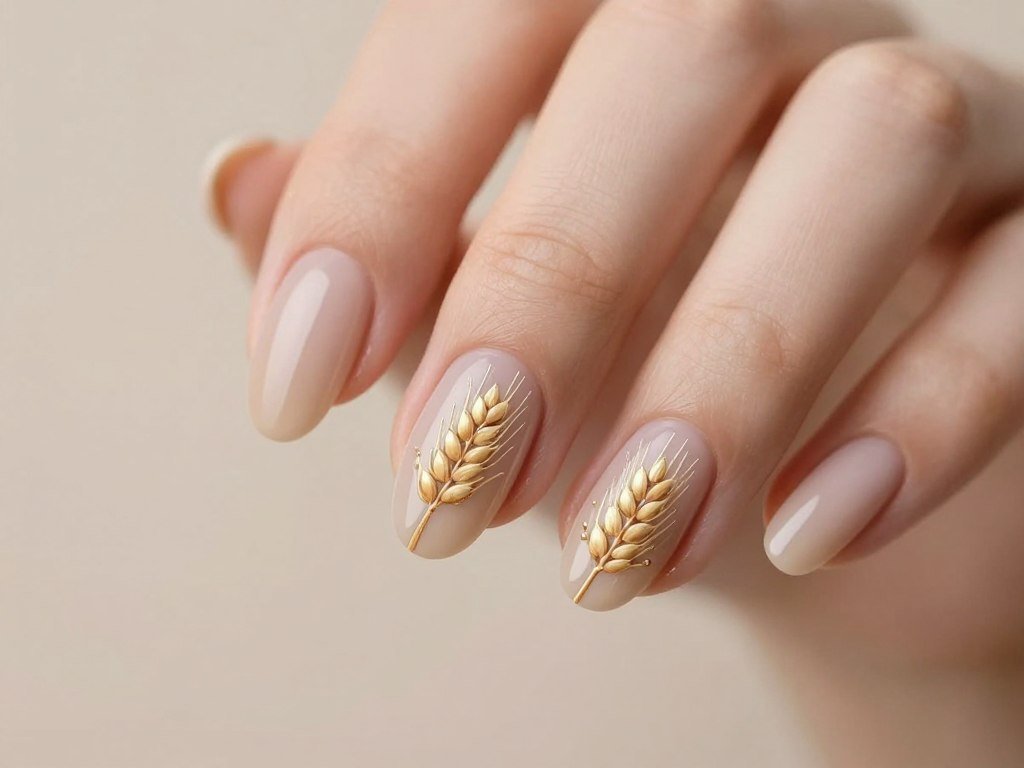
Wheat stalks create elegant, minimalist nail art. Golden grain patterns on nude base feel sophisticated and natural.
Apply a nude or beige base. Use thin brushes to paint delicate wheat stalks in gold or brown. Add small grain details along each stalk.
This understated design works for professional settings. The botanical theme stays on-trend while remaining subtle.
Elegant and Sophisticated Spring Nail Designs
Spring elegance combines soft colors with refined details. These designs work for formal events, weddings, and professional environments.
25. Pearl Accent Manicure
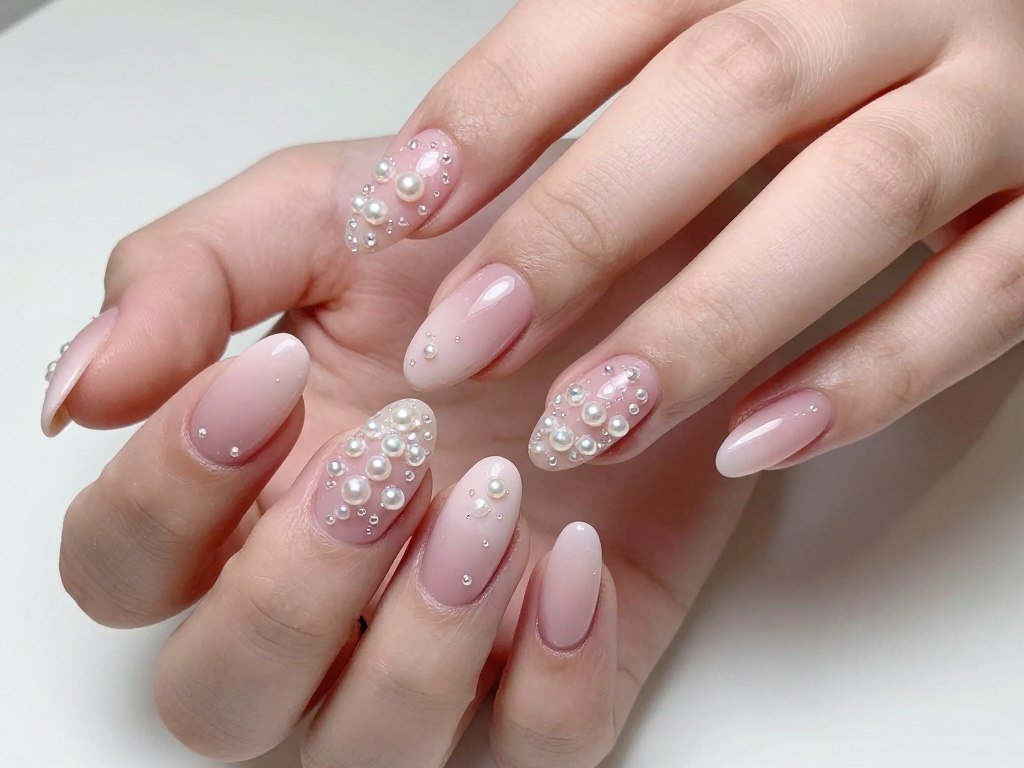
Pearl accents add luxury to spring nails. Small pearl embellishments on soft pink create timeless elegance.
Apply a soft pink or nude base. While top coat is still tacky, place small pearls using tweezers. Seal with additional top coat layers.
This design suits weddings and formal occasions. The pearls catch light beautifully without being overly flashy.
26. Rose Gold French Tip
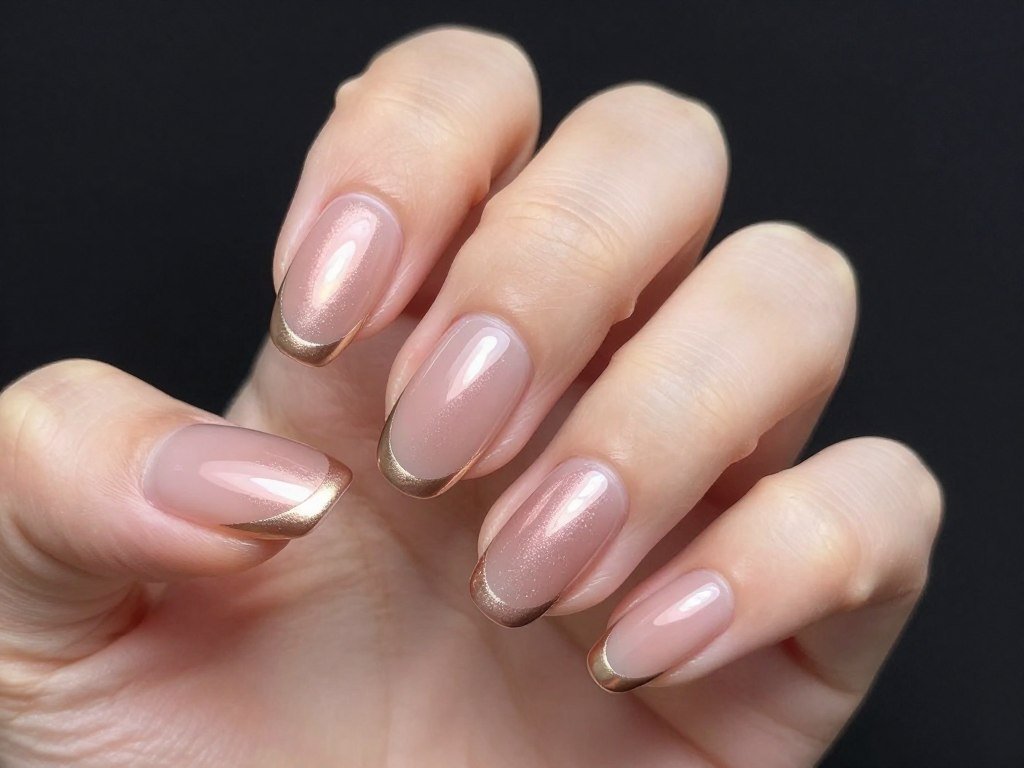
Rose gold elevates the classic French manicure. Metallic tips on nude base create modern sophistication.
Apply nude base coat. Paint tips with rose gold metallic polish. Keep lines clean and precise for a polished look.
This design bridges classic and contemporary styles. The rose gold adds warmth perfect for spring.
27. Nude with Gold Foil
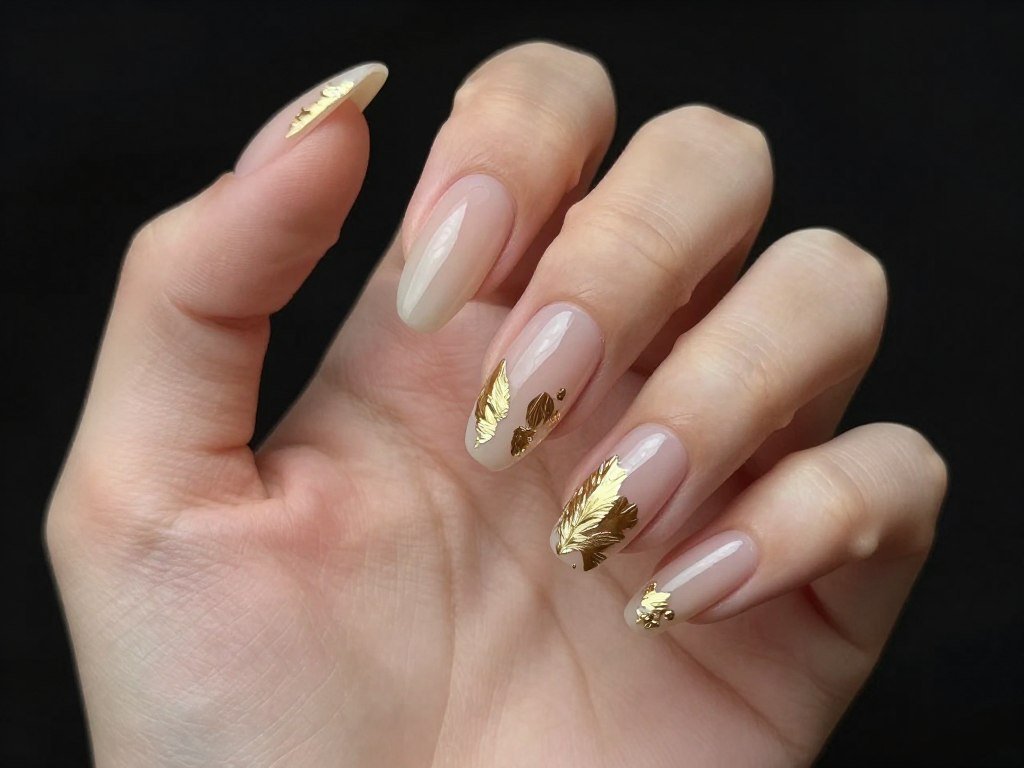
Gold foil creates artistic accents on nude nails. This minimalist approach feels expensive and refined.
Apply nude base and let dry. Add small pieces of gold leaf foil to wet top coat on accent nails. Seal with clear top coat.
The random foil placement makes each manicure unique. This design works for any occasion requiring subtle elegance.
28. Sheer Pink with Glitter
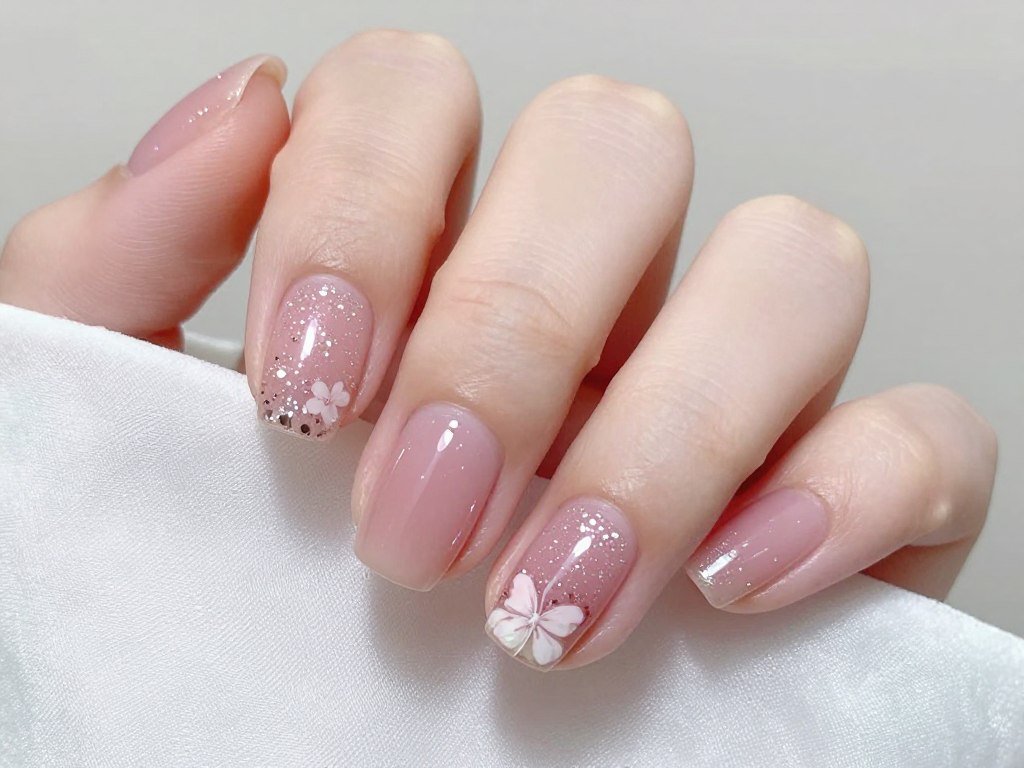
Sheer pink with fine glitter combines natural beauty with subtle sparkle. This understated design enhances rather than covers natural nails.
Apply sheer pink polish as base. Add a glitter top coat with fine particles. The sheerness lets your natural nail show through.
This design flatters all skin tones and nail lengths. Perfect for those preferring natural-looking manicures with a hint of glamour.
29. Champagne Shimmer
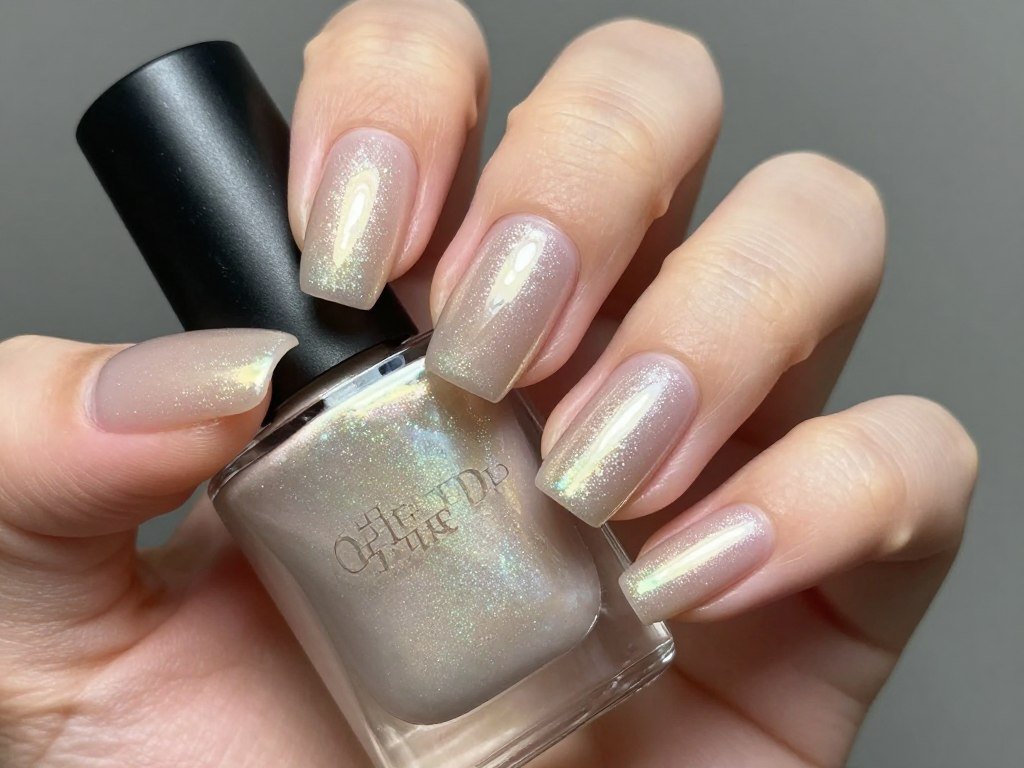
Champagne shimmer polish offers versatile elegance. The neutral metallic shade complements any outfit or occasion.
Apply two coats of champagne shimmer polish. The metallic particles catch light from all angles, creating dimensional color.
This fail-safe design works for every spring event. The sophisticated shade transitions seamlessly from day to night.
30. White Lace Pattern
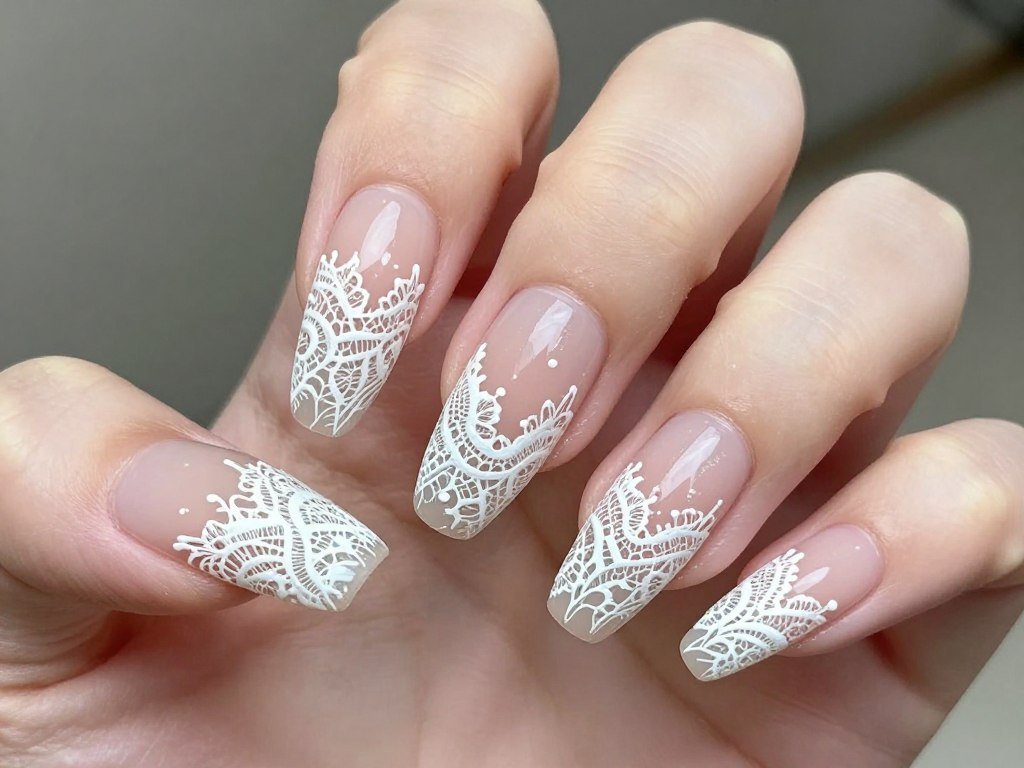
White lace patterns create bridal-worthy elegance. Intricate lace designs on nude base evoke vintage romance.
Start with nude or sheer pink base. Use white polish and a fine brush to create lace patterns with delicate swirls and dots.
This design requires steady hands but delivers stunning results. Perfect for weddings, graduations, or special spring celebrations.
Tips for Creating Perfect Spring Nail Art Designs
Achieving salon-quality nail art at home requires proper technique and preparation. These tips help ensure beautiful, long-lasting results for all spring nail designs.
Proper Nail Preparation
Clean nails create the best canvas for nail art. Remove all old polish completely. Push back cuticles gently with a cuticle pusher.
Buff nail surfaces lightly to create texture for polish adherence. Wipe nails with rubbing alcohol to remove oils. This preparation step prevents chipping and extends manicure life.
Shape nails before applying polish. File in one direction to prevent splitting. Choose a shape that complements your finger length and personal style.
Base Coat Importance
Never skip base coat. This protective layer prevents staining and creates a smooth surface for color application.
Base coat helps polish adhere better and last longer. Allow it to dry completely before applying color. Some base coats include strengthening ingredients that improve nail health.
For best results, choose a base coat that matches your nail needs. Ridge-filling base coats smooth uneven surfaces. Strengthening base coats help brittle nails.
Thin Coats Work Best
Multiple thin coats beat one thick coat every time. Thin layers dry faster and create smoother, more even coverage.
Apply polish in three strokes – one down the center, one on each side. This technique ensures even distribution. Wait between coats for proper drying.
Thick coats take forever to dry and often result in smudges or bubbles. Patience with thin layers delivers professional results.
Detail Work Techniques
Detail brushes make nail art possible. Invest in quality brushes in various sizes for different design elements.
Clean brushes immediately after use to maintain bristle shape. Use nail polish remover or brush cleaner. Store brushes flat or hanging to protect bristles.
Practice designs on paper or nail wheels before attempting on actual nails. This builds confidence and refines technique.
Top Coat Protection
Top coat seals your design and adds protective shine. Apply a generous layer over completely dry nail art.
Wrap the tip by running the brush along the free edge. This prevents chipping and extends manicure wear time.
Reapply top coat every two to three days to maintain shine and protection. Quick-dry top coats save time without sacrificing quality.
Spring Nail Color Trends and Shade Selection
Spring brings specific color trends each year. Understanding current shade preferences helps create on-trend nail designs that feel fresh and modern.
Pastel Power
Pastels dominate spring nail trends consistently. Soft blues, pinks, lavenders, and greens capture the season’s gentle energy.
This year’s pastels lean toward muted rather than candy-bright. Think dusty rose instead of bubblegum pink. These sophisticated pastels suit all ages and styles.
Mix pastels for dimension. Combine baby blue with mint green or lavender with peach. The soft colors complement each other beautifully.
Bold Brights Return
Vibrant shades balance pastel trends. Hot pink, electric blue, and sunny yellow make strong statements this spring.
Bold colors work especially well as accent nails paired with neutral bases. They also shine in mix match manicures where each nail showcases a different bright shade.
Don’t fear bright colors. Spring provides the perfect excuse to experiment with shades outside your comfort zone.
Nude Sophistication
Nude shades never go out of style. Spring nudes lean toward warm beiges and soft taupes rather than cool pinks.
The perfect nude complements your skin tone. Test shades on your nail bed rather than the bottle to see true color match.
Nude base provides the ideal canvas for nail art designs. The neutral background makes colors and patterns pop.
Metallic Accents
Metallics add spring glamour. Rose gold, champagne, and soft gold create elegant accents without overwhelming designs.
Use metallics strategically for maximum impact. Paint just the tips, add thin metallic lines, or use metallic foil for artistic touches.
Metallic polishes require careful application. Use thin coats and avoid over-brushing, which can create streaks.
Sheer Overlays
Sheer polishes create natural-looking manicures with subtle color. These washes of color enhance rather than cover natural nails.
Layer sheer shades for custom colors. A sheer pink over white creates a different effect than sheer pink alone.
Sheer formulas work beautifully for office-appropriate manicures. They provide polish without being too bold or distracting.
Maintaining Your Spring Nail Designs
Beautiful nail art deserves proper maintenance. These care tips extend manicure life and keep designs looking fresh longer.
Daily Protection Habits
Wear gloves when doing dishes or cleaning. Water and harsh chemicals break down polish quickly. Rubber gloves protect your manicure during household tasks.
Apply cuticle oil daily. This keeps the nail bed moisturized and prevents polish from lifting at the edges. Massage oil into cuticles and surrounding skin.
Avoid using nails as tools. Opening cans, peeling stickers, or scratching surfaces damages polish and natural nails. Use proper tools instead.
Touch-Up Techniques
Fix small chips immediately. Dab matching polish over the chip and blend gently. Seal with top coat once dry.
Refresh top coat every few days. This maintains shine and adds protective layers. Clean nails with rubbing alcohol before reapplying.
Address lifting edges promptly. Gently push back lifted polish or trim it away. Leaving loose edges leads to bigger chips.
Removal Best Practices
Remove polish properly to protect natural nails. Soak cotton pads in remover and press onto nails. Wait 30 seconds before wiping.
Never peel or pick polish off. This damages the top layer of your natural nail. Patient removal prevents nail damage.
Give nails occasional breaks between manicures. Even a few days without polish allows nails to breathe and recover.
Choosing Designs Based on Skill Level
Not all nail art requires advanced skills. Match designs to your ability level for best results and less frustration.
Beginner-Friendly Designs
- Solid pastel colors with glossy top coat
- Simple French manicure variations
- Dotted patterns using dotting tools
- Mix match solid color sets
- Shimmer and glitter polish application
- Basic gradient using sponge technique
- Striping tape geometric patterns
Intermediate Level Designs
- Simple floral patterns with few petals
- Geometric shapes with clean lines
- Ombre gradients with multiple colors
- Cherry blossom branch designs
- Basic butterfly or bee illustrations
- Marble swirl techniques
- Pearl or rhinestone application
Advanced Skill Designs
- Detailed butterfly wing patterns
- Intricate lace designs
- Realistic flower paintings
- Complex geometric patterns
- Pressed flower nail art with gel
- Multi-element nature scenes
- Fine line illustration work
Start with beginner designs to build confidence and skill. As techniques improve, gradually attempt more complex patterns. Every expert started with simple solid colors.
Essential Tools and Supplies for Spring Nail Art
The right tools make nail art easier and more enjoyable. Building a basic kit enables you to create most spring designs at home.
Must-Have Brushes
Detail brushes in various sizes handle different design elements. A fine liner creates thin lines and outlines. A flat brush works for broader strokes and filling.
Dotting tools create perfect circles for flowers, dots, and decorative elements. Purchase a set with multiple sizes for design versatility.
A fan brush helps with gradient application and texture effects. Clean-up brushes with angled tips remove polish around cuticles for neat edges.
Polish Collection Basics
Start with a good base coat and top coat. These essential products protect nails and seal designs.
Build a color collection gradually. Focus on spring staples first – white, black, nude, and a few pastels. Add bright and metallic shades as your collection grows.
Quality matters more than quantity. Invest in polishes with good pigmentation and smooth application. Cheap formulas often streak or require many coats.
Application Aids
Striping tape creates clean geometric lines without freehand painting. The thin tape comes in various colors including metallic options.
Nail guides help with French manicure tips and other shaped designs. Reusable silicone guides offer flexibility and durability.
A makeup sponge enables gradient and ombre techniques. Cut sponges into small wedges for nail-sized application.
Embellishment Options
Small pearls, rhinestones, and studs add dimensional details. Purchase variety packs to have options for different designs.
Gold and silver foil create artistic accents. Foil sheets or flakes apply over wet top coat for abstract metallic touches.
Pressed flowers or small dried botanicals work for nature-inspired designs. Source tiny flowers specifically sized for nail art.
Frequently Asked Questions About Spring Nail Designs
How long do spring nail designs typically last?
With proper application and care, spring nail designs last 7 to 14 days. Regular polish typically lasts one week, while gel polish extends to two weeks or longer. Applying quality base and top coat, avoiding water exposure, and wearing gloves during chores significantly extends manicure life. Touch up the top coat every few days to maintain shine and protection.
Can I create floral nail art without artistic skills?
Yes, simple floral designs work for beginners. Use dotting tools to create five-dot flowers that require no painting skills. Nail stickers and decals offer another option for detailed florals without freehand work. Start with simple daisy patterns using dots, then progress to more complex flowers as confidence grows. Practice on paper first to build technique.
What nail shape works best for spring designs?
Most spring designs work on any nail shape, but certain shapes showcase specific styles better. Almond and oval shapes flatter floral designs and provide good canvas space. Square nails suit geometric patterns and French manicures. Round nails work well for simpler designs and shorter lengths. Choose based on personal preference and finger shape rather than design requirements.
Should I use regular or gel polish for nail art?
Both regular and gel polish work for spring nail designs. Regular polish dries quickly and removes easily but chips faster. Gel polish lasts longer and maintains shine but requires UV lamp curing and special removal. For intricate designs, regular polish offers easier correction of mistakes. Gel works better for long-lasting manicures without frequent touch-ups.
How do I prevent smudging detailed nail art?
Allow each layer to dry completely before adding details. Use quick-dry top coat to set designs faster. Work in thin layers rather than thick applications. Avoid touching or using hands for at least 30 minutes after finishing. Consider using a fan or cool air setting on a hairdryer to speed drying without heat damage.
What colors complement spring nail designs best?
Spring palettes include pastels like baby blue, lavender, mint, peach, and powder pink. Bright shades like hot pink, sunny yellow, and electric blue also work well. Neutrals including nude, beige, and white provide versatile bases for nail art. Metallics like rose gold and champagne add elegant accents. Mix and match these color families for dimension and interest.
Embrace Spring with Beautiful Nail Designs
Spring nail designs celebrate renewal, growth, and vibrant energy. These 30 ideas offer endless inspiration for creating seasonal manicures that capture the essence of spring.
From soft pastels to bold brights, delicate florals to nature-inspired art, spring nails express personal style while embracing seasonal trends. Whether you prefer elegant sophistication or playful creativity, these designs provide options for every taste and skill level.
Start with simple designs that match your abilities, then challenge yourself with more complex patterns as skills develop. Remember that practice builds confidence and technique. Every manicure teaches something new.
Gather quality supplies, prepare nails properly, and enjoy the creative process. Spring nail art transforms ordinary manicures into expressions of seasonal joy. Let these designs inspire your next visit to the salon or your next DIY session at home.