
Fine hair doesn’t mean you have to settle for flat, lifeless style. Shaggy hairstyles for women over 50 offer the perfect solution for adding volume, texture, and movement to thin hair. These layered cuts create the illusion of fuller hair while keeping maintenance simple.
The right shag haircut can transform your look completely. Layers create dimension and body that fine hair naturally lacks. Strategic cutting techniques lift hair at the crown and add texture throughout, giving you that coveted voluminous appearance.
This guide showcases twenty stunning shaggy hairstyles specifically designed for mature women with fine, thin hair. Each style focuses on maximizing volume through expert layering, strategic texturing, and face-flattering shape. You’ll discover cuts that work with your hair’s natural texture rather than against it.
Table of Contents
Short Shaggy Pixie With Textured Layers
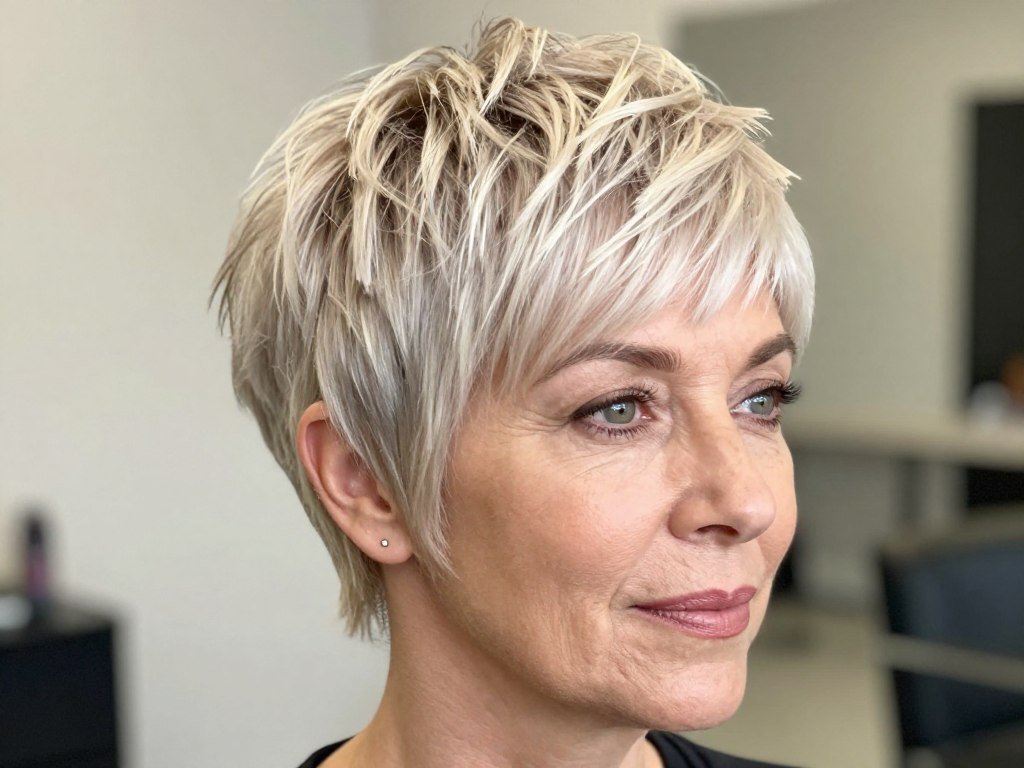
The short shaggy pixie delivers maximum volume with minimum fuss. This cut features choppy layers throughout the crown that create lift and dimension. The textured ends add movement while keeping the style youthful and modern.
This pixie works exceptionally well for fine hair because the short length prevents hair from being weighed down. Layers are cut at different lengths to create a feathered effect. The crown area gets special attention with shorter layers that stand up naturally.
Styling this cut takes just minutes each morning. Apply volumizing mousse to damp hair and blow dry using your fingers to lift at the roots. A bit of texturizing paste on the ends creates piece-y definition. The beauty of this style lies in its effortless appearance.
Ask your stylist for choppy layers throughout with the shortest layers at the crown. The sides should gradually get longer toward the nape. This creates the signature shaggy texture while maintaining a flattering shape around your face.
Medium Length Shag With Curtain Bangs
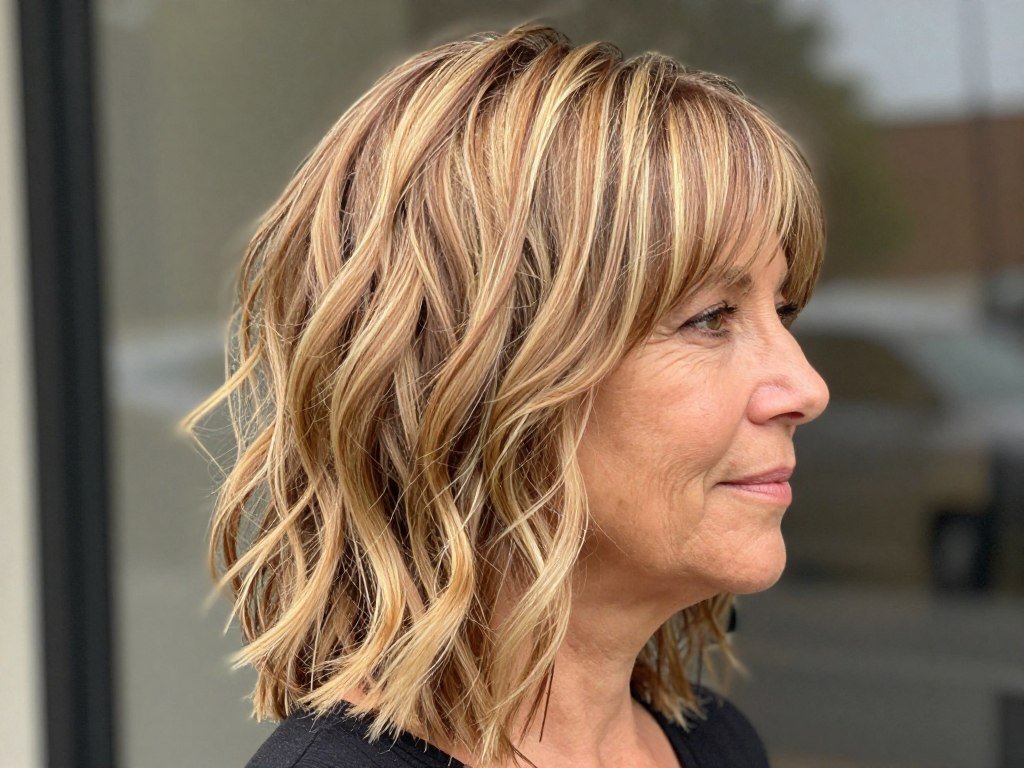
Curtain bangs paired with a medium shag create an incredibly flattering frame for your face. The bangs part naturally in the center and sweep to the sides, drawing attention to your eyes. This style adds volume through layered cutting techniques that work throughout the entire cut.
The layers in this shag start around the chin and continue downward. This placement creates movement without sacrificing length. The curtain bangs add a soft, feminine touch while hiding fine lines on the forehead. Together, these elements produce a style that looks fuller and more dimensional.
Blow drying with a round brush gives this style its signature volume. Focus the brush at the roots for lift, then work through mid-lengths and ends. The curtain bangs require special attention – blow dry them forward first, then sweep to the sides for that perfect curtain effect.
The key to this cut is requesting face-framing layers that start at cheekbone level. Your stylist should create curtain bangs that reach your cheekbones when blown straight. The rest of the hair gets layered in a graduated fashion to maintain body and shape.
Choppy Bob Shag With Volume at Crown
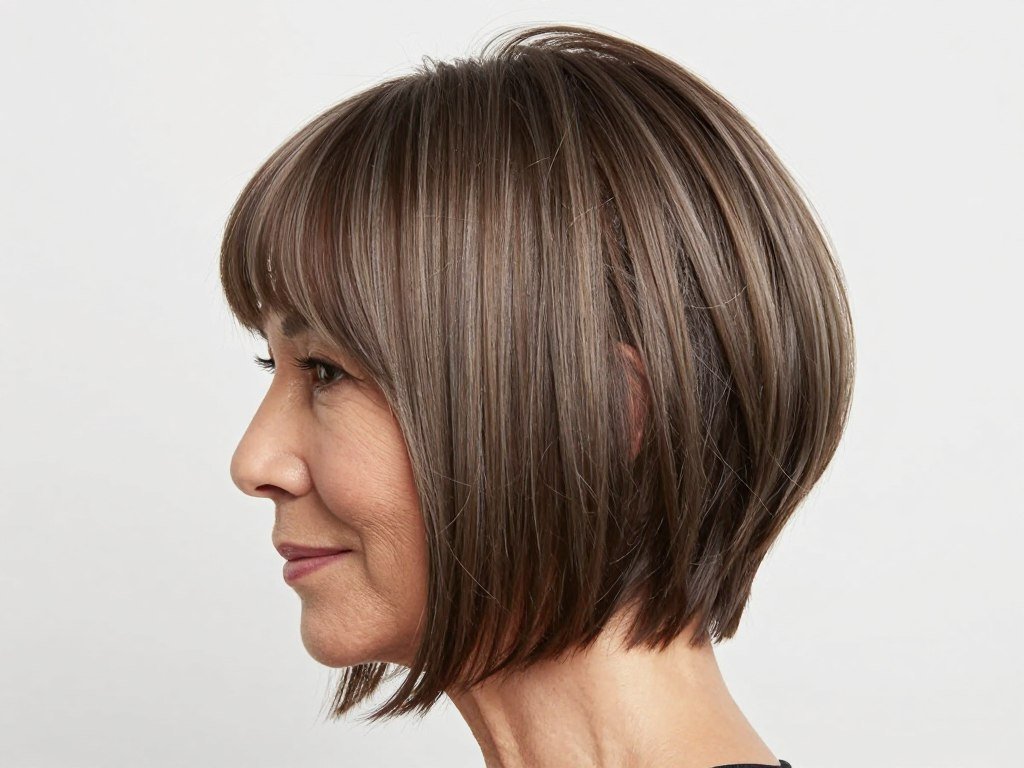
The choppy bob shag combines the classic bob length with shaggy texture for stunning results. This cut focuses volume at the crown while keeping ends slightly jagged for texture. The choppy layers create dimension that makes fine hair appear substantially thicker.
This style works by stacking shorter layers at the back and crown area. These layers lift away from the head naturally, creating height and body. The front sections frame the face with longer, piece-y layers that add softness around the jawline and cheeks.
Styling requires a blow dryer and round brush for best results. Dry the crown area first, lifting hair up and away from the scalp. Use a brush to create volume at the roots. The ends can be left slightly messy or smoothed for a more polished look, depending on your preference.
When booking your appointment, mention you want a choppy bob with stacked layers at the back. The crown should have the shortest layers for maximum lift. Request longer face-framing pieces that can be textured with a razor for that perfectly imperfect shaggy finish.
Layered Shag With Deep Side Part

A deep side part instantly adds volume to one side while creating dramatic movement. Combined with a layered shag cut, this styling technique maximizes the appearance of fullness. The asymmetrical part creates natural lift at the roots, making hair look thicker overall.
The layers in this cut work throughout all sections of hair. They start relatively short at the crown and gradually lengthen toward the ends. This graduated layering creates a cascade effect that adds both movement and dimension. The deep part emphasizes this movement beautifully.
Creating this style starts with blow drying on the opposite side of where you’ll part your hair. This builds volume at the roots. Once dry, flip hair over to your deep side part. Use your fingers to position the part where you want it, typically two to three inches from center.
Tell your stylist you want a heavily layered shag with the shortest layers starting around eye level. The layers should be cut to create maximum movement when styled with a deep side part. Request feathered layers around the face for a soft, flattering frame.
Shaggy Lob With Face-Framing Layers
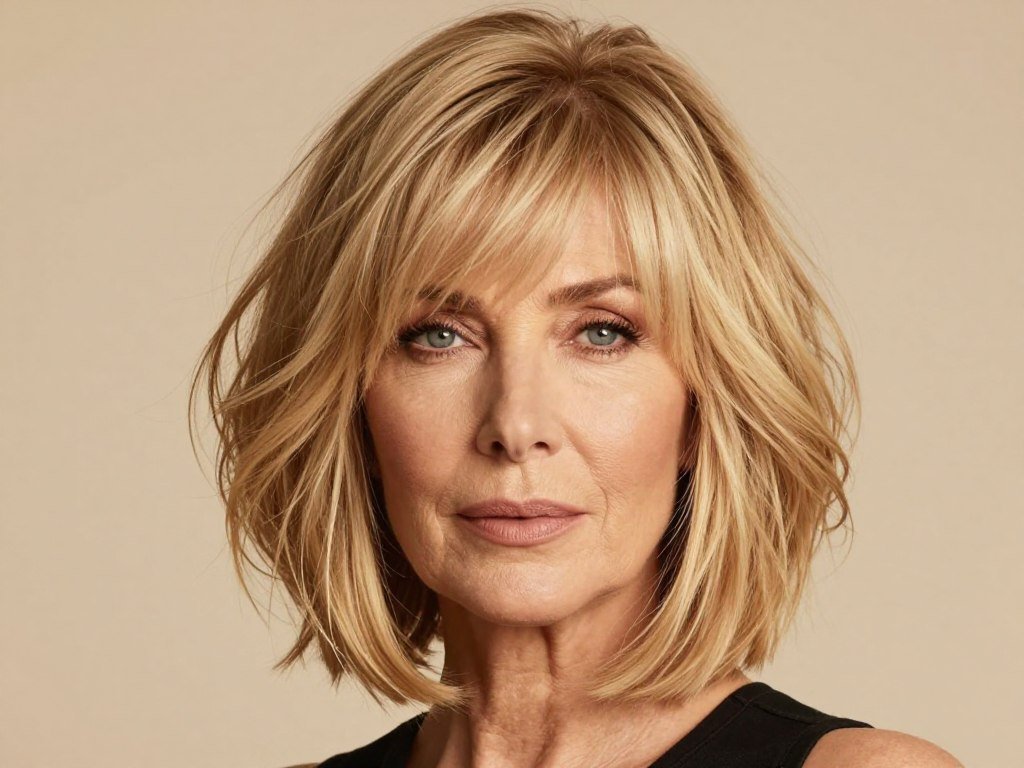
The long bob, or lob, becomes spectacular when cut with shaggy layers. Face-framing layers are cut shorter around the face and gradually blend into longer lengths at the back. This creates a flattering shape that draws attention to your best features while adding crucial volume to fine hair.
These face-framing layers work like magic for mature women. They soften the jawline and highlight cheekbones while creating movement around the face. The layers throughout the rest of the cut add body and prevent the style from looking flat or heavy.
Styling this cut involves blow drying with a round brush, focusing on the face-framing pieces first. Wrap these sections around the brush and direct heat downward for smooth, flattering movement. The rest can be dried with less precision, allowing natural texture to emerge for that effortless shaggy effect.
Request a lob length that hits between your chin and shoulders. The face-framing layers should start at your cheekbones and angle downward. Your stylist should use point-cutting or razor techniques on the ends to create that desirable shaggy texture throughout.
Essential Volumizing Products for Fine Hair
Transform your shaggy cut with professional-grade products designed specifically for fine, thin hair over 50. These stylist-recommended essentials create lasting volume and texture.
Textured Crop With Wispy Fringe

The textured crop offers a bold, modern take on short hair for mature women. This cut combines short sides and back with slightly longer, heavily textured top sections. A wispy fringe adds softness and frames the face beautifully while the texture creates impressive volume.
This style works particularly well for fine hair because the short length maximizes lift at the roots. The crop is cut in a way that removes weight while maintaining enough length on top to create shape. The wispy fringe is cut with a razor to create soft, piece-y ends that flutter naturally.
Styling requires minimal effort, making this an excellent low-maintenance option. Apply a volumizing mousse to towel-dried hair and blow dry while running your fingers through for natural texture. A small amount of styling cream on the fringe creates definition without weighing it down.
Ask your stylist for a short crop with the sides and back tapered close. The top should be left longer with choppy layers cut throughout. The fringe should be cut with a razor to create wispy, textured ends that can be styled forward or swept to the side.
Shoulder Length Shag With Tousled Waves
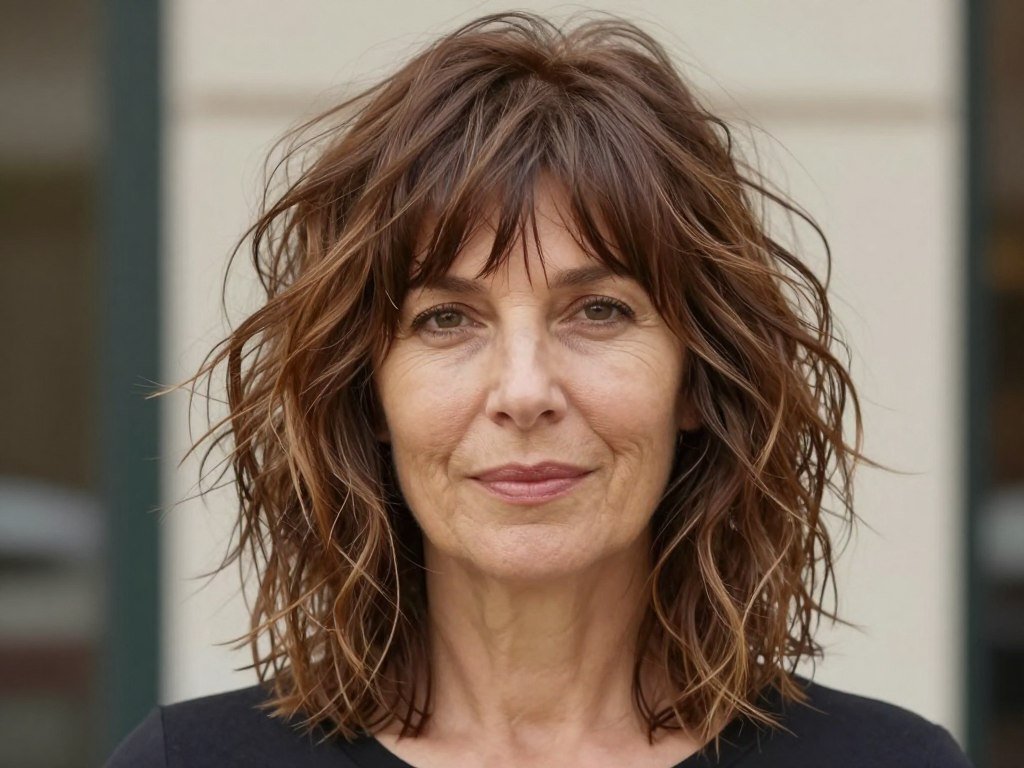
Tousled waves add incredible dimension to a shoulder-length shag cut. The waves create the appearance of thickness while the shaggy layers provide structure and shape. This combination results in a style that looks effortlessly chic and full of life.
The layers in this cut are essential for creating the wave pattern. They remove bulk and allow hair to move freely, forming natural-looking waves with minimal styling. The layers are cut throughout all sections, with particular attention paid to creating movement around the face and through the crown.
Creating these waves can be done with a curling iron, wand, or even braiding damp hair overnight. The key is to create loose, imperfect waves rather than tight curls. Once the waves are formed, gently separate them with your fingers and apply a texturizing spray for hold and definition.
When discussing this cut with your stylist, request shoulder-length hair with heavy layers throughout. The layers should start at chin level and continue through the ends. Ask for the cut to be done with a combination of shears and razor to create texture that holds waves beautifully.
Short Feathered Shag With Lift at Roots

Feathered layers create a light, airy quality that’s perfect for fine hair. This short shag features feathered layers throughout that lift away from the scalp for natural volume. The feathering technique removes weight while maintaining length, creating a fuller appearance without heaviness.
The cut focuses on creating lift at the crown and throughout the top sections. Feathered layers are achieved by using a specific cutting technique that creates soft, blended transitions between lengths. This results in hair that stands away from the scalp naturally, providing built-in volume.
Styling this cut is remarkably simple. The feathered layers naturally create volume when blow dried in any direction. Use a round brush at the crown to enhance lift, or simply blow dry with your fingers for a more casual look. The feathering creates texture that doesn’t require much product or manipulation.
Explain to your stylist that you want a short shag with feathered layers throughout. The crown should have the shortest layers to create maximum lift. The feathering technique should be used on all layers to create that soft, voluminous effect that makes fine hair look fuller.
Asymmetrical Shag With Longer Front Pieces

An asymmetrical cut adds modern edge to the classic shag. This style features longer pieces in the front that angle downward, creating visual interest and drawing the eye. The asymmetry adds dimension while the shaggy layers throughout provide volume and texture.
The longer front pieces frame the face beautifully on one side while the other side is cut shorter for contrast. This creates a flattering shape that works with many face shapes. The back and crown are cut with typical shag layering to maintain volume and movement throughout.
Styling emphasizes the asymmetrical nature of the cut. The longer side can be blown smooth or left with natural texture, while the shorter side is typically styled with more volume. This contrast creates the dramatic, eye-catching effect that makes this cut so special.
Request an asymmetrical cut with one side left significantly longer than the other. The longer side should extend to your collarbone or below, while the shorter side hits around ear length. The back should be layered in a standard shag pattern for volume and texture.
Chin Length Shag With Flipped Ends
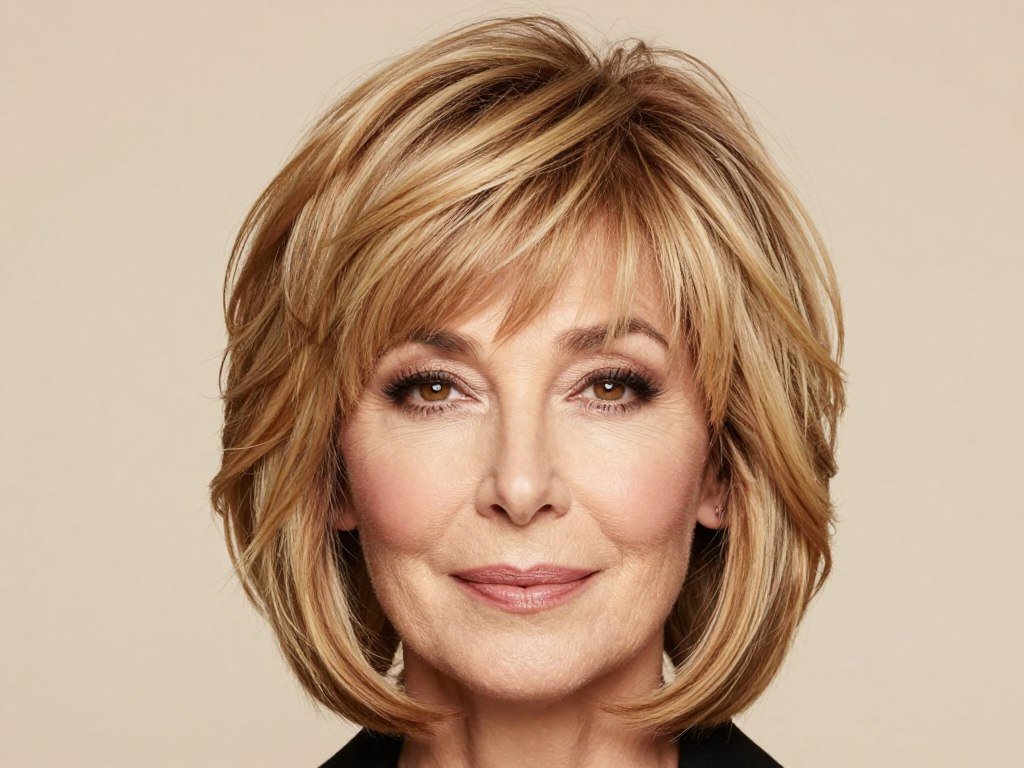
Flipped ends add a playful, youthful quality to a chin-length shag. The outward flip creates width at the bottom of the cut, balancing the face shape beautifully. Combined with shaggy layers throughout, this style delivers both volume and personality.
The layers in this cut are designed to encourage the outward flip. They’re cut at strategic lengths that naturally want to turn out when styled. The crown area features shorter layers for lift, while the perimeter is left slightly longer to create the flip effect.
Creating the flip requires a round brush and blow dryer. As you dry the ends, roll the brush outward to encourage the hair to flip out. You can also use a flat iron to flip the ends if you prefer. A light hold hairspray keeps the flip in place throughout the day.
Ask your stylist for a chin-length shag with layers that start at the cheekbones. The perimeter should be cut to encourage an outward flip when styled. Request choppy layers throughout the crown for volume, with the ends cut to create texture and movement.
Long Shag With Curtain Bangs and Balayage
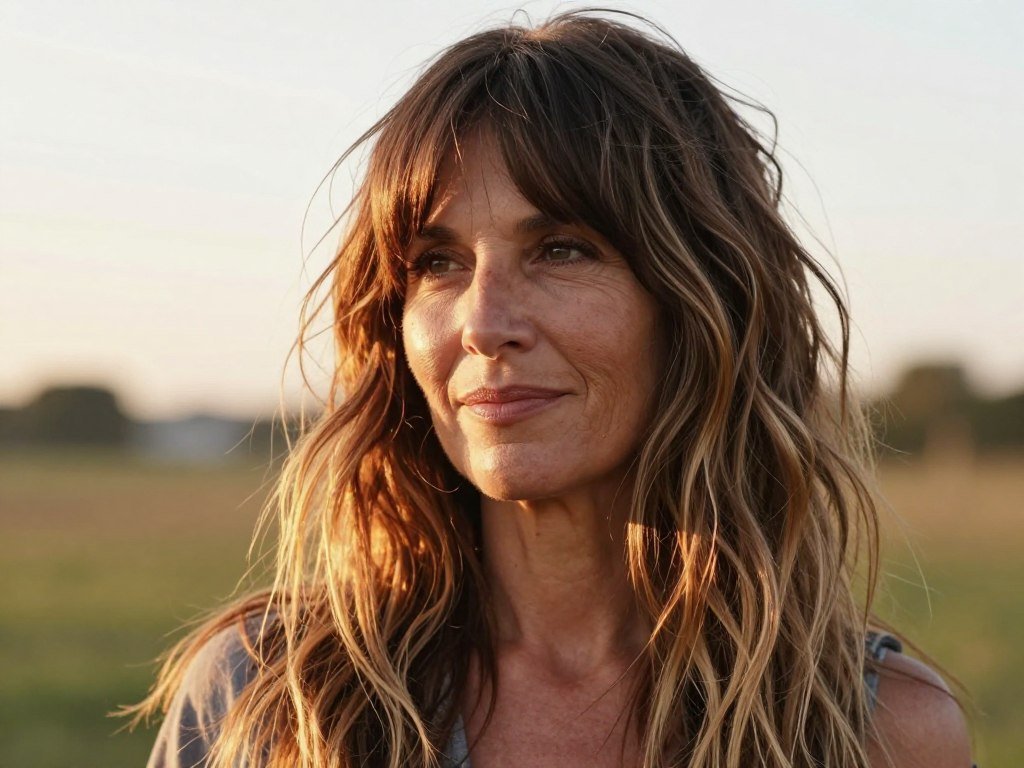
Balayage highlights combined with a long shag create stunning dimension. The hand-painted color technique adds depth and the illusion of thickness, while the shaggy cut provides movement and volume. Curtain bangs complete the look with face-framing softness.
This style works beautifully for women who want to maintain longer hair while addressing volume concerns. The layers are cut long, starting around the shoulders and continuing through the ends. This preserves length while removing weight that could pull hair down and make it look flat.
The balayage technique involves painting highlights throughout the hair in a way that mimics natural sun-lightening. This creates dimension that makes hair appear fuller and more textured. When combined with the shaggy layers and curtain bangs, the effect is truly transformative.
Request a long shag with layers starting at shoulder level. The curtain bangs should frame your face, parting naturally in the center. Discuss balayage placement with your colorist, focusing on face-framing pieces and throughout the crown for maximum dimension and the appearance of volume.
Professional Styling Tools for Perfect Volume
Achieve salon-quality results at home with the right tools. From volumizing round brushes to ionic blow dryers, these professional-grade tools help you create and maintain your shaggy style with ease.
Pixie Shag With Tapered Nape
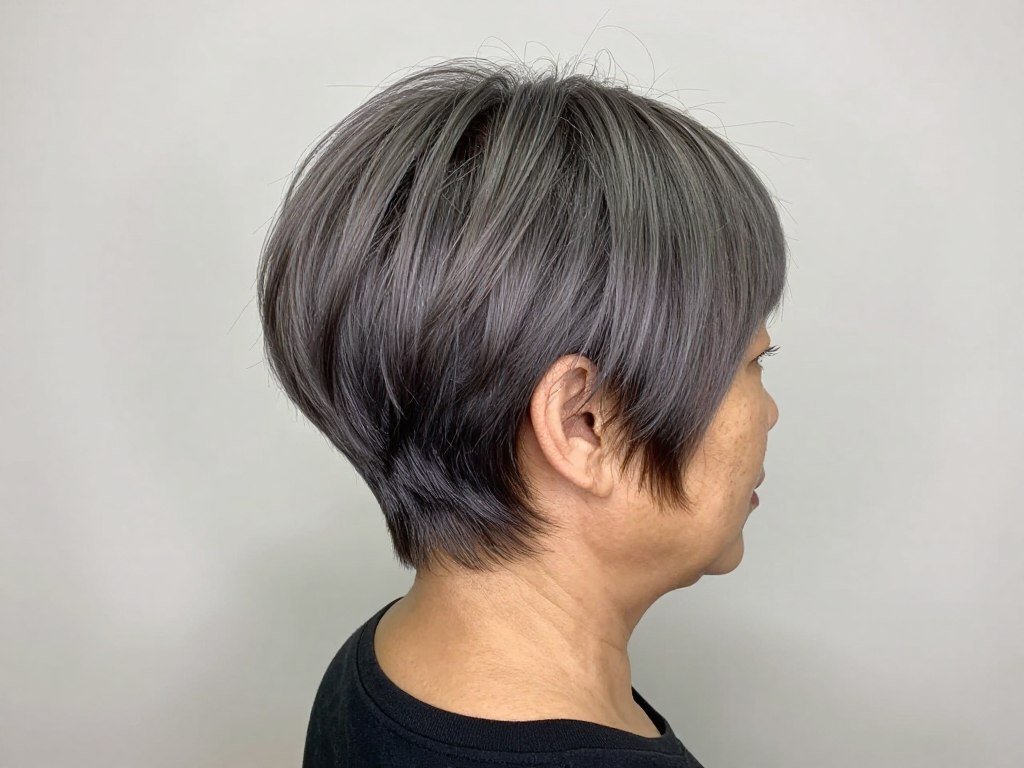
A tapered nape adds sophistication to the pixie shag. This detail creates a clean, polished look at the back while maintaining the textured, voluminous top characteristic of a shag. The taper creates beautiful shape that flatters the neck and head.
The cut features longer, choppy layers on top that create volume and texture. As the cut moves down toward the nape, the hair is gradually shortened and tapered close to the neck. This creates contrast between the fuller top sections and the sleek nape area.
Styling focuses on enhancing the volume on top while keeping the nape smooth. Apply mousse to the roots and blow dry the top sections using your fingers to create lift and texture. The tapered nape requires little attention – it lies naturally smooth against the neck.
Tell your stylist you want a pixie shag with significant length and texture on top. The sides should gradually taper shorter, with the nape cut very short and tapered close to the neck. Request choppy, piece-y layers on top for maximum volume and movement.
Medium Shag With Side-Swept Bangs

Side-swept bangs add elegance and versatility to a medium shag. The bangs sweep across the forehead, covering fine lines while drawing attention to the eyes. Combined with a shaggy layered cut, this style offers both sophistication and youthful energy.
The layers in this cut start at varying lengths throughout, creating dimension and movement. The side-swept bangs are cut longer than traditional bangs, allowing them to blend seamlessly into the face-framing layers. This creates a cohesive look that’s flattering and easy to style.
Styling the side-swept bangs requires a round brush and blow dryer. Dry the bangs sweeping them to your preferred side, using the brush to create a gentle curve. The rest of the hair can be blown dry for volume or allowed to air dry with natural texture for a more relaxed look.
Ask for a medium-length shag with layers throughout. The side-swept bangs should be cut long enough to tuck behind your ear if desired, typically around eyebrow length or slightly longer. Request the bangs be cut to naturally sweep to one side rather than hanging straight across.
Shaggy Layers With Blunt Perimeter
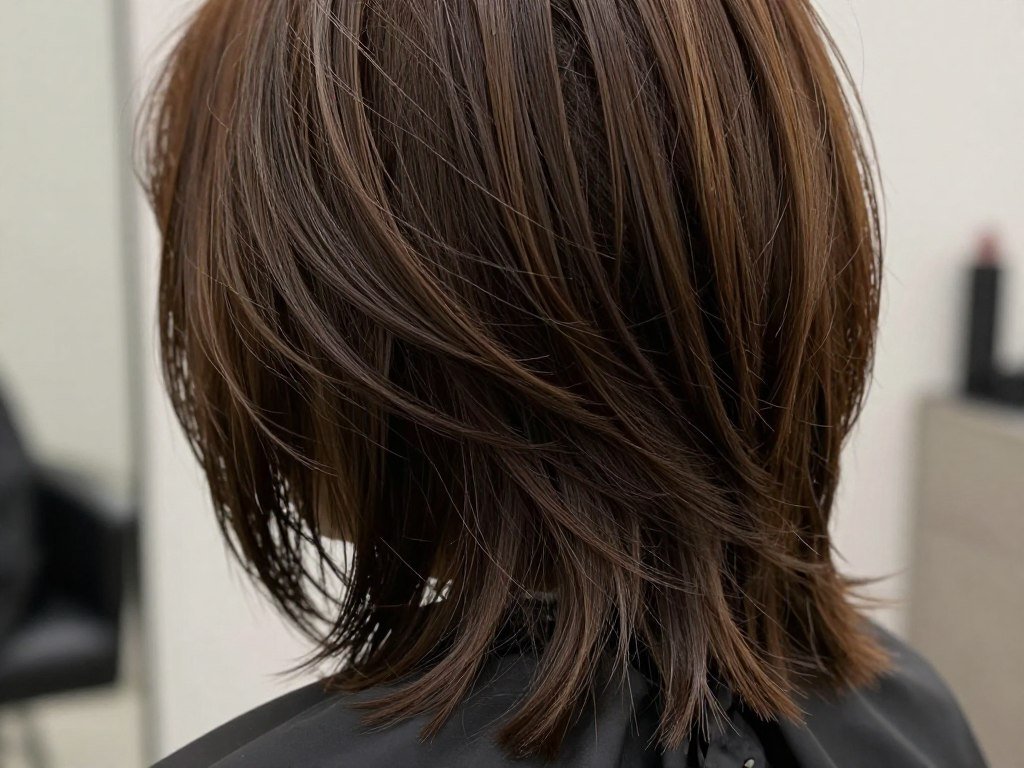
Combining shaggy layers with a blunt perimeter creates an interesting contrast. The layers throughout provide volume and movement, while the blunt bottom edge gives the style a modern, polished finish. This combination works especially well for fine hair that needs body without looking choppy at the ends.
The layers are cut shorter through the crown and mid-lengths, creating lift and dimension. However, the bottom perimeter is cut in a straight, blunt line rather than being layered or textured. This creates the appearance of fuller ends while maintaining the volume benefits of the layered top sections.
Styling emphasizes the volume through the layers while keeping the bottom edge smooth and neat. Use a round brush when blow drying to create lift at the roots and through the layers. The blunt perimeter can be smoothed with a flat iron or left with natural texture, depending on your preference.
Request shaggy layers throughout the top and crown sections for volume. The perimeter should be cut blunt and straight across rather than layered. This creates a line of demarcation between the textured layers and the solid bottom edge for a sophisticated finish.
Short Textured Shag With Dimensional Highlights
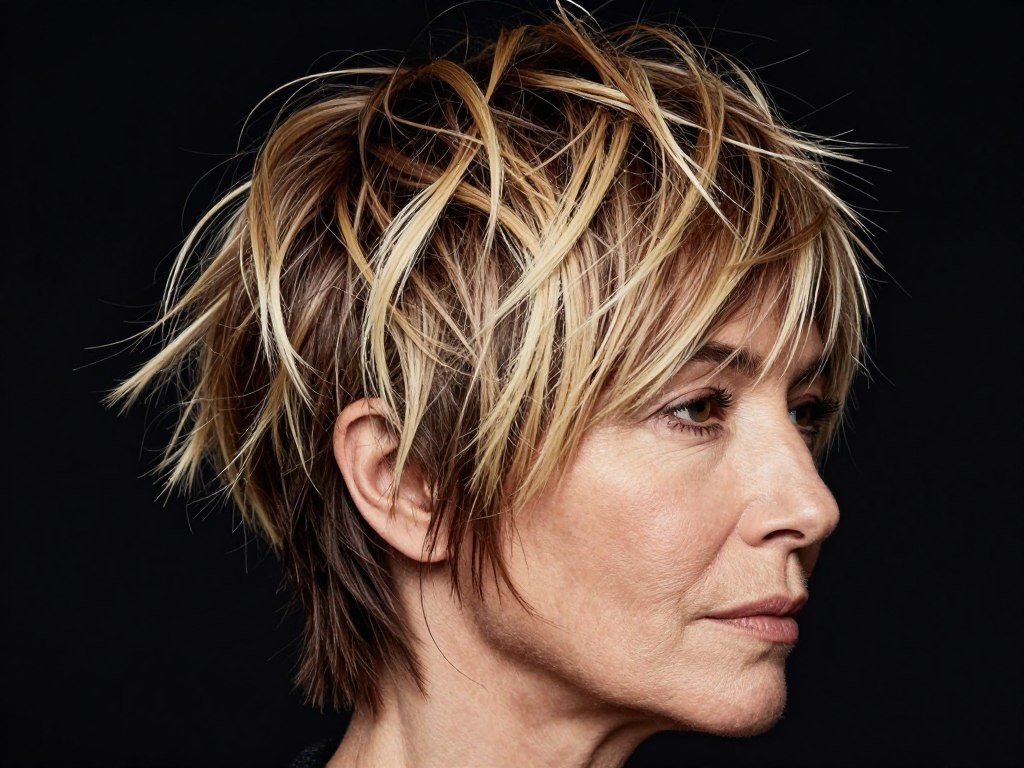
Dimensional highlights transform a short textured shag into something spectacular. Multiple tones woven throughout the cut create depth and the illusion of incredible thickness. The textured shag cut provides the structure while the highlights add visual interest and dimension.
This cut features short, choppy layers throughout that create maximum texture and volume. The highlights are placed strategically around the face and through the crown where they’ll be most visible. The combination of texture and color dimension makes fine hair appear substantially fuller.
The textured nature of this cut means styling can be quite casual. Apply a volumizing product and blow dry with your fingers, scrunching and lifting at the roots. The highlights will catch the light as you move, creating dynamic visual interest that draws attention to the texture and movement.
Ask for a short shag cut with heavy texturing throughout using both shears and razor techniques. Discuss highlight placement with your colorist, focusing on face-framing pieces and throughout the crown. Request multiple tones for the most natural, dimensional result that makes hair look thicker.
Collar Length Shag With Heavy Face-Framing
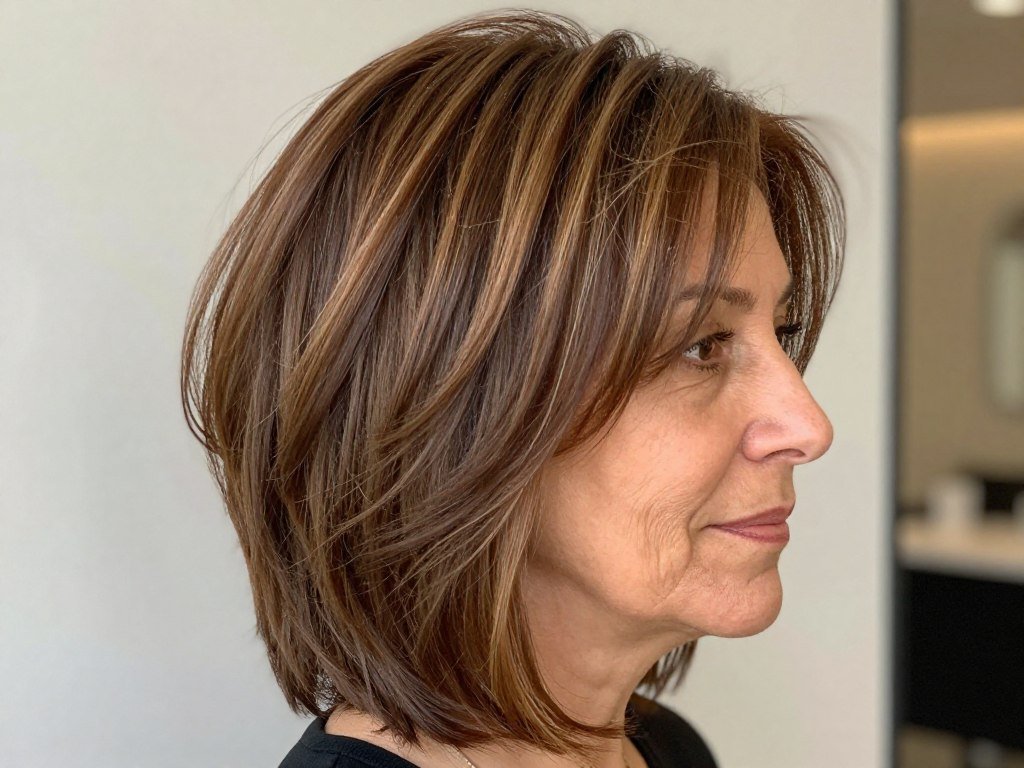
Heavy face-framing creates a flattering focal point in a collar-length shag. The layers around the face are cut significantly shorter than the rest, drawing attention to your features while adding volume where it matters most. This style flatters many face shapes and works beautifully with fine hair.
The face-framing layers start around the cheekbones and gradually blend into the longer collar-length hair. This creates a frame around the face that’s both flattering and volumizing. The rest of the cut features standard shag layering to maintain body and movement throughout.
Styling these face-framing layers requires attention to create the most flattering effect. Use a round brush to blow dry them, directing the hair slightly forward and then sweeping it back. This creates gentle movement that softly frames your face. The rest can be styled more casually with fingers or a paddle brush.
Request a collar-length shag with heavy, dramatic face-framing layers starting at cheekbone level. These layers should be cut two to three inches shorter than the rest of the hair. The back should be layered for volume with the longest length hitting at the collar.
Choppy Pixie Shag With Longer Top

Extra length on top gives this choppy pixie shag incredible styling versatility. The longer top sections can be styled up for volume, swept to the side for drama, or tousled for a casual look. The choppy texture throughout ensures the cut never looks flat or boring.
The cut features short sides and back with significantly longer top sections. The top is heavily layered and textured to create piece-y, movable strands. This length difference creates dimension and allows for various styling options while maintaining the volume benefits of a short cut.
Styling options are nearly endless with this cut. Use mousse and blow dry the top straight up for maximum height. Apply wax and style it messy for a casual weekend look. Smooth it to one side for sophistication. The versatility makes this an excellent choice for women with active lifestyles.
Ask for a pixie cut with the sides and back kept short, while the top is left significantly longer – typically three to four inches. The top should be heavily layered and textured with choppy, piece-y cuts. This creates the perfect canvas for various styling options.
Shoulder Shag With Soft Waves and Balayage

Soft waves and balayage create a dreamy, romantic version of the classic shag. The waves add body and movement while the balayage creates dimensional color that makes hair appear thicker. This combination results in a style that’s both beautiful and volumizing for fine hair.
The shag is cut with layers starting at the shoulders and continuing through the ends. This length is ideal for creating soft, flowing waves that don’t look overly styled. The balayage is painted from mid-lengths to ends, creating a natural sun-kissed effect that adds depth and dimension.
Creating soft waves involves using a large barrel curling iron or wand. Wrap sections loosely around the barrel, alternating directions for a natural look. Once all sections are waved, brush through gently with your fingers or a wide-tooth comb. Apply a light texturizing spray for hold and definition.
Request a shoulder-length shag with long layers throughout. The layering should be subtle rather than choppy for this softer look. Discuss balayage placement with your colorist, typically starting at mid-lengths and painting toward the ends for a natural, sun-lightened appearance that adds dimension.
Complete Volumizing System for Fine Hair
Transform your shaggy style with our curated collection of volumizing essentials. This complete system includes shampoo, conditioner, mousse, texturizing spray, and styling tools recommended by top hairstylists for women over 50.
Layered Bob Shag With All-Over Texture

All-over texture creates consistent volume throughout a layered bob shag. Every section is cut with texture in mind, creating a cohesive look that’s full of movement and dimension. This approach ensures that fine hair looks thick and full from every angle.
The cut involves texturing every layer from the crown to the ends. This is achieved through a combination of point cutting, slide cutting, and sometimes razor work. The result is a cut where every strand contributes to the overall volume and texture rather than lying flat against the head.
Styling emphasizes the natural texture created by the cut. Apply a volumizing spray to damp hair and scrunch while blow drying. You can also let it air dry and use your fingers to enhance the piece-y texture. The beauty of this cut is that it looks great with minimal styling effort.
Ask your stylist for a bob-length shag with heavy texturing throughout every section. Request that they use multiple cutting techniques to create maximum texture. The result should be a cut where no two strands are exactly the same length, creating natural, built-in volume and movement.
Angled Shag With Shorter Back

An angled shag creates dramatic shape with the back cut significantly shorter than the front. This creates a flattering line that draws the eye forward while the shorter back prevents the style from weighing down and losing volume. The angle adds modern edge to the classic shag.
The cut features stacked layers in the back that create volume and height at the crown. The sides gradually get longer as they move toward the front, where the longest pieces frame the face. This angling creates beautiful shape and ensures the style maintains its form and volume.
Styling involves enhancing the volume at the crown while smoothing the angled sides. Use a round brush to blow dry the back sections, lifting them up and away from the head. The longer front pieces can be smoothed with a brush or left with natural texture, depending on your preference.
Request an angled bob with a shaggy texture throughout. The back should be cut short with stacked layers for maximum volume. The sides should angle down toward the front, with the longest pieces reaching your collarbone or below. Heavy layering throughout creates the shaggy texture.
Long Feathered Shag With Maximum Movement

Feathered layers create incredible movement in a long shag. The feathering technique softens the edges of each layer, allowing them to blend seamlessly while maintaining their individual movement. This creates a flowing, dynamic style that never looks static or flat.
The feathered layers start around shoulder level and continue through the ends. Each layer is cut with a technique that creates soft, tapered edges rather than blunt lines. This allows the layers to move independently, creating that flowing, feathered effect that adds so much dimension to fine hair.
Styling can be minimal with this cut because the layers naturally create movement. Blow dry with your fingers, scrunching and lifting as you go. Add a texturizing spray for definition. The feathered layers will move beautifully as you move, creating constant visual interest and the appearance of thickness.
Ask for a long shag with feathered layers starting at the shoulders. Emphasize that you want maximum movement, so the layers should be cut with soft, tapered edges using a feathering technique. The result should be a cut that moves and flows with incredible dimension and body.
Essential Styling Tips for Shaggy Hairstyles
Product Selection
Choosing the right products makes all the difference for fine hair. Volumizing mousse applied to roots provides lift that lasts all day. Texturizing spray adds grip and dimension without weight. Lightweight styling creams define layers without making hair look greasy.
Avoid heavy oils and thick serums that weigh fine hair down. Look for products specifically labeled for fine or thin hair. These formulations provide styling benefits without the heaviness that causes volume loss.
Dry shampoo is your secret weapon for maintaining volume between washes. Apply it at the roots on day two or three to absorb oil and boost volume. It also adds texture that makes styling easier and helps your shaggy cut look freshly styled.
Blow Drying Techniques
Proper blow drying creates volume that lasts. Always start at the roots, directing heat up and away from your scalp. This lifts hair at the base where volume matters most. Use a round brush at the crown for maximum lift.
Dry your hair upside down for added body throughout. Flip your head over and blow dry from underneath, scrunching with your hands. Once mostly dry, flip back up and smooth the surface layer for a polished finish with volume underneath.
Don’t over-dry your hair, as this can make it look flat and lifeless. Leave it slightly damp and allow it to finish drying naturally. This prevents heat damage while maintaining the volume you’ve created with your blow dryer.
Maintenance Schedule
Regular trims keep your shaggy cut looking its best. Book appointments every six to eight weeks to maintain the shape and remove split ends. Shaggy cuts can lose their structure when layers grow out unevenly.
Between cuts, use a good quality shampoo and conditioner designed for fine hair. These products cleanse without stripping natural oils that protect your hair. Condition only the ends to avoid weighing down roots.
Deep condition once weekly to maintain hair health. Apply a lightweight mask to mid-lengths and ends, avoiding the roots. This keeps hair soft and manageable without causing volume loss at the crown.
Color Considerations
Color adds dimension that makes fine hair look thicker. Highlights and lowlights create depth that tricks the eye into seeing more volume. Discuss dimensional color techniques with your stylist for best results.
Avoid single-process all-over color which can make hair look flat. Instead, choose techniques like balayage or foil highlights that create variation. This dimensional color catches light differently, creating the illusion of texture and fullness.
Gray coverage can be achieved while maintaining dimension. Ask your colorist to leave some lighter pieces around your face even when covering gray. This creates a natural, multidimensional result that’s flattering and volumizing.
Choosing the Right Shaggy Style for Your Face Shape
Oval Face Shape
Oval faces have balanced proportions that work with virtually any shaggy style. This versatile face shape can handle dramatic angles, heavy bangs, or soft layers equally well. Consider your personal style preferences when choosing.
- Medium to long shags with curtain bangs frame features beautifully
- Asymmetrical cuts add modern edge without overwhelming proportions
- Side-swept bangs create softness and draw attention to eyes
- Avoid styles that add too much height on top, which can elongate the face
Round Face Shape
Round faces benefit from shaggy styles that create length and angles. The goal is to add vertical lines that elongate while avoiding width at the sides. Strategic layering achieves this beautifully.
- Long shags with face-framing layers create length and definition
- Deep side parts add asymmetry that flatters round faces
- Avoid blunt, chin-length cuts that emphasize roundness
- Angled styles with longer front pieces create slimming vertical lines
Square Face Shape
Square faces have strong jawlines that benefit from softening layers. Shaggy cuts with wispy, textured layers around the face create flattering contrast to angular features. Avoid blunt lines that emphasize squareness.
- Soft, feathered layers around the jawline create flattering softness
- Textured, piece-y ends break up angular lines beautifully
- Side-swept or curtain bangs draw attention to eyes rather than jaw
- Avoid blunt bobs or one-length cuts that emphasize jaw angles
Heart Face Shape
Heart-shaped faces have wider foreheads and narrower chins. The ideal shaggy cut adds width at the jawline while minimizing forehead width. Strategic layer placement achieves this balance perfectly.
- Chin-length shags with outward-flipped ends balance narrow chins
- Side-swept bangs minimize forehead width attractively
- Avoid short pixies that emphasize the wide forehead-narrow chin contrast
- Layers that start at chin level add flattering width where needed
Common Styling Mistakes to Avoid
Do These Things
- Use volumizing products specifically designed for fine hair
- Blow dry with your head upside down for extra volume
- Get regular trims every 6-8 weeks to maintain shape
- Apply product to roots for lift where it matters most
- Use a round brush at the crown for maximum volume
- Finish with light texturizing spray for hold and definition
- Consider dimensional color to create appearance of thickness
- Sleep on a silk pillowcase to prevent breakage and frizz
Avoid These Mistakes
- Using heavy products that weigh down fine hair
- Over-washing hair which strips natural oils and volume
- Brushing hair too aggressively which causes breakage
- Applying conditioner to roots which causes flatness
- Over-drying hair with high heat which damages strands
- Waiting too long between trims allowing shape to be lost
- Choosing single-process color that makes hair look flat
- Pulling hair back tightly which stresses fine strands
Frequently Asked Questions About Shaggy Hairstyles
Will a shag haircut make my fine hair look thinner?
No, a properly executed shag actually makes fine hair look fuller. The layers create dimension and movement that tricks the eye into seeing more volume. The key is having an experienced stylist who knows how to layer fine hair without removing too much bulk. Strategic layering adds body while maintaining enough density to look thick and full.
How often should I wash my shaggy hairstyle?
For fine hair, washing every two to three days is typically ideal. Overwashing strips natural oils that provide volume and protection. Use dry shampoo between washes to absorb oil at roots and maintain volume. This schedule keeps hair clean while preserving the natural texture and body that makes shaggy styles look their best.
Can I get a shag if I have naturally straight hair?
Absolutely! Shags work beautifully on straight hair. The layers create movement and dimension even without natural wave or curl. Straight hair actually shows the precision of the cut nicely. Use volumizing products and proper blow drying techniques to create body and texture. Many women with straight, fine hair find shags easier to style than blunt cuts.
What products are essential for styling a shag haircut?
Essential products include volumizing mousse for the roots, texturizing spray for definition, and lightweight styling cream for the ends. A good heat protectant is crucial before blow drying. Dry shampoo helps maintain volume between washes. Choose products specifically formulated for fine hair to avoid weighing it down. Quality products make a significant difference in achieving volume and holding your style.
How long does it take to style a shaggy haircut daily?
Most shaggy cuts take 10 to 15 minutes to style. Short shags may take less time, while longer versions might need a bit more. The beauty of shags is they’re meant to look slightly undone, so they don’t require perfect styling. Apply volumizing product, blow dry with a round brush at the crown, and you’re done. Many women find shags easier to style than other cuts.
Will a shag work with my curly or wavy hair?
Shags work wonderfully with naturally wavy or curly hair. The layers enhance natural texture and prevent the triangular shape that can happen with one-length cuts. The shaggy layers allow curls and waves to form naturally while reducing bulk. Many women with wavy or curly hair find shags are the most flattering cut for their texture.
Transform Your Look With the Perfect Shaggy Hairstyle
Shaggy hairstyles offer women over 50 with fine, thin hair the perfect solution for creating volume, dimension, and style. These twenty cuts demonstrate how strategic layering, texturing, and styling can transform flat hair into full, gorgeous style. Each cut focuses on maximizing volume through expert techniques that work with fine hair rather than against it.
The versatility of shaggy cuts means there’s a perfect option for every face shape, hair length preference, and personal style. From short pixies to long flowing layers, these cuts prove that fine hair can look thick, full, and absolutely stunning. The key lies in choosing the right cut for your specific features and learning the proper styling techniques.
Working with an experienced stylist who understands fine hair is essential. Bring reference photos to your appointment and discuss your styling routine honestly. The right cut should fit your lifestyle while making your hair look its absolute best. With the proper cut, products, and techniques, your fine hair can look fuller than you ever thought possible.