
Hand embroidery letters add a personal touch to any project. Whether you’re customizing clothing, creating wall art, or personalizing gifts, beautiful lettering transforms ordinary fabric into something special. This guide presents 25 unique embroidery letter ideas that range from simple elegance to intricate designs.
Each style offers different visual appeal and complexity. You’ll find options perfect for beginners and challenging designs for experienced embroiderers. Let’s explore these beautiful hand embroidery letter ideas that will elevate your creative projects.
Table of Contents
Classic Embroidery Letter Styles
Classic lettering never goes out of style. These timeless designs work beautifully on any project and provide the foundation for mastering hand embroidery letters.
1. Simple Stem Stitch Script
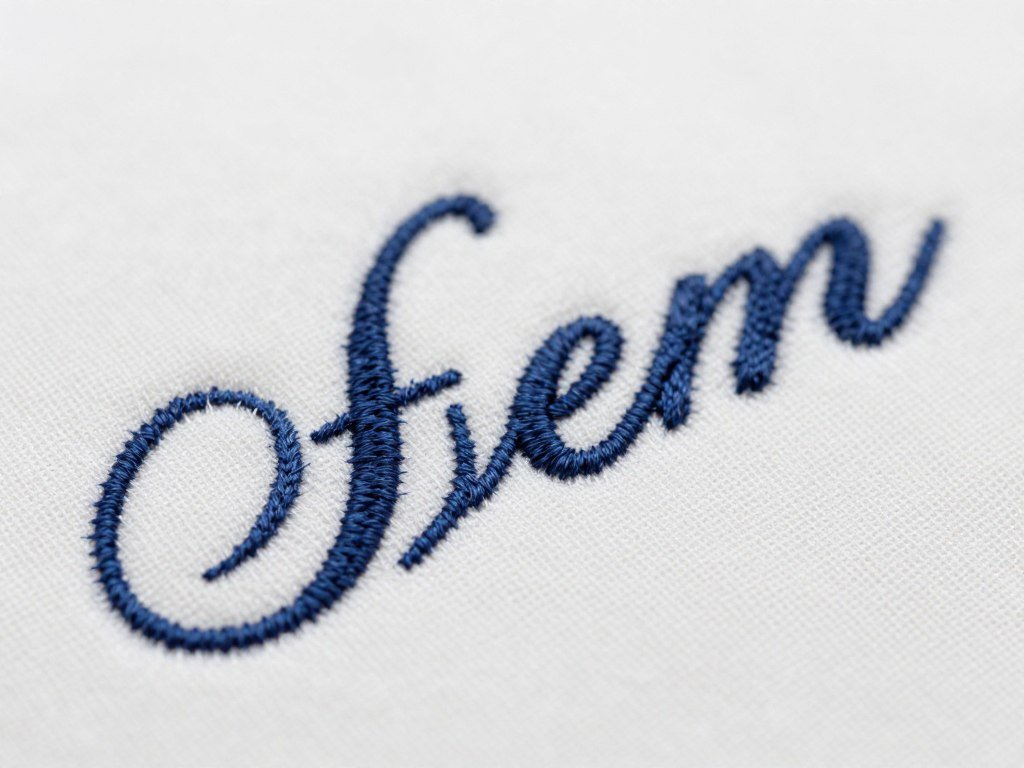
The stem stitch creates elegant flowing letters perfect for cursive fonts. This technique works wonderfully for thin letters and delicate script styles. Use two or three strands of embroidery floss for best results.
Start at the baseline of each letter and work upward. Keep your stitches consistent in length, about 3-4mm each. The stem stitch naturally curves, making it ideal for script fonts with tight curves and flowing connections.
Difficulty: Beginner | Best Thread: 2-3 strands cotton floss | Ideal Fabric: Cotton, linen
2. Bold Satin Stitch Capitals
Satin stitch fills create thick letters with smooth, glossy surfaces. This classic technique requires patience but delivers stunning results. Use three to six strands embroidery floss depending on your letter size.
Work from one edge of the letter to the other with parallel stitches. Keep tension consistent to avoid puckering. The satin stitch works best for block letters and geometric designs where clean edges matter most.
Difficulty: Intermediate | Best Thread: 4-6 strands cotton floss | Ideal Fabric: Tightly woven cotton
3. Back Stitch Outline Letters
Back stitch creates clean, precise outlines perfect for thin letters and minimalist designs. This versatile embroidery stitch works equally well for straight lines and curves. Use one to two strands for delicate work or three strands for more visible lettering.
Keep your stitch length uniform, typically 2-3mm for small letters. The back stitch provides excellent control, making it perfect for complex letter shapes and tight corners. This technique suits both modern and traditional lettering styles.
Difficulty: Beginner | Best Thread: 2-3 strands cotton floss | Ideal Fabric: Any weight cotton or linen
4. Chain Stitch Decorative Letters
The chain stitch adds texture and dimension to embroidered letters. Each loop connects to the next, creating a rope-like appearance. This embroidery stitch works beautifully for thicker letters and decorative fonts.
Use three to four strands of embroidery floss for visible texture. The chain stitch handles curves naturally, making it perfect for rounded letters. This technique adds vintage charm to any embroidery project.
Difficulty: Beginner-Intermediate | Best Thread: 3-4 strands cotton floss | Ideal Fabric: Medium-weight cotton
Modern Minimalist Embroidery Letter Ideas
Contemporary designs focus on clean lines and simple elegance. These modern approaches to embroidering letters suit minimalist aesthetics and contemporary home decor.
5. Single-Line Sans Serif
Ultra-minimal letters created with a single line of back stitch or running stitch. Use just one or two strands of thread for the most delicate effect. This style embodies modern simplicity and works perfectly for subtle monograms.
Choose clean, geometric fonts without serifs. The minimalist approach requires precise stitch placement. Each stitch should follow the letter outline exactly to maintain crisp lines.
Difficulty: Beginner | Best Thread: 1-2 strands cotton floss | Ideal Fabric: Lightweight cotton or silk
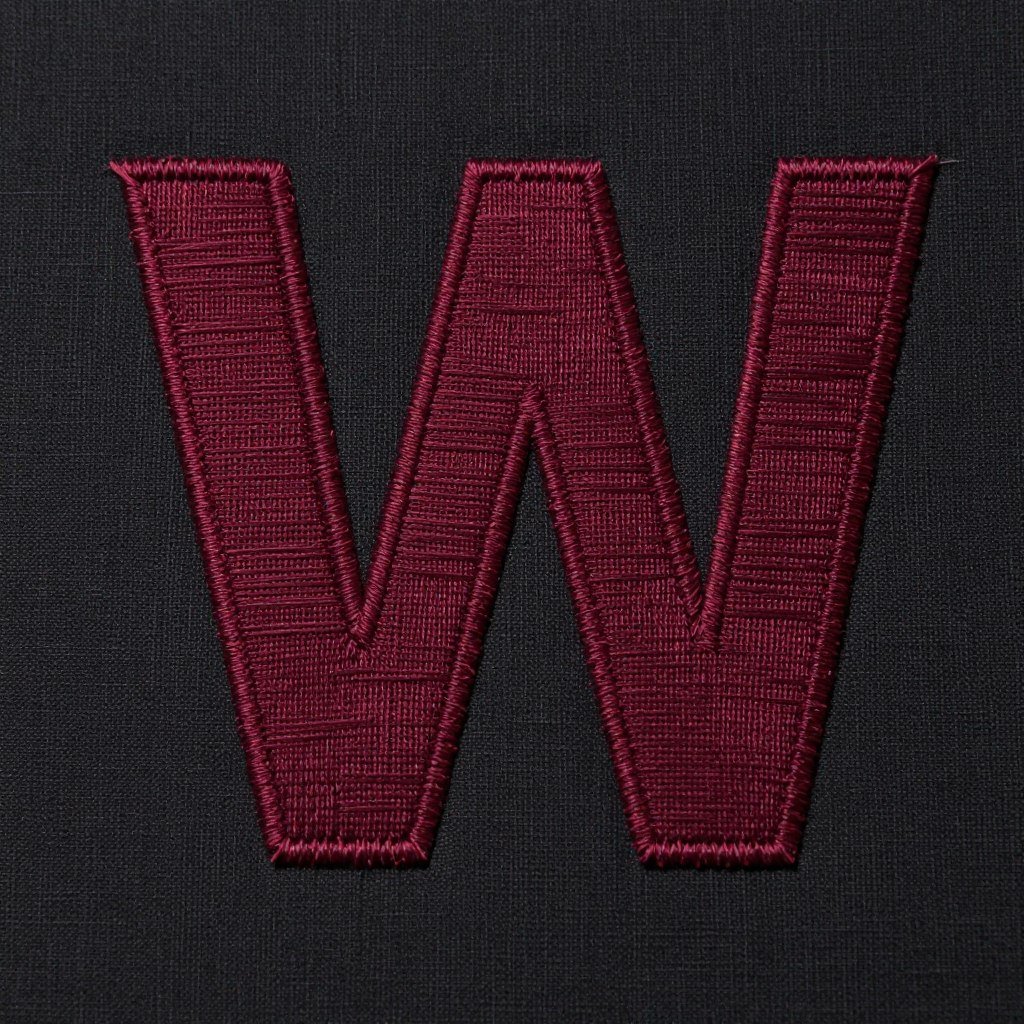
6. Geometric Block Letters
Sharp, angular letters filled with satin stitch or long short stitch. These bold designs make strong visual statements. Use consistent stitch direction within each letter section for professional results.
Plan your stitch direction before starting. Geometric letters often require directional changes at corners. This creates visual interest while maintaining clean, modern lines.
Difficulty: Intermediate | Best Thread: 4-6 strands cotton floss | Ideal Fabric: Medium-weight cotton
7. Negative Space Letters
Create letters by embroidering the background rather than the letters themselves. Fill the space around each letter with satin stitch or seed stitch. The fabric color becomes the letter, creating striking contrast.
This technique requires planning but delivers dramatic results. Use strands of embroidery floss that contrast strongly with your fabric. The negative space approach works best with simple, bold letter forms.
Difficulty: Advanced | Best Thread: 4-6 strands cotton floss | Ideal Fabric: Contrasting solid colors
8. Monochrome Line Weight Variation
Vary the thickness of your stitches within single letters to create depth. Start with thick letters at the baseline using six strands, gradually transitioning to thin letters at the top using two strands embroidery floss.
This technique adds sophistication without color changes. The varying line weight creates visual hierarchy and draws the eye through the composition. Practice consistent transitions between thick and thin sections.
Difficulty: Intermediate-Advanced | Best Thread: 2-6 strands cotton floss | Ideal Fabric: Solid neutral fabrics
Decorative and Embellished Lettering
Add personality and charm with decorative elements. These embellished letters transform simple alphabets into works of art through creative embroidery stitches and embellishments.
9. Floral Vine Letters

Combine letter outlines with delicate floral embellishments. Use stem stitch for the main letter form, then add small flowers using French knots or lazy daisy stitches. Tiny leaves created with single straight stitches complete the garden effect.
Plan your vine placement to enhance the letter shape. Flowers should accent key points without overwhelming the letterform. Use strands of embroidery floss in harmonious colors that complement each other.
Difficulty: Intermediate | Best Thread: 2-3 strands cotton floss | Ideal Fabric: Linen or cotton
10. Ornamental Serif Letters
Traditional serif fonts with enhanced decorative elements. Embroider the main letter in satin stitch, then add ornate serifs and flourishes using stem stitch or back stitch. This Victorian-inspired style suits formal projects.
Study historical lettering for inspiration. Ornamental details should balance the letter without making it difficult to read. Use consistent embroidery stitches throughout for cohesive appearance.
Difficulty: Advanced | Best Thread: 3-5 strands cotton floss | Ideal Fabric: Fine cotton or linen
11. Shadow Effect Letters
Create dimension by adding a shadow behind each letter. Embroider the main letter in one color, then add offset outline stitches in a darker shade. The shadow effect adds depth and makes letters appear three-dimensional.
Keep your shadow offset consistent across all letters. Typically, shadows fall to the bottom-right. Use back stitch for crisp shadow lines or chain stitch for softer effects.
Difficulty: Intermediate | Best Thread: 2-3 strands cotton floss | Ideal Fabric: Solid colors
12. Beaded Accent Letters
Combine traditional embroidery with seed beads or sequins. Create the letter outline with back stitch, then add beads at strategic points for sparkle. This technique works beautifully for celebratory or special occasion projects.
Secure beads properly to prevent loss. Use strong thread or double your embroidery floss. Beads add weight, so choose appropriate fabric that won’t pucker under the added dimension.
Difficulty: Intermediate | Best Thread: 2-3 strands cotton floss plus beading thread | Ideal Fabric: Sturdy cotton or canvas
Essential Hand Embroidery Supplies
Quality materials make a difference in your finished letters. Get professional results with these carefully selected embroidery essentials.
Textured and Dimensional Letter Designs
Add physical texture to your embroidered letters using specialized techniques. These methods create letters that you can actually feel, adding tactile interest to visual appeal.
13. Raised Satin Stitch Letters
Create padded letters by first laying down rows of running stitch or chain stitch as foundation. Then cover with satin stitch worked perpendicular to the padding. This technique produces beautifully raised letters with professional finish.
The padding creates smooth, rounded surfaces. Use more strands for your padding than your top stitches. This method requires patience but delivers stunning dimensional results perfect for monograms.
Difficulty: Advanced | Best Thread: 4-6 strands cotton floss | Ideal Fabric: Tightly woven cotton
14. Long and Short Stitch Gradient Letters
The long short stitch creates smooth color transitions within letters. This shading technique adds realism and depth. Start with dark thread at one edge, gradually blending to lighter shades across the letter.
Use at least three colors in your gradient. Alternate long and short stitches to blend colors seamlessly. This embroidery stitch requires practice but creates painterly effects.
Difficulty: Advanced | Best Thread: 3-4 strands cotton floss | Ideal Fabric: Fine cotton or linen
15. Couching Technique Letters
Lay thick cords or multiple thread strands along letter outlines, securing them with small stitches. This couching technique creates bold, raised letters with strong visual impact. Perfect for large-scale lettering projects.
Choose decorative threads like pearl cotton for your laid cords. Secure with tiny stitches in matching or contrasting thread. The couching method works especially well for thick letters and chunky fonts.
Difficulty: Intermediate | Best Thread: Pearl cotton or multiple strands | Ideal Fabric: Canvas or heavy cotton
16. French Knot Filled Letters
Fill letter shapes entirely with French knots for incredible texture. Outline the letter first with back stitch, then fill the interior with densely packed knots. Use strands of embroidery floss in varying colors for multi-toned effects.
Maintain consistent knot size throughout. Wrap thread around your needle twice for standard knots. This time-intensive technique creates letters with unique bumpy texture that catches light beautifully.
Difficulty: Intermediate-Advanced | Best Thread: 2-3 strands cotton floss | Ideal Fabric: Medium-weight linen
Colorful and Playful Letter Styles
Bright colors and whimsical designs bring joy to embroidery projects. These fun approaches to embroidering letters work perfectly for children’s items and cheerful home decor.
17. Rainbow Ombre Letters
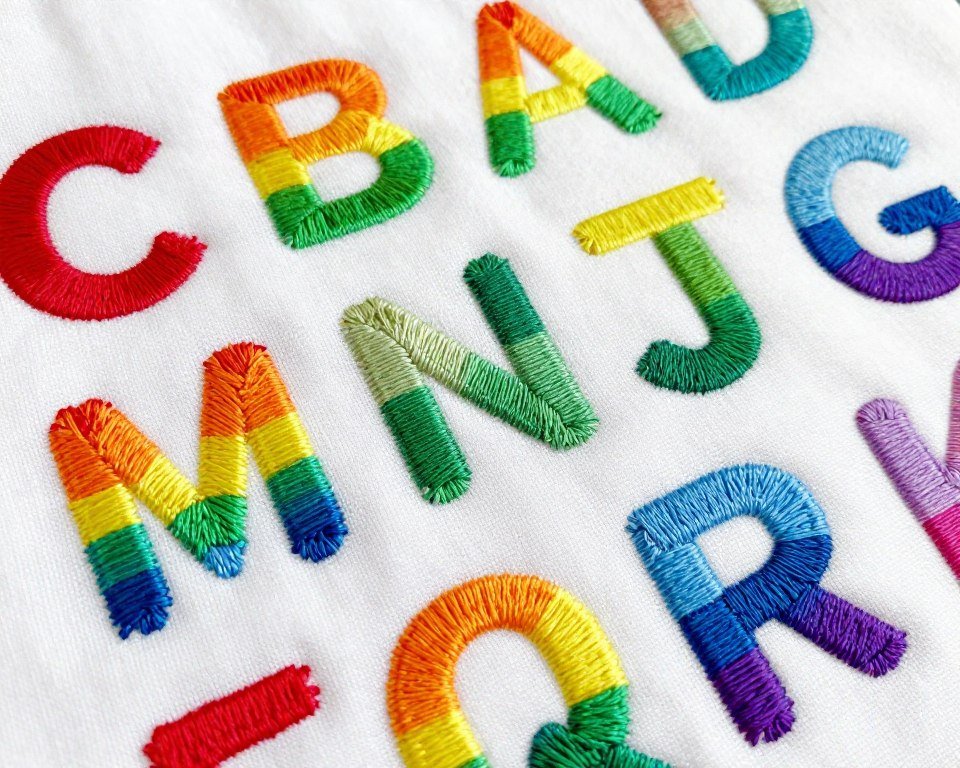
Create letters that transition through rainbow colors. Divide each letter into sections and work each in different hues using satin stitch or long short stitch. The color progression creates eye-catching, playful lettering.
Plan your color transitions carefully. Blend adjacent colors where they meet for smooth gradients. This technique works best with thick letters that provide enough space for multiple color sections.
Difficulty: Intermediate | Best Thread: 4-5 strands cotton floss | Ideal Fabric: White or light-colored cotton
18. Polka Dot Pattern Letters
Outline letters with back stitch, then fill with evenly spaced French knots in contrasting colors. The polka dot effect adds whimsy and charm. Use two colors together for checkerboard patterns or multiple hues for confetti effects.
Space your dots evenly for professional results. Mark dot positions lightly with water-soluble pen before stitching. This playful approach suits casual projects and children’s items perfectly.
Difficulty: Beginner-Intermediate | Best Thread: 2-3 strands cotton floss | Ideal Fabric: Any cotton or linen
19. Striped Candy Cane Letters
Create letters with alternating colored stripes. Work satin stitch in bands of different colors across each letter. The striped effect adds energy and movement to static letterforms.
Keep stripe widths consistent throughout. Alternate between two or three colors for best results. This technique works wonderfully for holiday projects and festive decorations.
Difficulty: Intermediate | Best Thread: 4-6 strands cotton floss | Ideal Fabric: Solid background fabrics
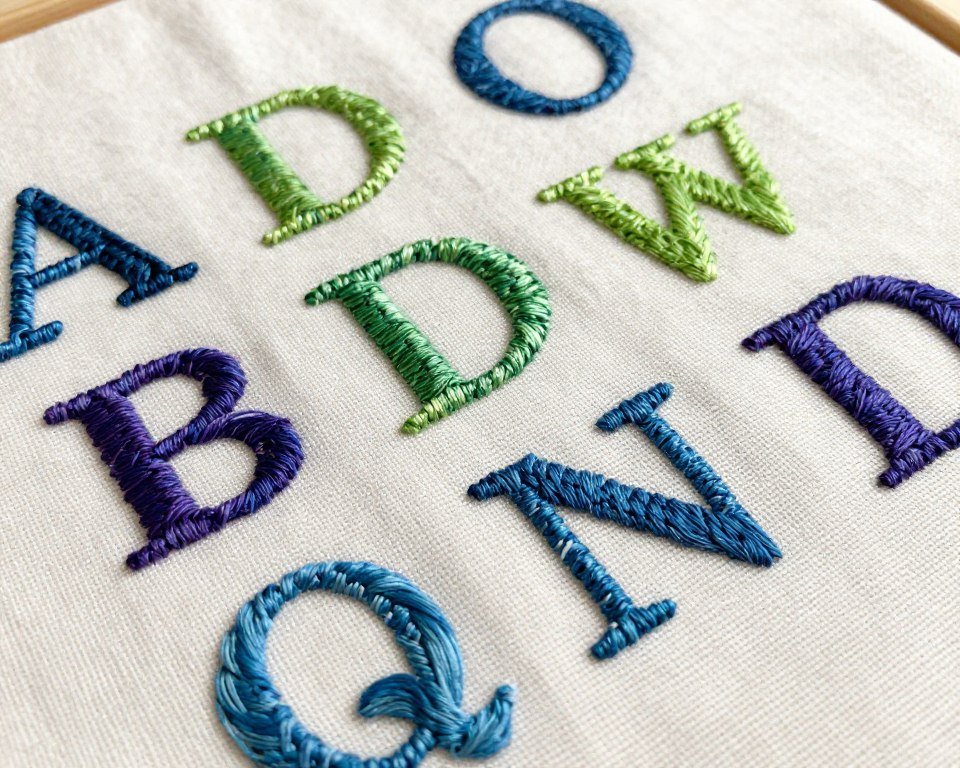
20. Mixed Stitch Sampler Letters
Use different embroidery stitches within a single letter or across an alphabet. One letter might feature stem stitch while another uses chain stitch. This educational approach showcases various techniques while creating interesting visual variety.
Choose stitches that complement each letter’s shape. Straight letters work well with line stitches while curved forms suit flowing stitches like stem stitch. This method makes excellent practice for learning new embroidery stitches.
Difficulty: Beginner-Intermediate | Best Thread: 2-4 strands cotton floss | Ideal Fabric: Practice muslin or cotton
Elegant and Formal Embroidery Letters
Sophisticated designs perfect for wedding items, formal wear, and elegant home decor. These refined lettering styles emphasize grace and timeless beauty.
21. Gold Metallic Thread Script

Embroider flowing script fonts using metallic gold or silver thread. Work with stem stitch or back stitch for best control with specialty threads. Metallic threads add luxury and formality perfect for special occasions.
Use shorter stitch lengths with metallic thread to prevent fraying. Keep tension looser than with regular floss. The shimmering effect elevates simple letter forms into elegant statements.
Difficulty: Intermediate-Advanced | Best Thread: Metallic embroidery thread | Ideal Fabric: Silk, satin, or fine linen
22. Classic Monogram Style
Traditional three-letter monograms with enlarged center initial. Use satin stitch for smooth fills and add decorative borders or flourishes. This timeless style suits wedding gifts, towels, and formal accessories.
Proportion matters in monograms. The center letter should be noticeably larger than flanking initials. Maintain consistent stitch quality throughout for professional appearance.
Difficulty: Intermediate | Best Thread: 4-6 strands cotton floss | Ideal Fabric: Linen or cotton
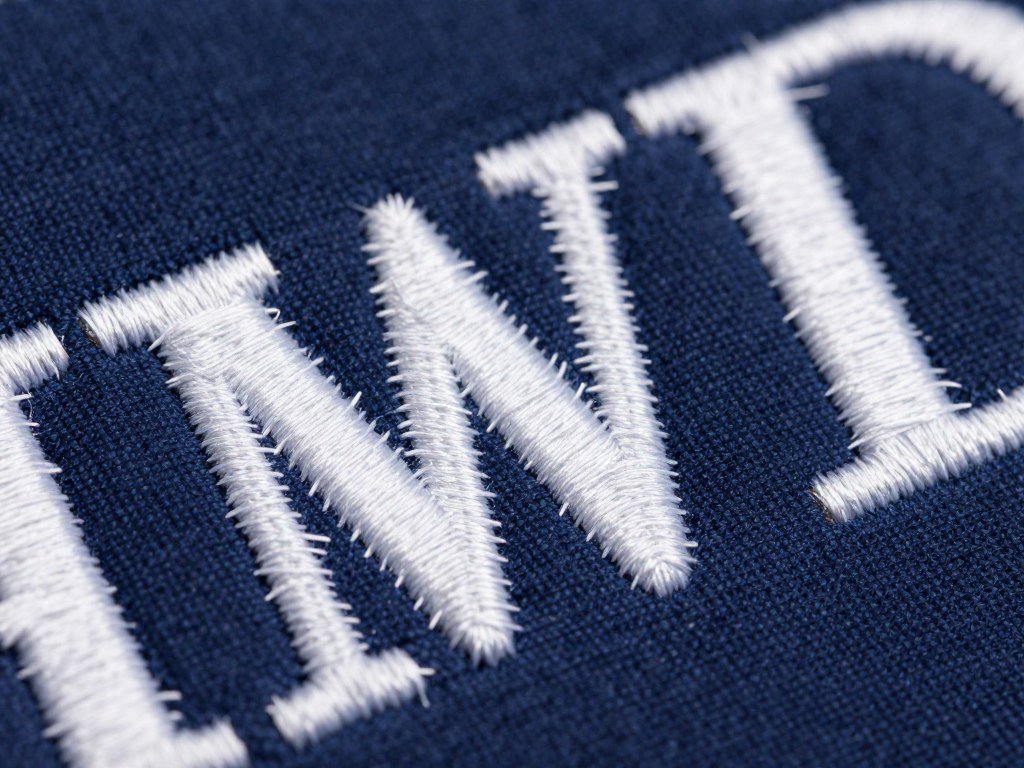
23. Whitework Letters
Create tone-on-tone elegance by embroidering white letters on white fabric. Use various embroidery stitches to create subtle texture and dimension. The monochromatic approach emphasizes technique and craftsmanship.
Texture becomes your primary design element. Combine satin stitch, French knots, and cutwork for sophisticated results. Whitework suits bridal items and classic home linens beautifully.
Difficulty: Advanced | Best Thread: White cotton floss or silk | Ideal Fabric: White or cream linen
Creative and Artistic Approaches
Push creative boundaries with these innovative letter embroidery ideas. Experimental techniques produce unique results perfect for art pieces and statement projects.
24. Botanical Letter Forms
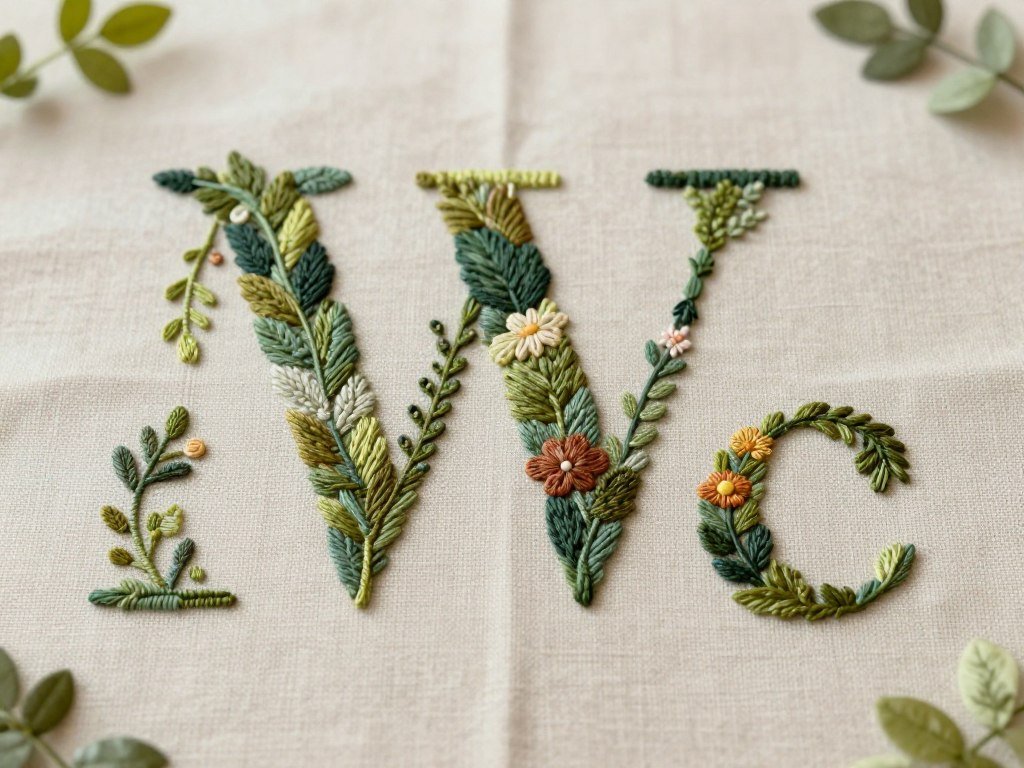
Create letters entirely from natural forms. Letter “L” becomes a branch with leaves. Letter “O” forms from a floral wreath. This artistic approach requires imagination but delivers stunning, nature-inspired results.
Sketch your design before stitching. Use various embroidery stitches to represent different plant elements. This technique works best when letters remain recognizable despite their organic construction.
Difficulty: Advanced | Best Thread: 2-4 strands cotton floss | Ideal Fabric: Natural linen
25. Abstract Geometric Interpretation
Deconstruct traditional letter forms into abstract geometric shapes. Break letters into lines, angles, and segments using back stitch and straight stitch. This modern artistic approach creates letters that function as contemporary design elements.
Maintain enough letter structure for recognition while embracing abstraction. Use bold thread colors against neutral fabric. This experimental style suits modern art projects and statement pieces.
Difficulty: Advanced | Best Thread: 3-4 strands cotton floss | Ideal Fabric: Canvas or heavy cotton
Essential Tips for Beautiful Hand Embroidery Letters
Success with embroidering letters depends on proper techniques and materials. These fundamental tips help you achieve professional results regardless of which letter style you choose.
Choosing the Right Fabric
Tight Weave Fabrics
Densely woven fabrics provide the best foundation for detailed lettering. They prevent thread from snagging and support heavy embroidery stitches without distortion.
- Cotton quilting fabric for general projects
- Linen for traditional and formal work
- Canvas for large bold letters
- Muslin for practice pieces
Thread Selection Guide
Different threads create different effects. Cotton embroidery floss remains the most versatile choice for hand embroidery letters, available in countless colors.
- DMC or Anchor floss for standard work
- Pearl cotton for bold lines
- Metallic thread for formal pieces
- Silk thread for luxury projects
Needle Considerations
Match your needle to your thread and fabric. Sharp embroidery needles work best for most lettering projects, punching through fabric cleanly.
- Size 7-8 for 4-6 strands embroidery floss
- Size 9-10 for 1-3 strands
- Sharp points for tight weaves
- Larger eyes for specialty threads
Transfer Methods
Accurate letter placement ensures professional results. Several transfer methods work well for embroidery patterns, each with specific advantages.
- Water-soluble pens for temporary marks
- Iron-on transfers for complex designs
- Light box tracing for precision
- Carbon paper for dark fabrics
Mastering Stitch Tension
Consistent tension separates amateur work from professional embroidery. Pull thread snug but not tight. Fabric should lie flat without puckering. Use an embroidery hoop to maintain even fabric tension while you work.
Practice makes perfect with tension control. Your stitches should look uniform in size and spacing. If fabric pulls or gathers, loosen your thread tension. If stitches appear loose or sloppy, pull slightly tighter.
Working With Multiple Strands
Pro Tip: When using multiple strands of embroidery floss, separate all six strands first, then recombine only the number you need. This prevents twisting and creates smoother, flatter stitches.
Most embroidery floss comes as six-strand skeins. You’ll rarely use all six strands together. For thin letters, use two to three strands. For thick letters and bold designs, use four to six strands embroidery floss.
Separate strands by pulling one thread at a time from the group. Align the strands you need and thread your needle. This extra step prevents tangling and produces neater stitches.
Handling Tight Curves
Script fonts and flowing letters present challenges at curves. Shorten your stitch length when working tight curves. Smaller stitches bend more easily and create smoother lines.
The stem stitch naturally curves, making it ideal for script. The back stitch also handles curves well when stitches stay small. Avoid satin stitch on tight curves unless you have advanced skills.
Starting and Ending Thread
Never use knots in fine embroidery work. Start by leaving a tail on the back and securing it with your first few stitches. Make sure to trap the tail under subsequent stitches.
End thread by weaving it under nearby stitches on the back. Secure it well to prevent unraveling. Trim excess thread close to fabric. This technique keeps your work neat and prevents bumps showing through.
Common Mistakes and How to Avoid Them
Preventing Puckered Fabric
Fabric puckering ruins otherwise beautiful lettering. This problem occurs when thread tension is too tight or when working without a hoop. Always use an embroidery hoop to keep fabric taut.
Check tension frequently while working. If you notice puckering starting, remove those stitches immediately. It’s easier to fix problems early than to remove completed letters later.
Maintaining Consistent Letter Size
Mark guidelines lightly with water-soluble pen before starting. Use a ruler to ensure uniform letter height and baseline alignment. Professional-looking lettering requires careful planning and measurement.
Create a template if you’re embroidering multiple similar items. Transfer the same pattern each time for consistency. This approach saves time and ensures matching results across projects.
Avoiding Thread Tangling
Let your needle hang freely every few stitches to unwind accumulated thread twist. This simple habit prevents frustrating tangles and keeps your work moving smoothly. Keep thread lengths manageable, around 18 inches maximum.
Dealing with Stitch Mistakes
Everyone makes mistakes while embroidering. Keep a seam ripper or small scissors nearby for removing incorrect stitches. Work carefully but don’t fear mistakes. Each error teaches valuable lessons about technique.
Remove mistakes completely before continuing. Partial removal leaves thread fragments that show through later. Take your time with corrections to protect surrounding stitches and fabric.
Project Ideas for Hand Embroidered Letters

Beautiful hand embroidery letter ideas transform into countless practical and decorative projects. Here are popular ways to use your new lettering skills.
Personalized Gifts
Add special touches to gifts with custom embroidered letters. Monogram towels, handkerchiefs, or baby items. Create meaningful presents that recipients treasure.
- Kitchen towels with family initials
- Baby blankets with name and birthdate
- Handkerchiefs for wedding parties
Home Decor Items
Embellish your living space with embroidered lettering. Create custom throw pillows, wall hangings, or table linens featuring meaningful words or monograms.
- Inspirational quote wall art
- Monogrammed pillow covers
- Decorative tea towels
Fashion Accessories
Customize clothing and accessories with hand embroidered letters. Add initials to jacket collars, personalize denim, or embellish canvas bags.
- Monogrammed shirt pockets
- Personalized tote bags
- Custom denim jackets
Building Your Skills Over Time
Mastering hand embroidery letters takes practice and patience. Start with simpler techniques and gradually progress to more complex designs as your confidence grows.
Practice Progression Path
Beginner Skills (Weeks 1-4)
- Master basic back stitch letters
- Practice stem stitch on curves
- Learn consistent tension control
- Complete simple block letters
- Try single-color projects first
Intermediate Skills (Months 2-3)
- Perfect satin stitch fills
- Combine multiple embroidery stitches
- Work with color transitions
- Add decorative elements
- Create dimensional effects
Advanced Skills (Months 4+)
- Master long short stitch shading
- Design custom letter styles
- Work with specialty threads
- Create artistic interpretations
- Combine techniques freely
Creating Your Practice Sampler
Dedicate fabric to practicing different letter styles and embroidery stitches. A practice sampler helps you compare techniques and discover your preferences. Label each section with the stitch name and thread count used.
Keep your sampler as reference for future projects. You’ll return to it when choosing techniques for new lettering. The sampler also tracks your skill improvement over time, providing motivation to keep learning.
Caring for Your Embroidered Letters
Proper care preserves your beautiful hand embroidery letters for years. Follow these guidelines to protect your finished work from damage and fading.
Washing Embroidered Items
Hand wash embroidered pieces in cool water with gentle soap. Avoid harsh detergents that might fade thread colors. Never wring or twist embroidered fabric.
Press water out gently between towels. Lay flat to dry away from direct sunlight. Heat and sun cause colors to fade over time. Handle embroidered items carefully when wet, as threads are vulnerable.
Storing Finished Pieces
Store embroidered items flat or loosely rolled, never folded tightly. Creases damage threads and fabric. Wrap pieces in acid-free tissue paper to prevent color transfer and dust accumulation.
Keep stored embroidery in cool, dry places away from direct light. Check stored pieces periodically for signs of moisture or pests. Proper storage protects your investment of time and creativity.
Start Your Letter Embroidery Journey Today
You now have 25 beautiful hand embroidery letter ideas to inspire your next project. Whether you’re creating personalized gifts or decorating your home, these techniques help you achieve stunning results.
Begin Creating Beautiful Letters
Hand embroidery letters add personal meaning to every project. From simple stem stitch script to complex dimensional designs, you now understand techniques for creating beautiful lettering. Each style offers unique character and visual appeal.
Start with techniques matching your current skill level. Master basic embroidery stitches before attempting advanced methods. Practice regularly to improve your stitch quality and develop personal style. Remember that even experienced embroiderers continue learning new approaches.
The beauty of hand embroidery lies in its accessibility. You need only basic supplies to begin creating stunning lettered pieces. Choose your favorite letter style from these 25 ideas and start embroidering today. Your unique creations will bring joy for years to come.