
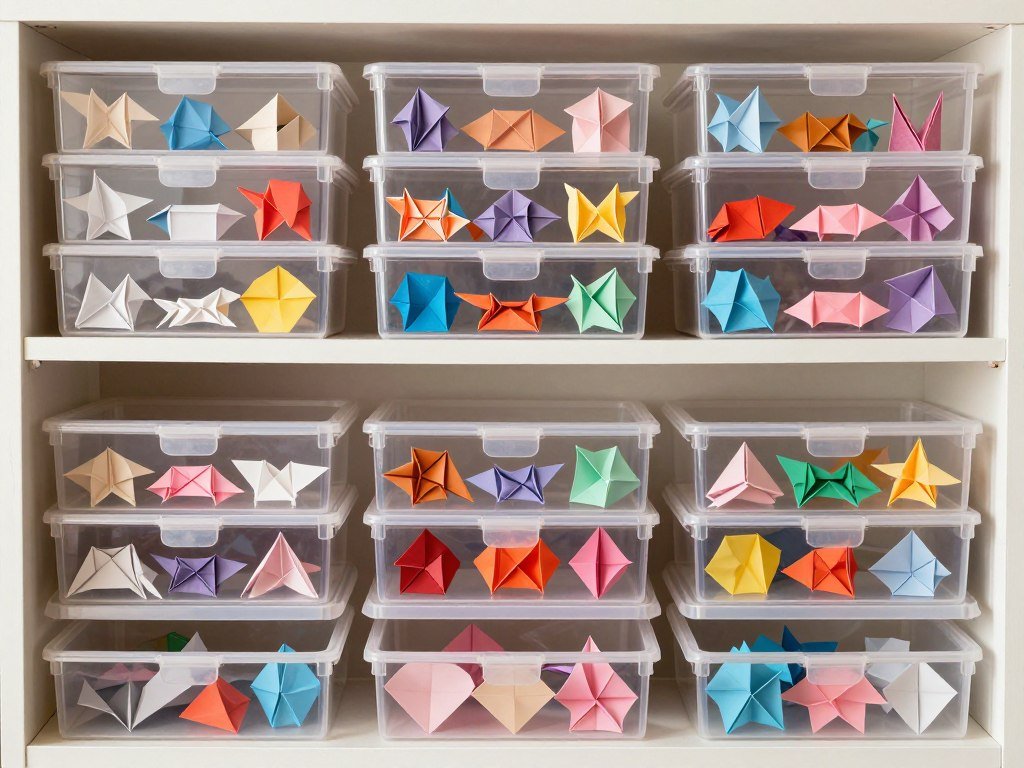
Origami transforms simple sheets of paper into functional art. While many people think of origami as purely decorative, the ancient Japanese paper folding art offers countless practical applications for everyday life. These creations solve real problems while adding beauty to your space.
This guide presents twenty useful origami projects that serve genuine purposes. Each project includes clear difficulty ratings and practical applications. Whether you need desk organization, gift packaging, or storage solutions, paper folding provides elegant answers.
The projects range from beginner-friendly designs to advanced creations. You will discover storage boxes, drawer organizers, and functional decorations. Every fold serves a purpose beyond aesthetics.
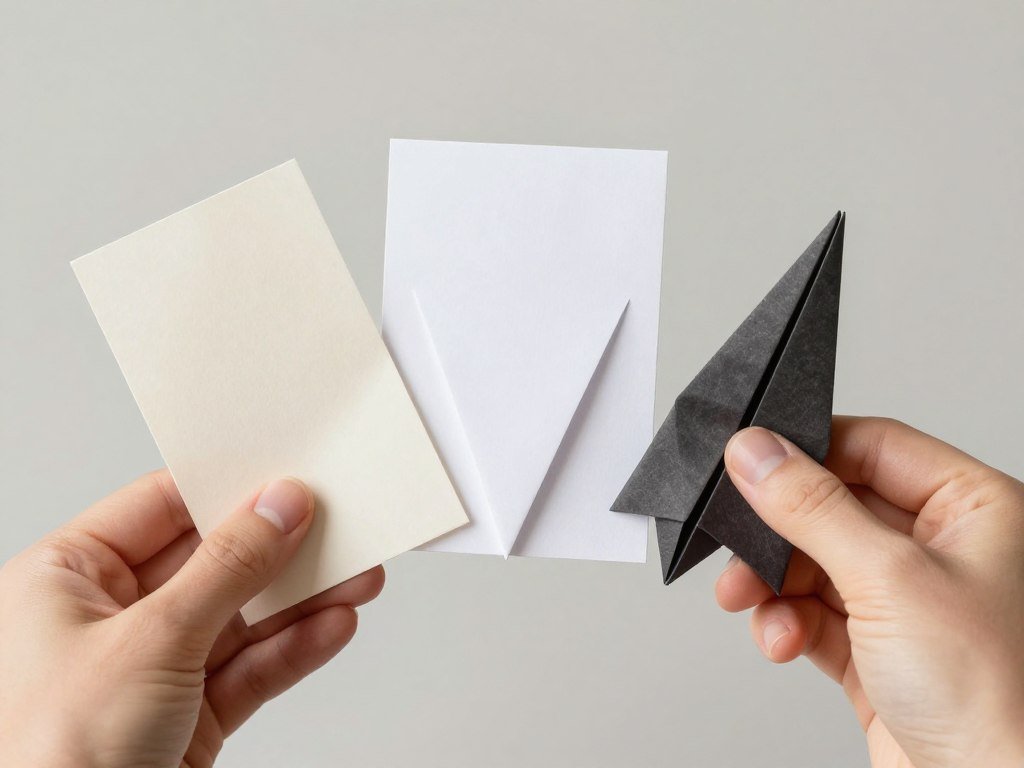
Getting Started: Before diving into these projects, gather basic origami paper in various sizes. Square sheets work best, though you can cut regular paper into squares. Each project lists the recommended paper size and type for optimal results.
Table of Contents
Essential Supplies for Useful Origami Projects
Success in origami starts with the right materials. The paper you choose affects both the folding process and the finished project’s durability. Different projects demand different paper types.
Basic Paper Requirements
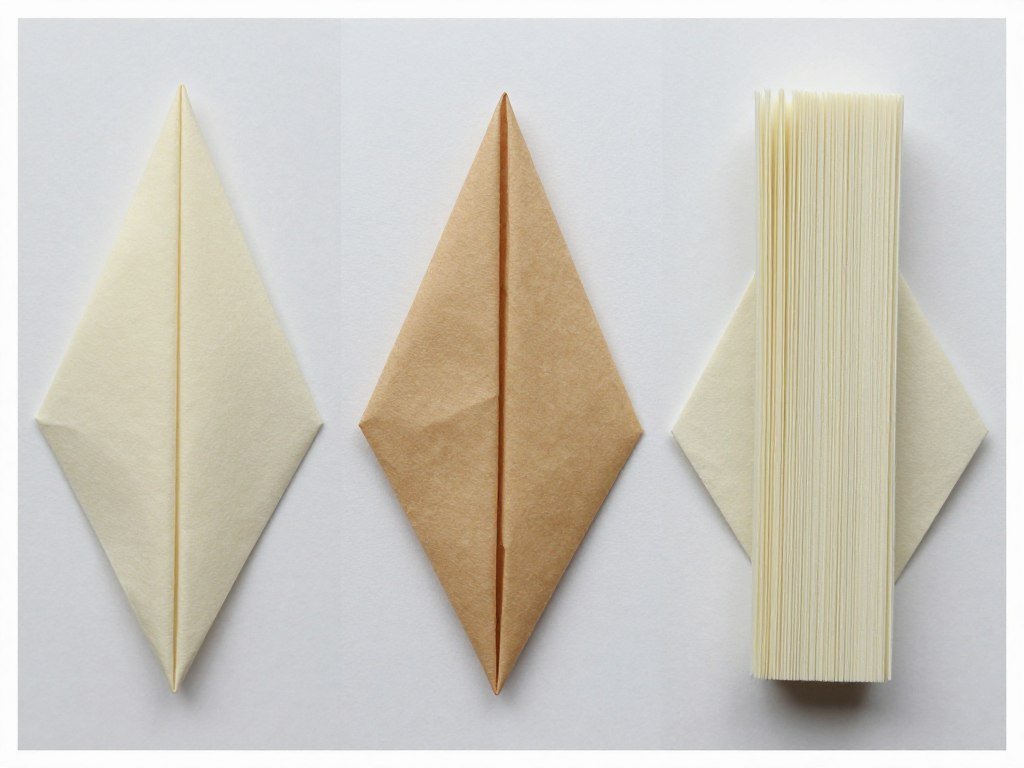
Standard origami paper comes in square sheets ranging from 3 to 10 inches. Beginners should start with 6-inch squares. This size provides enough material to work with while remaining manageable for learning basic folds.
Weight matters significantly for functional projects. Lightweight papers work well for decorative items but lack durability for everyday use. Medium-weight papers between 70-90 gsm offer the best balance for useful origami projects.
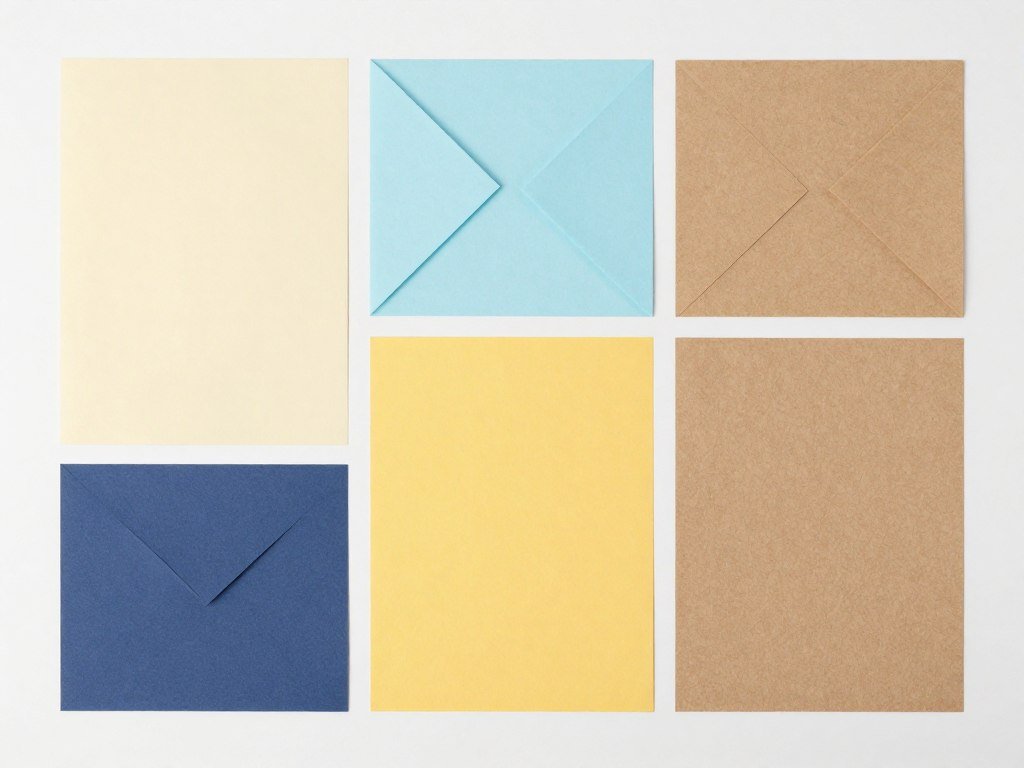
Recommended Paper Types
- Kami paper for practice and beginner projects
- Tant paper for boxes and containers requiring structure
- Kraft paper for rustic, durable storage solutions
- Washi paper for decorative yet functional items
- Cardstock for projects needing extra strength
Beginner-Friendly Storage Solutions
Storage projects introduce origami’s practical side. These beginner-level designs require basic folds while creating genuinely useful items. Each project takes 10-15 minutes to complete once you learn the pattern.
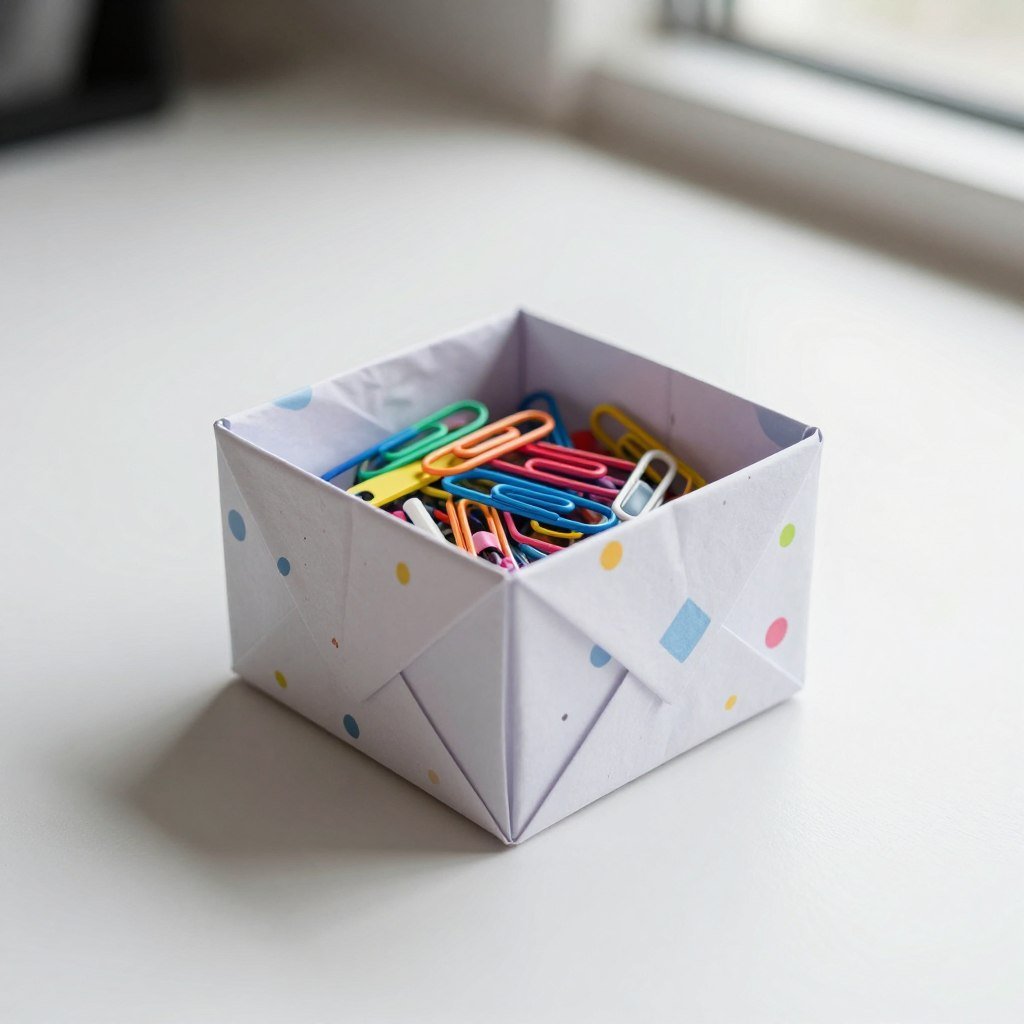
1. Simple Origami Box
The simple origami box serves as the foundation for countless storage projects. This design uses a single sheet of paper and requires no glue or cutting. The finished box holds desk supplies, jewelry, or small craft items.
Best Uses: Paper clips, rubber bands, coins, earrings, pushpins, seeds, buttons, or small hardware items.
Paper Size: Start with 8-inch square paper for a 3-inch finished box. Larger papers create bigger containers.
Pro Tip: Use cardstock or thick origami paper for boxes that hold heavier items. The extra weight prevents the box from collapsing under the contents.
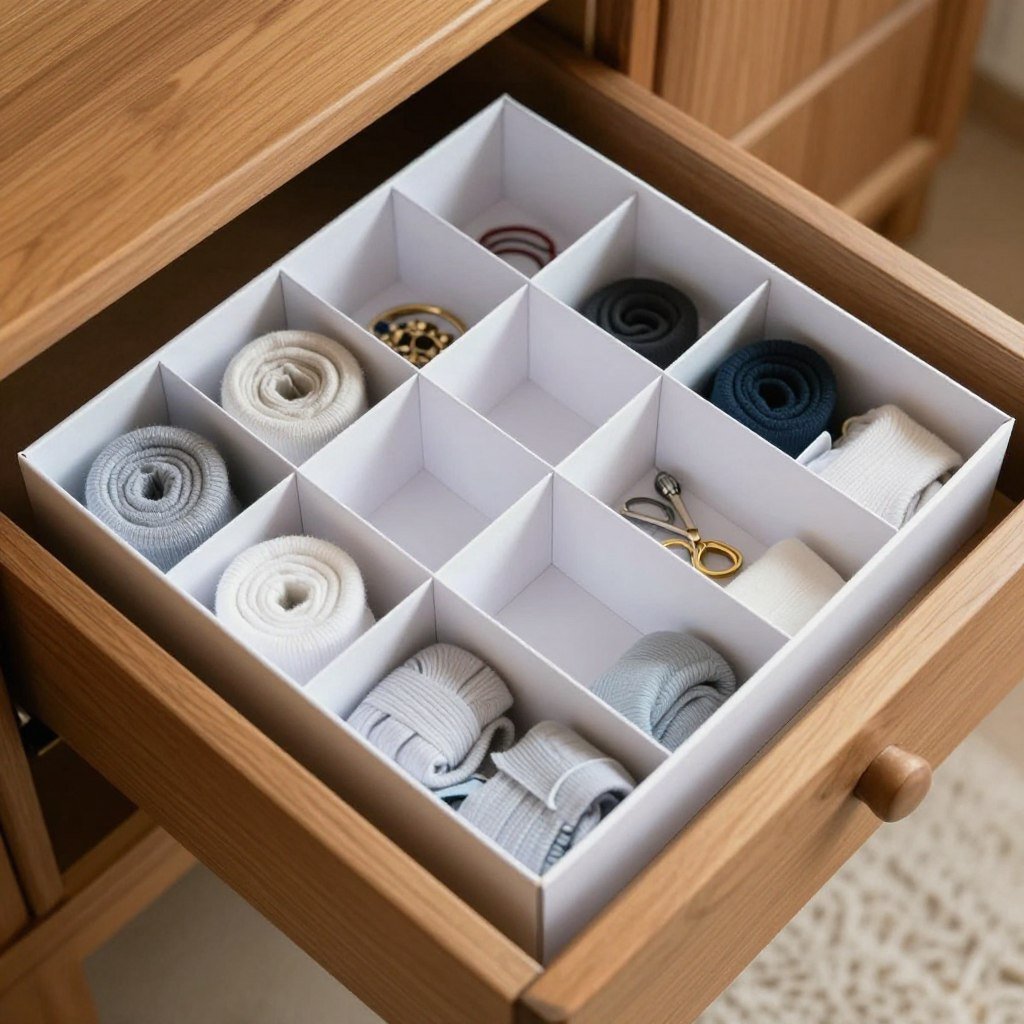
2. Origami Drawer Divider
Transform messy drawers into organized spaces with origami drawer dividers. These rectangular boxes fit inside existing drawers to separate socks, accessories, or office supplies. Make multiple units to create a custom organization system.
Best Uses: Sock organization, undergarment separation, jewelry storage, office supply sorting, craft material organization, or makeup compartments.
Paper Size: Measure your drawer and work backward. A 12-inch sheet creates a divider approximately 4 inches wide and 2 inches tall.
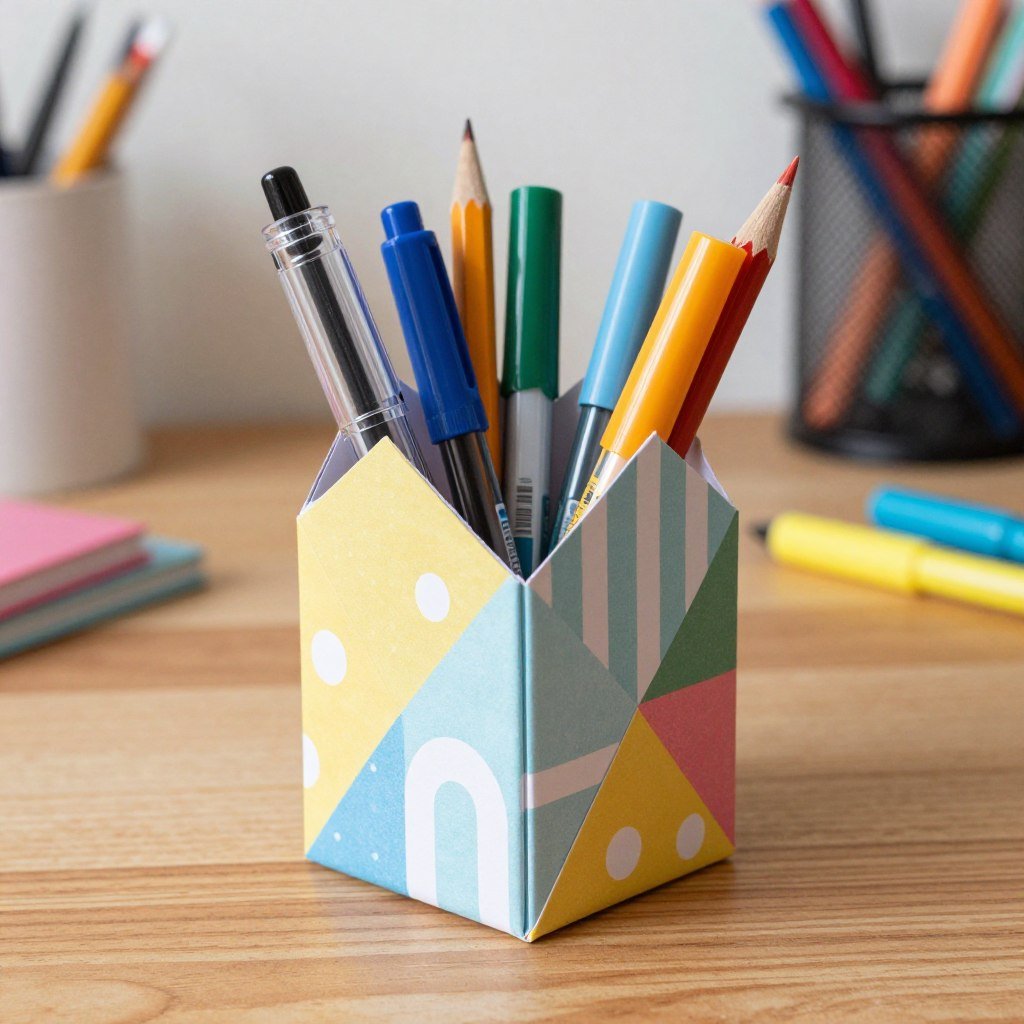
3. Origami Pencil Holder
The origami pencil holder combines form and function. This cylindrical design stands upright without additional support. Use it on your desk for writing tools, makeup brushes, or cooking utensils.
Best Uses: Pencils and pens, makeup brushes, cooking utensils, paintbrushes, craft tools, or knitting needles.
Paper Size: Use 10-12 inch square paper for a holder that accommodates standard pencils comfortably. Heavier paper provides better stability.
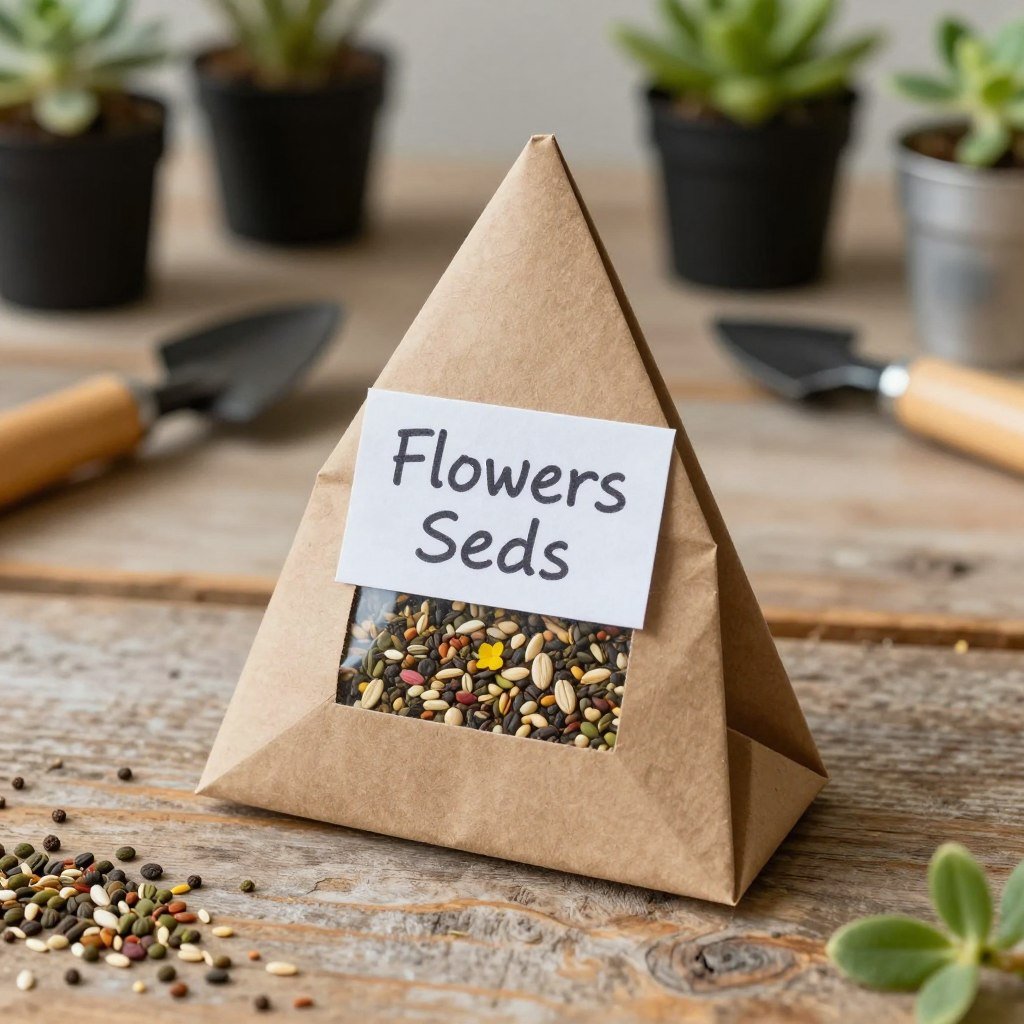
4. Origami Seed Packets
Gardeners love origami seed packets for organizing saved seeds. These simple envelopes keep different seed varieties separate and labeled. The fold creates a secure closure without tape or glue.
Best Uses: Garden seed storage, craft bead organization, small hardware parts, spice samples, tea bag storage, or small gift packaging.
Paper Size: Standard 6-inch squares work perfectly. Use kraft paper or wax paper for moisture resistance with seeds.
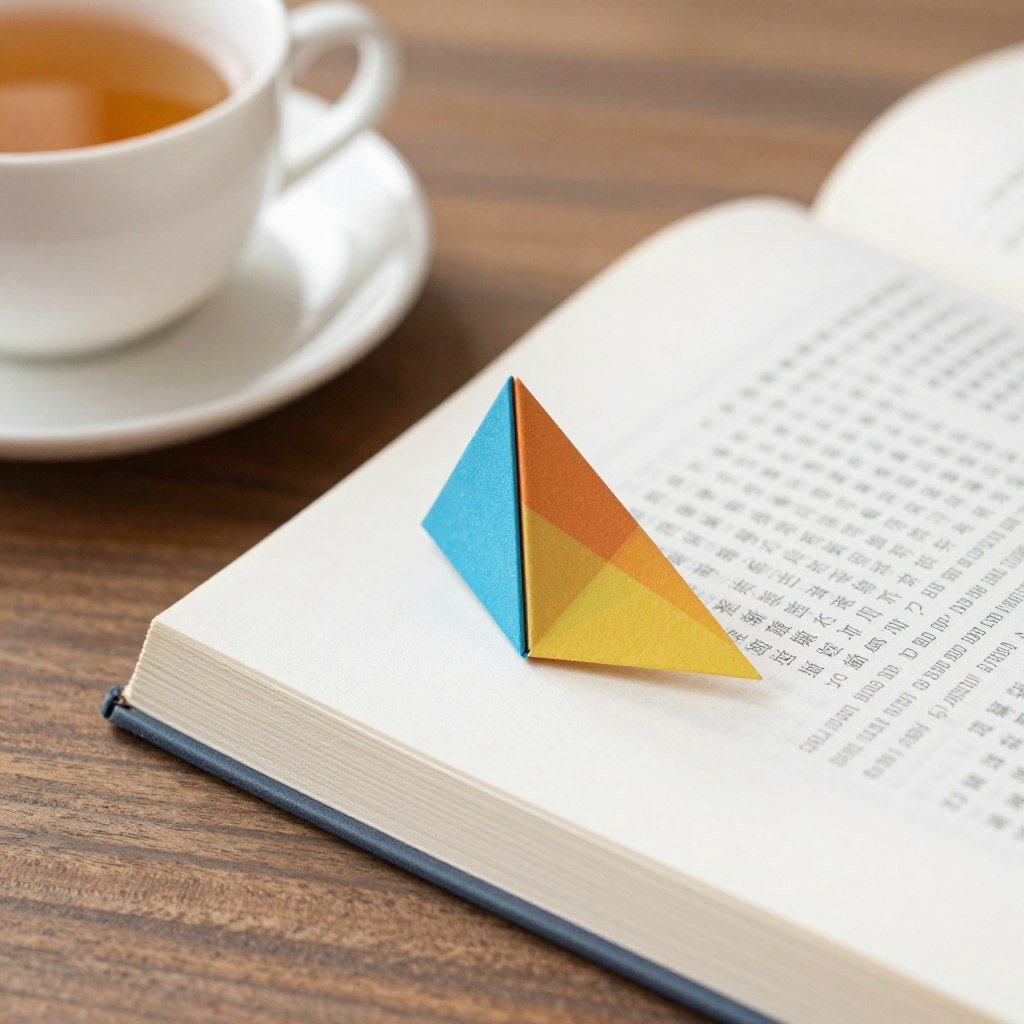
5. Origami Corner Bookmarks
The origami corner bookmark slips over page corners without damaging books. This beginner-friendly project takes just minutes to create. Make a batch in different colors to track multiple books or chapters.
Best Uses: Book page marking, magazine article flagging, recipe card organization, document indexing, or planner page markers.
Paper Size: Small 3-4 inch squares create perfect bookmarks. Decorative origami paper adds personality to your reading materials.
Intermediate Desk Organization Projects
These intermediate projects require more complex folding sequences. They create sophisticated desk organizers that rival store-bought options. Expect 20-30 minutes per project as you master the folds.

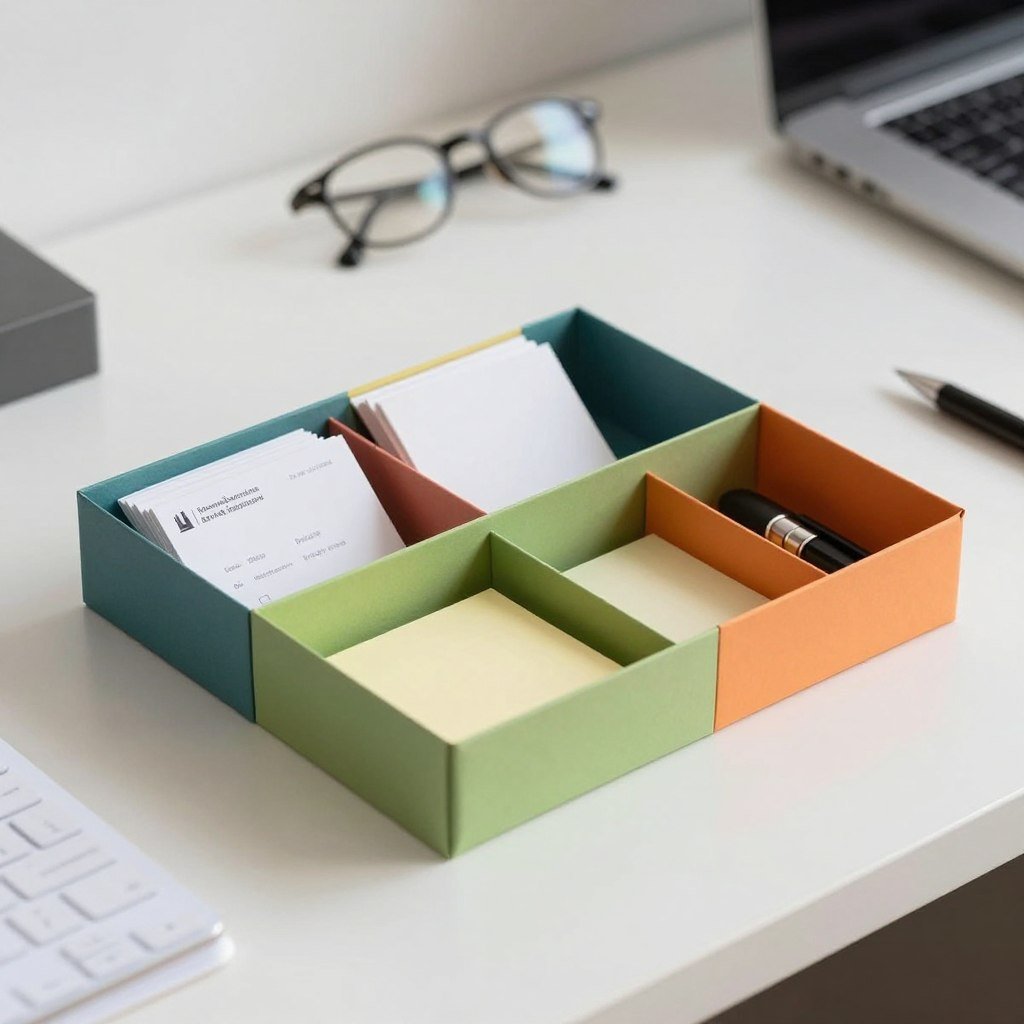
6. Origami Desk Tray
The origami desk tray features multiple compartments for organizing workspace essentials. This shallow rectangular design holds business cards, sticky notes, and small supplies. The reinforced corners prevent sagging under weight.
Best Uses: Business card holder, sticky note organizer, receipt collector, key tray, mail sorter, or charging cable organizer.
Paper Size: Use 12-inch square cardstock for a sturdy tray. Multiple sheets can be folded and combined for larger organizers.
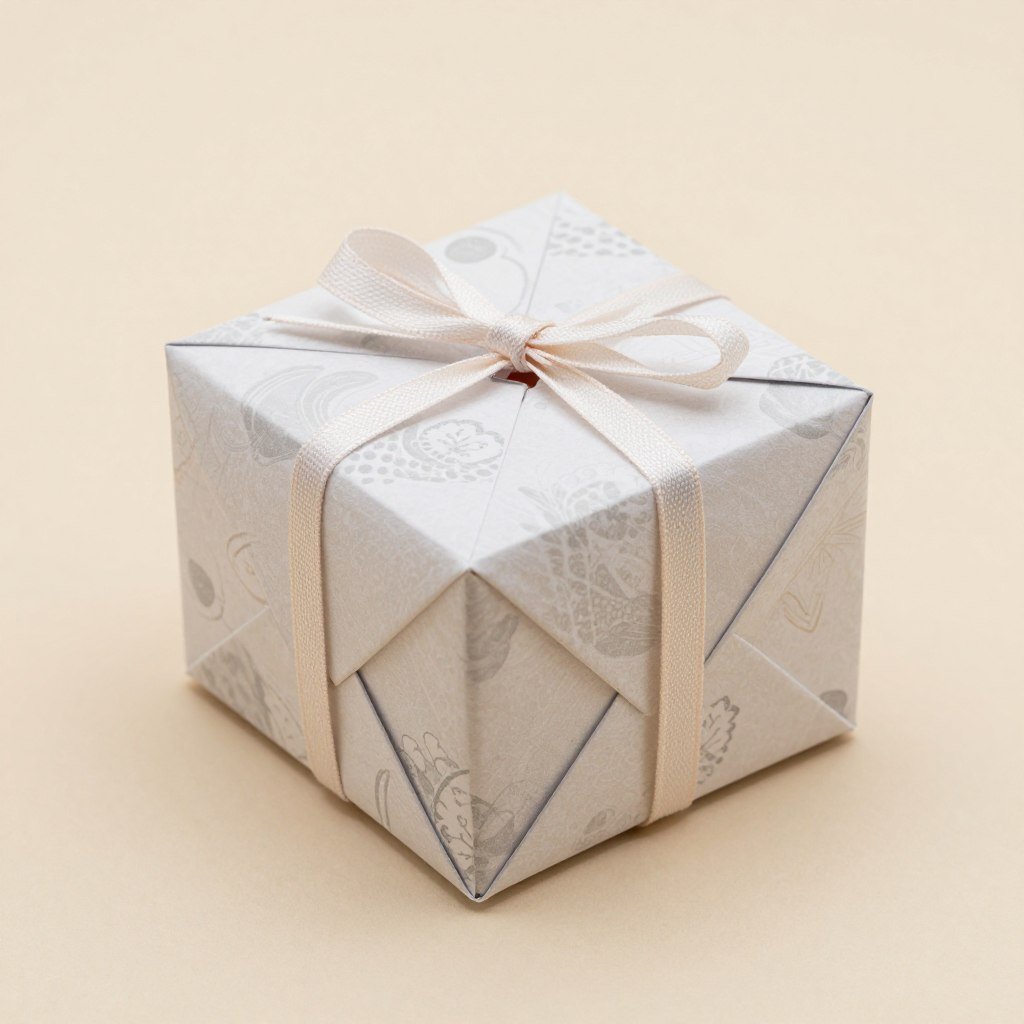
7. Origami Gift Box with Lid
Create impressive gift packaging with this origami box and lid combination. The box requires two sheets of slightly different sizes to ensure the lid fits properly. This project eliminates the need for purchased gift boxes.
Best Uses: Small gift packaging, jewelry presentation, candy boxes, wedding favors, party favor boxes, or keepsake storage.
Paper Size: Use 8-inch paper for the base and 8.5-inch paper for the lid. The slight size difference ensures a snug fit.
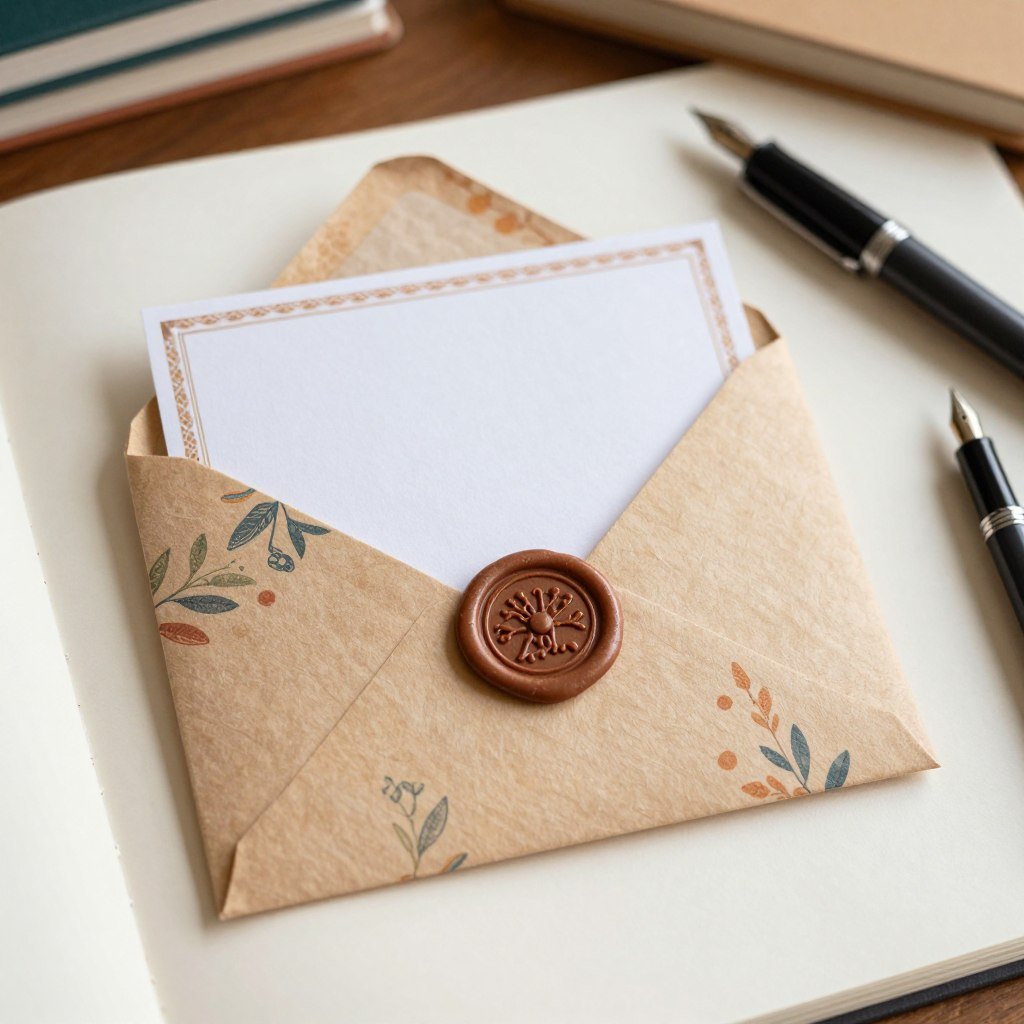
8. Origami Envelope
The origami envelope transforms any decorative paper into custom mail carriers. Multiple folding variations accommodate different card sizes. This sustainable option replaces store-bought envelopes for personal correspondence.
Best Uses: Greeting card envelopes, money gift presentation, letter mailing, card storage, invitation packaging, or note passing.
Paper Size: Standard letter-size paper (8.5×11 inches) creates envelopes for typical greeting cards. Adjust size based on contents.
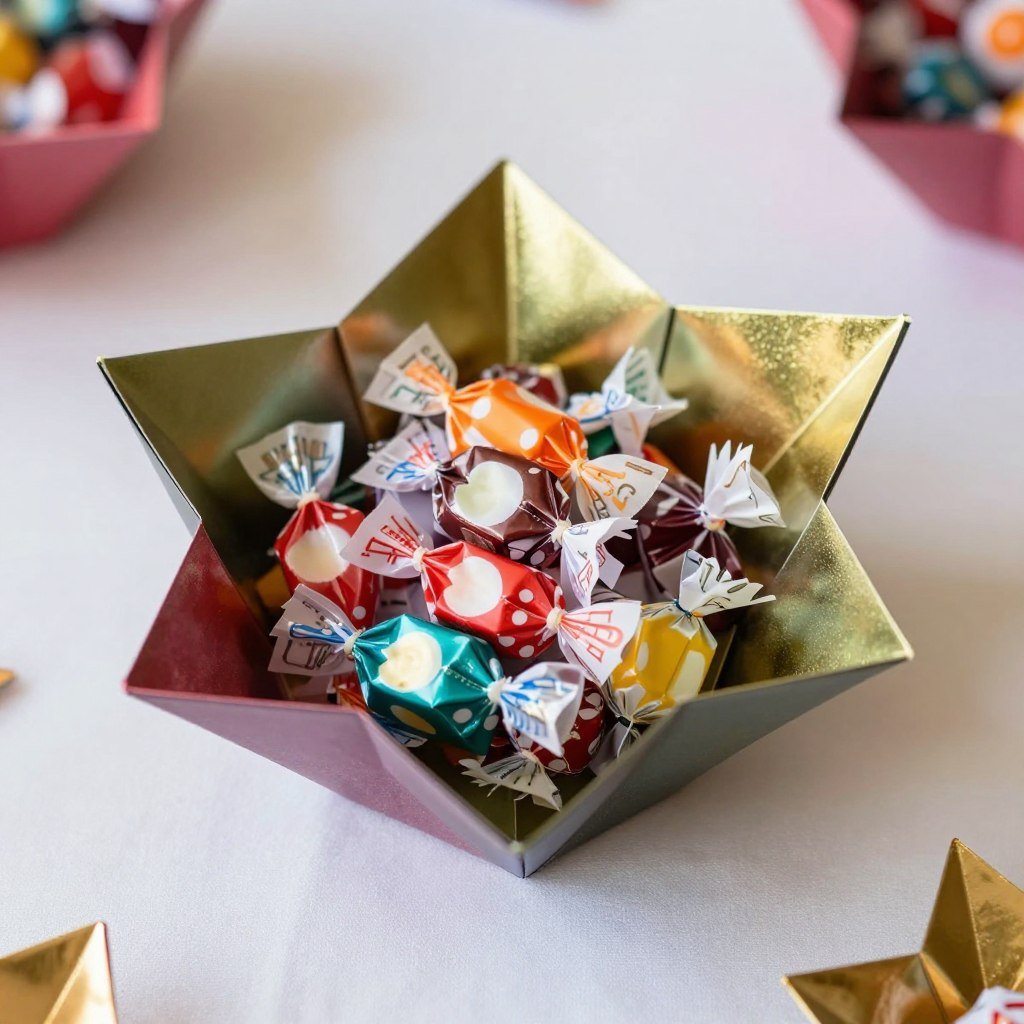
9. Origami Star Bowl
The origami star bowl combines beauty with function. This decorative container features pointed edges that form a star shape when viewed from above. Use it for candy, potpourri, or small decorative items.
Best Uses: Candy dish, potpourri holder, party snack bowl, decorative centerpiece, jewelry catch-all, or trinket storage.
Paper Size: Large 10-12 inch squares create usable bowls. Choose sturdy paper that holds its shape when filled.
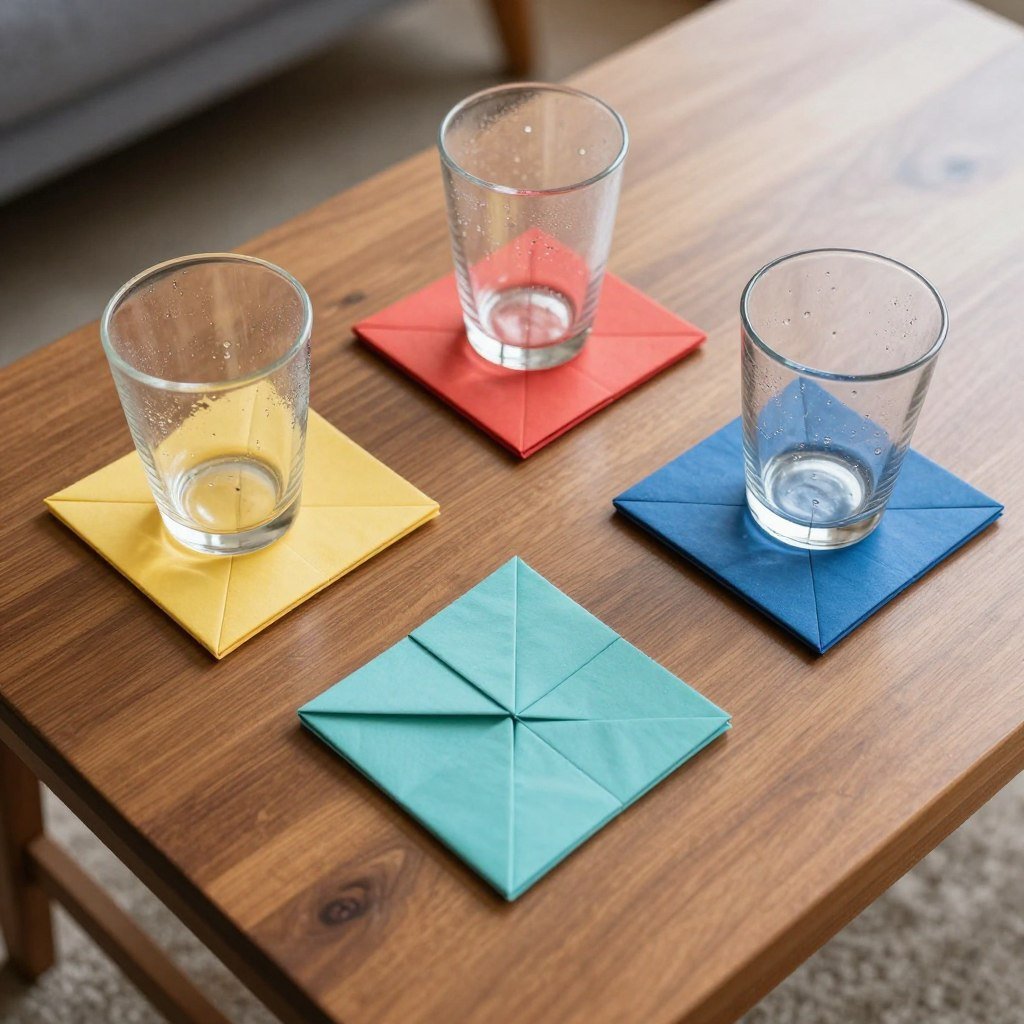
10. Origami Coasters
Protect furniture surfaces with decorative origami coasters. The multiple-layer folding technique creates cushioning that absorbs condensation. Make sets in coordinating colors for cohesive table settings.
Best Uses: Drink coasters, plant pot protectors, decorative table accents, gift set components, or craft fair items.
Paper Size: Use 6-8 inch squares. Consider laminating finished coasters or using water-resistant paper for longevity.
Advanced Functional Origami Creations
Advanced projects challenge your folding skills while creating impressive functional items. These designs incorporate complex sequences and multiple sheets. Dedicate 30-60 minutes to each project.
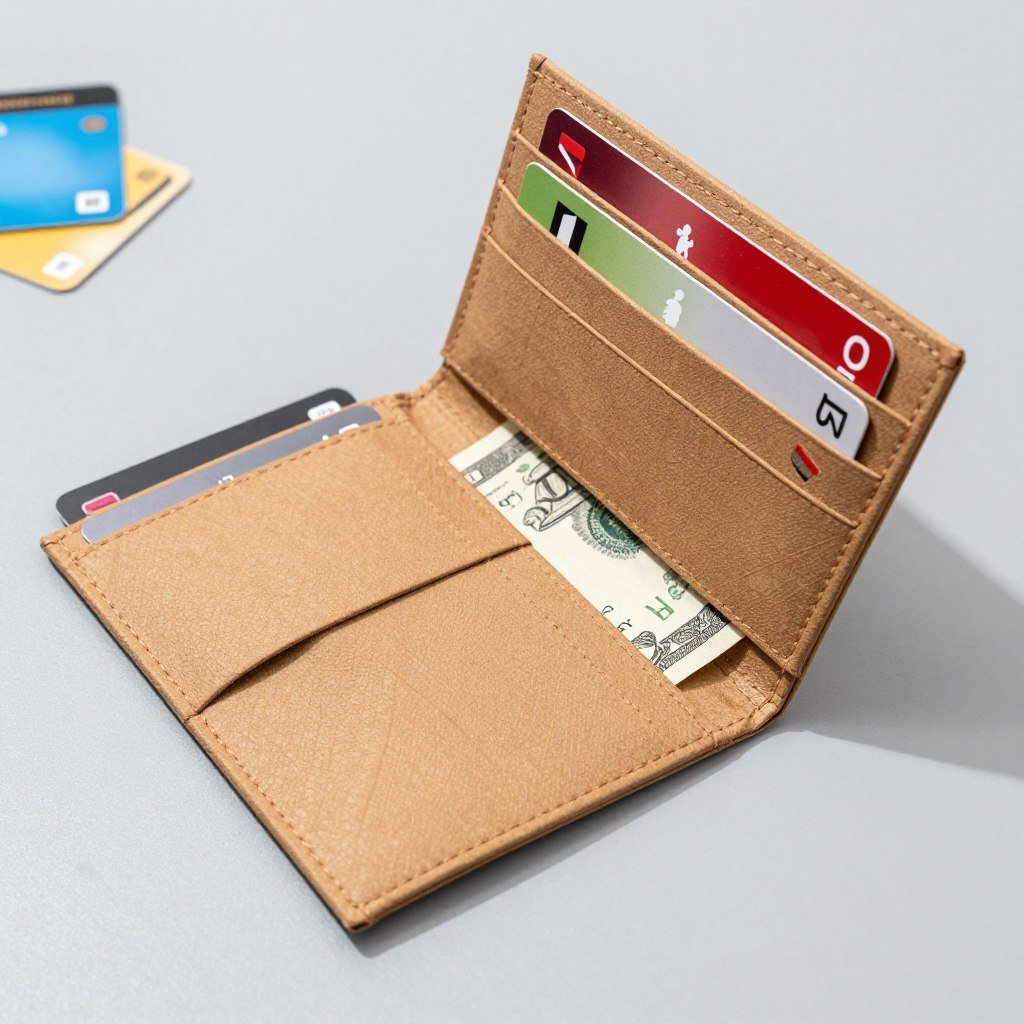
11. Origami Wallet
The origami wallet features multiple card slots and a bill compartment. This ambitious project requires precise folding and durable materials. Use Tyvek paper or reinforced craft paper for wallets that withstand daily use.
Best Uses: Minimalist wallet, travel document holder, gift card organizer, business card case, or emergency backup wallet.
Paper Size: Standard letter size (8.5×11 inches) works well. Tyvek material provides the best durability for actual wallet use.
Important: Paper wallets work best as temporary solutions or specialty items. For everyday use, consider laminating or using synthetic paper materials.
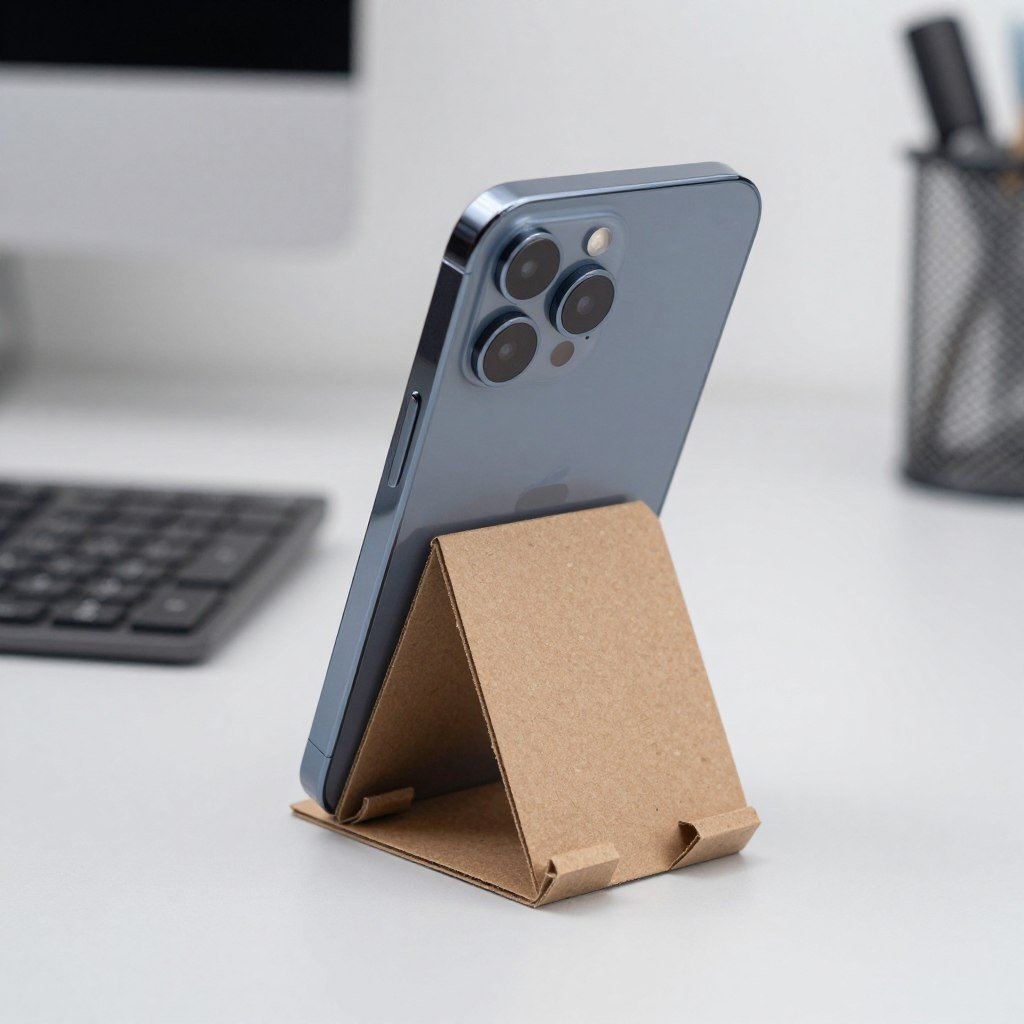
12. Origami Phone Stand
Create a functional phone stand from a single sheet of paper. This design angles your device for comfortable viewing during video calls or media consumption. The triangular base provides stable support for most smartphones.
Best Uses: Smartphone holder, tablet stand for small devices, recipe card holder, business card display, or photo frame stand.
Paper Size: Use 8-10 inch cardstock squares. Heavier weight paper prevents collapse under device weight.
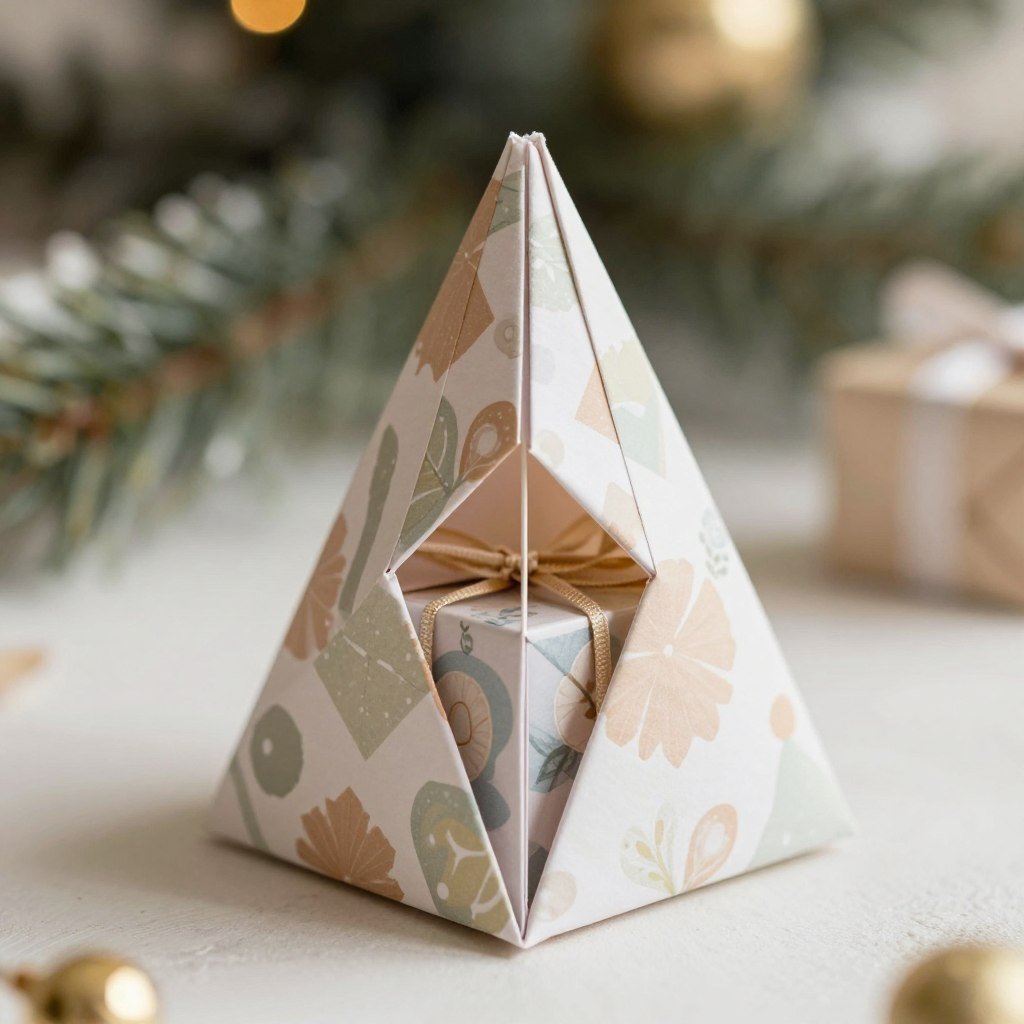
13. Origami Pyramid Box
The pyramid box creates eye-catching gift packaging. This geometric design assembles without glue through clever interlocking folds. Fill with treats, small gifts, or party favors.
Best Uses: Party favor packaging, chocolate or candy boxes, small jewelry gifts, wedding favor boxes, or decorative storage.
Paper Size: 8-10 inch squares create medium-sized pyramids. Scale up for larger gifts or down for miniature versions.
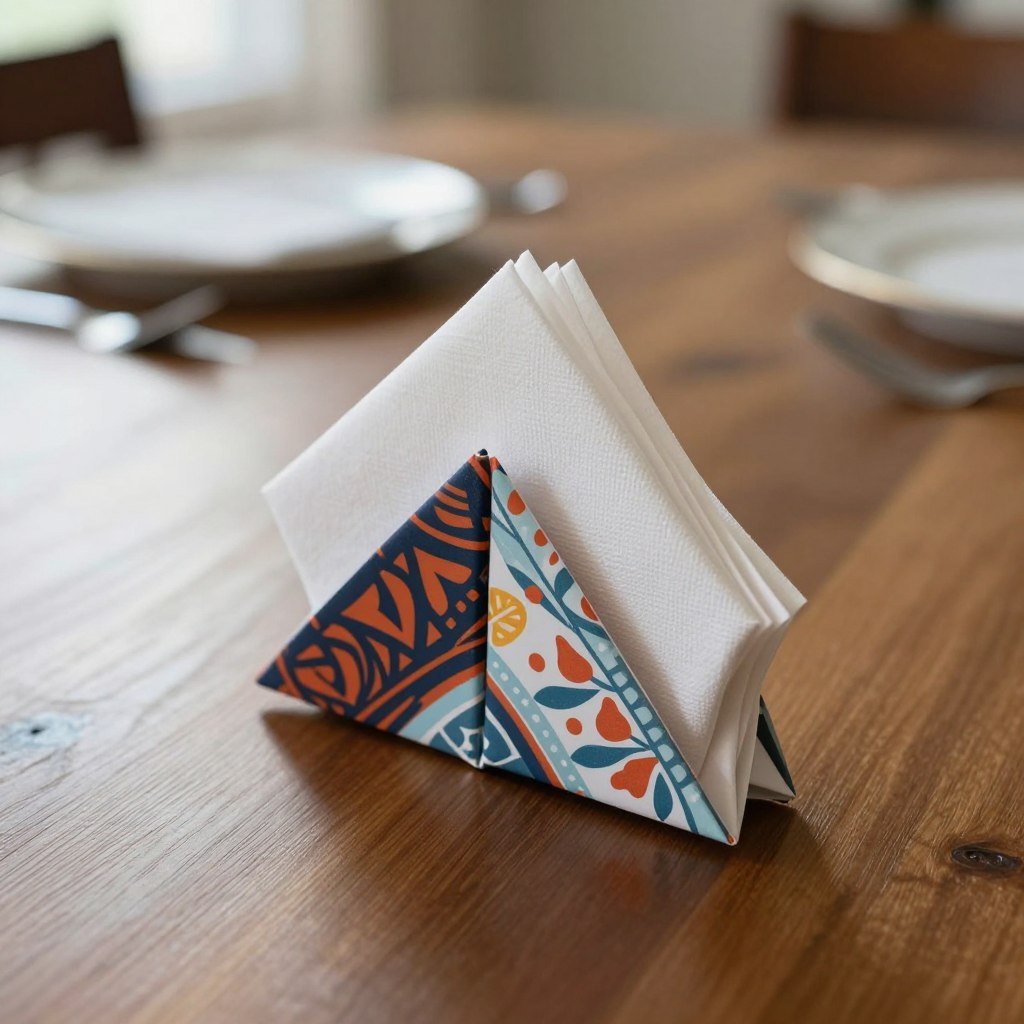
14. Origami Napkin Rings
Elevate table settings with origami napkin rings. These cylindrical holders add elegance to dinner parties without expensive tableware. Create seasonal designs by changing paper patterns.
Best Uses: Formal dinner napkin holders, casual meal table decor, party table settings, wedding reception decor, or reusable craft fair items.
Paper Size: Rectangular strips 2×8 inches work perfectly. Use metallic or decorative papers for special occasions.
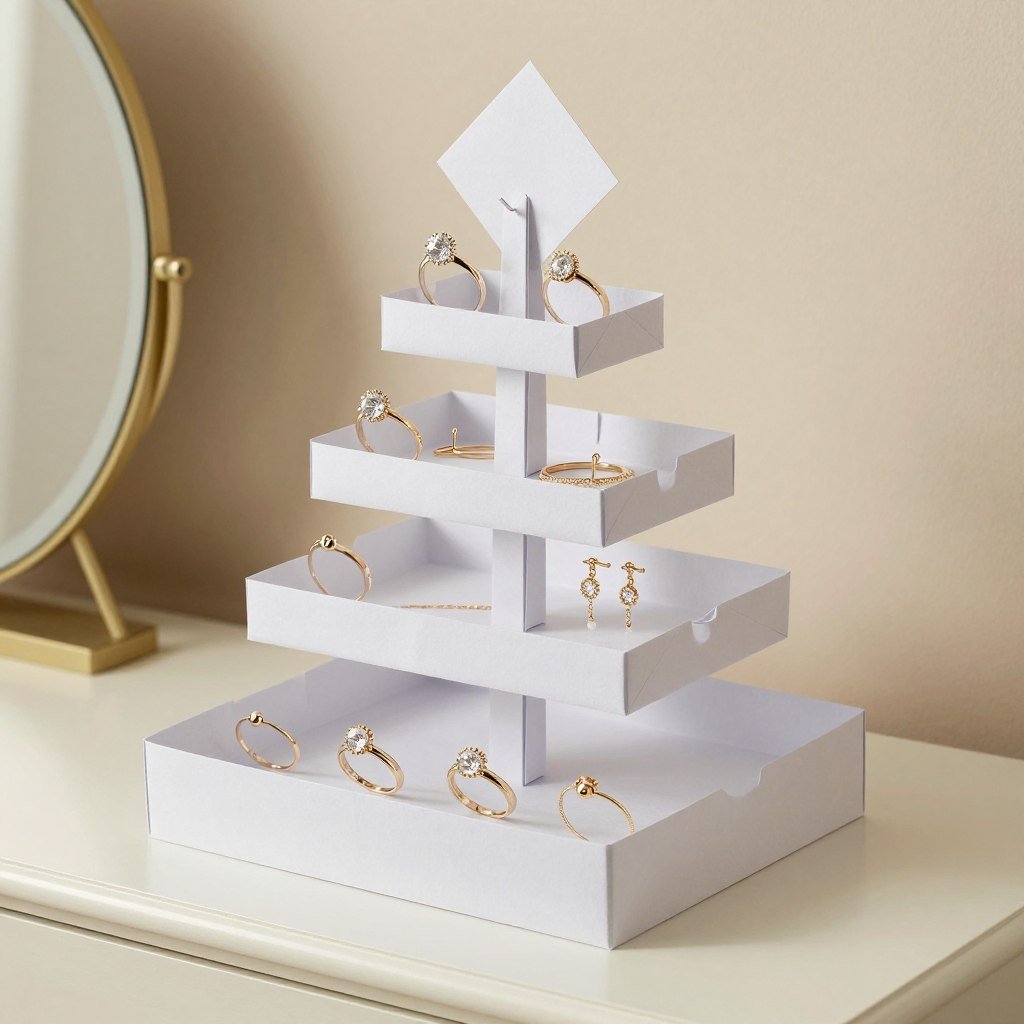
15. Origami Jewelry Holder
The origami jewelry holder features multiple compartments and ring posts. This intricate design organizes earrings, rings, and small necklaces. The standing structure saves counter space while displaying accessories.
Best Uses: Ring storage, earring organization, small necklace display, vanity organization, travel jewelry case, or gift for jewelry lovers.
Paper Size: This project typically requires 2-3 sheets of 10-12 inch cardstock assembled together for stability.
Seasonal and Holiday Practical Projects
Seasonal origami projects serve dual purposes as decorations and functional items. These designs adapt to different holidays and celebrations throughout the year.


16. Origami Gift Bags
Replace disposable gift wrap with reusable origami gift bags. These standing bags feature handles and expandable bottoms. Recipients can refold and reuse them for future gifts.
Best Uses: Birthday gift packaging, holiday present bags, party favor bags, retail packaging, eco-friendly gift wrap, or market tote bags.
Paper Size: Large 12-15 inch squares or letter-size paper create usable bags. Reinforce handles with ribbon or additional paper layers.
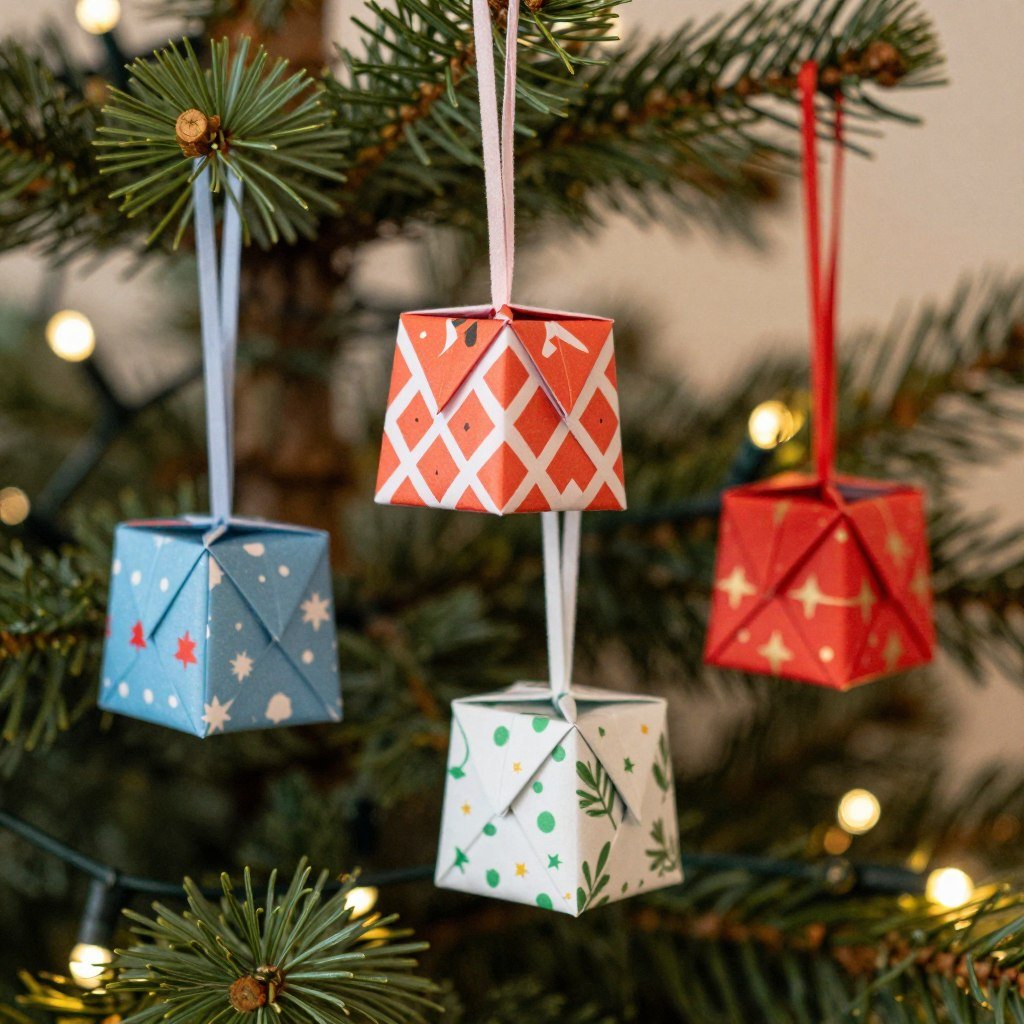
17. Origami Christmas Ornament Boxes
These small ornament boxes serve double duty as tree decorations and gift containers. Fill them with candy, small jewelry, or gift cards. They store flat for next year’s use.
Best Uses: Christmas tree ornaments, advent calendar boxes, small gift packaging, holiday party favors, or decorative storage year-round.
Paper Size: 4-6 inch squares create ornament-sized boxes. Use festive paper patterns for holiday appeal.
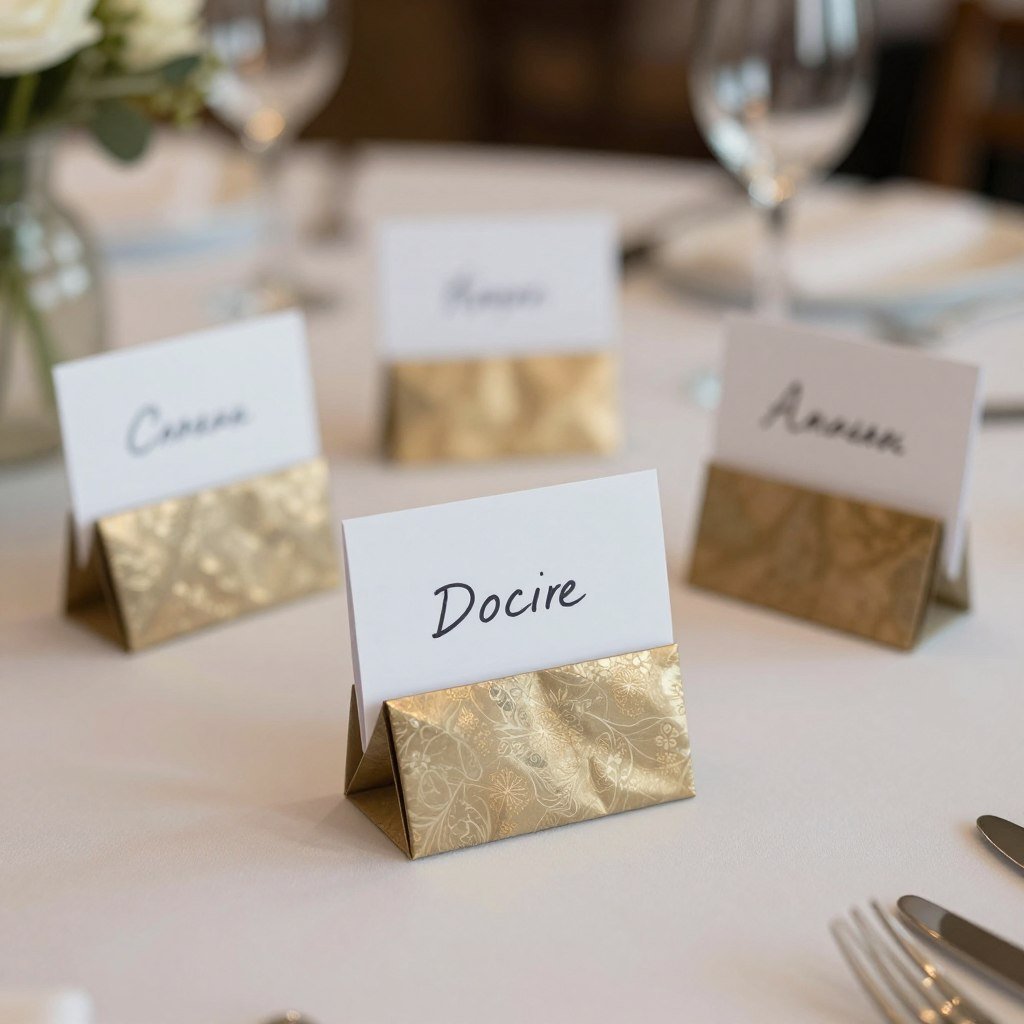
18. Origami Place Card Holders
Create sophisticated place card holders for events and gatherings. These standing designs hold name cards upright at each table setting. Make them match wedding colors or party themes.
Best Uses: Wedding place cards, dinner party seating, business event name cards, buffet food labels, or photo display stands.
Paper Size: Small 3-4 inch squares work perfectly. Choose paper that complements your event color scheme.

19. Origami Party Hats
Simple newspaper or poster board folds into wearable party hats. This classic origami project entertains children at parties and celebrations. Customize with stickers, stamps, or drawings.
Best Uses: Birthday party hats, costume accessories, children’s activities, pirate or sailor costume pieces, or painting protection hats.
Paper Size: Full newspaper sheets or 11×17 inch poster board create child-sized hats. Adjust size for adults or smaller children.
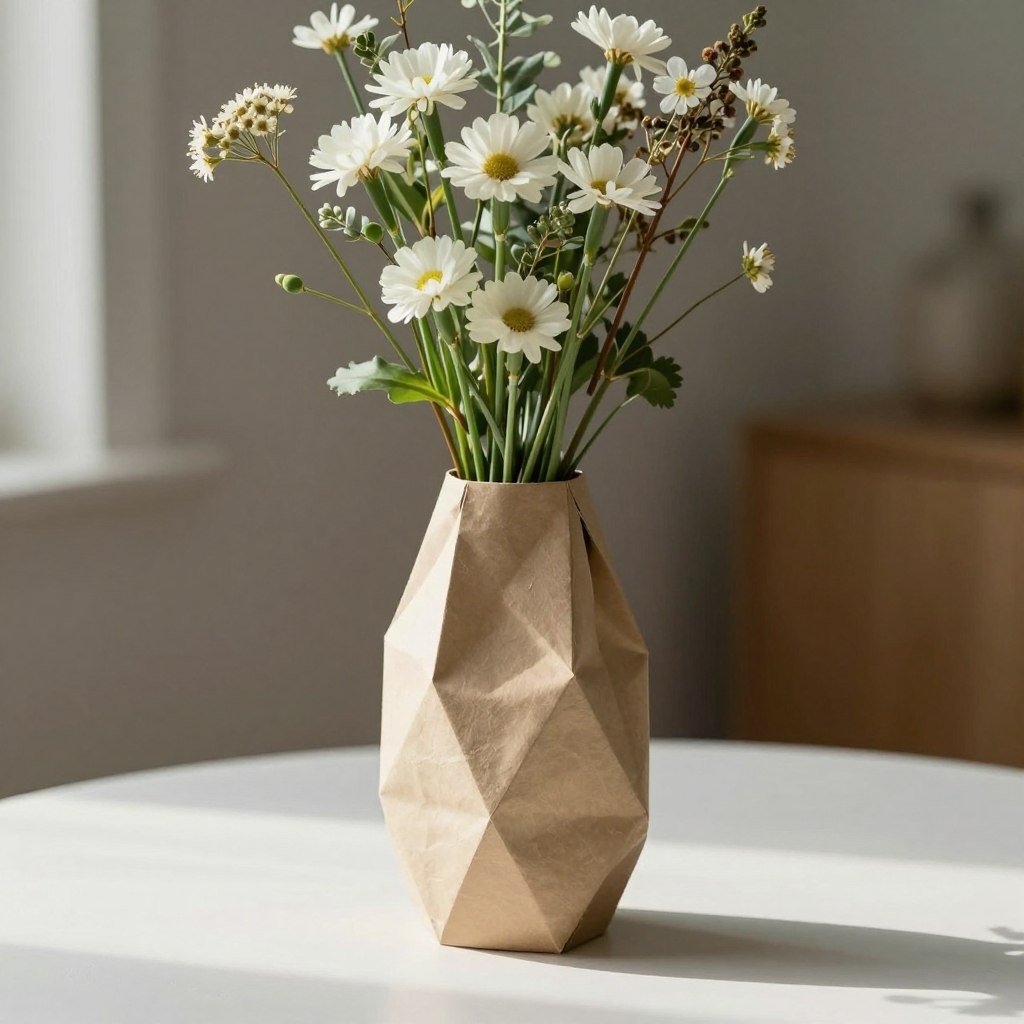
20. Origami Flower Vases
Advanced folders can create origami vases for dry or paper flowers. These geometric containers require waterproof paper or protective coating for fresh flowers. They make stunning centerpieces for events.
Best Uses: Dry flower display, paper flower holder, decorative centerpiece, pen and pencil holder, or single-stem fresh flower vase with water-resistant coating.
Paper Size: Large 12-15 inch squares create substantial vases. Consider using coated or waterproof origami paper for longevity.
Water Caution: Most paper vases work best with dry or paper flowers. For fresh flowers, insert a small glass or plastic container inside the origami structure to hold water.
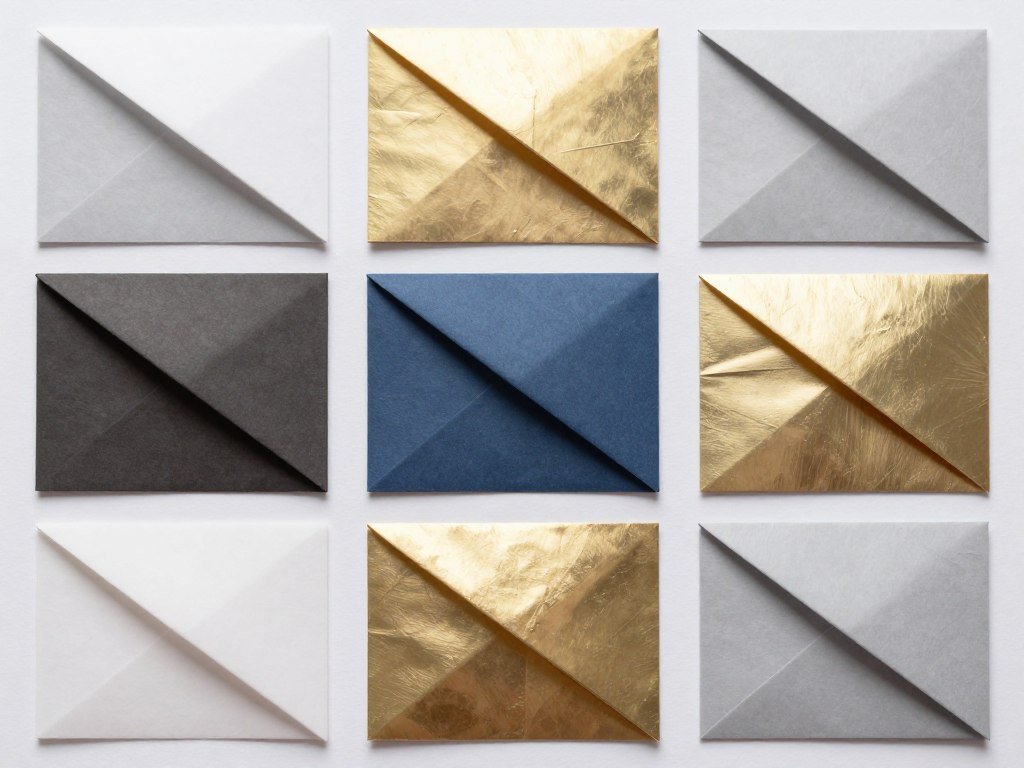
Choosing the Right Paper for Your Projects
Paper selection determines project success as much as folding technique. Different projects require specific paper characteristics. Understanding paper types helps you choose the best material for each creation.
Paper Weight Considerations
Paper weight affects both folding ease and finished durability. Lightweight papers fold easily but tear during complex sequences. Heavy papers create sturdy items but resist tight folds.
Measure paper weight in grams per square meter or pounds. Origami paper typically ranges from 60-100 gsm. Projects requiring multiple layers need lighter weight papers.
Texture and Finish Options
Paper texture influences both aesthetics and functionality. Smooth papers show crisp folds but can be slippery. Textured papers provide grip but may crack at fold lines.
Finishes range from matte to glossy. Matte papers accept pencil marks for planning folds. Glossy papers resist moisture better for functional items.
| Paper Type | Weight (GSM) | Best For | Difficulty Level | Cost Range |
| Kami (Standard Origami) | 60-70 | Practice, decorative items, learning | All levels | $ |
| Tant Paper | 78 | Boxes, containers, modular origami | Intermediate-Advanced | $$ |
| Kraft Paper | 80-90 | Storage boxes, durable items, rustic projects | Beginner-Intermediate | $ |
| Washi Paper | 25-60 | Delicate items, lampshades, decorative pieces | Advanced | $$$ |
| Cardstock | 120-200 | Phone stands, coasters, sturdy organizers | Intermediate | $ |
| Tyvek | Varies | Wallets, bags, water-resistant items | Advanced | $$$$ |
Quality Origami Paper Benefits
- Holds crisp folds without cracking
- Pre-cut to perfect squares saves time
- Colored on both sides enhances designs
- Consistent thickness ensures predictable results
- Often printed with patterns for added visual interest
- Appropriate weight for specific project types
Regular Paper Limitations
- May tear during complex folding sequences
- Requires cutting to square shape
- Usually white on one side only
- Thickness varies between brands and types
- Limited color and pattern options
- Can be too thick or too thin for certain projects
Common Origami Mistakes to Avoid
Even experienced folders encounter challenges. Recognizing common mistakes helps you troubleshoot problems before they ruin projects. These tips address the most frequent issues beginners face.

Mistakes That Ruin Projects
- Starting with worn or creased paper instead of fresh sheets
- Skipping step-by-step instructions and guessing folds
- Using paper that is too thin for structural projects
- Forcing folds that do not align properly
- Working on soft surfaces that prevent crisp creases
- Ignoring paper grain direction in advanced projects
- Rushing through complex sequences without checking accuracy
Best Practices for Success
- Begin each project with fresh, uncreased paper
- Follow instructions carefully, completing each step fully
- Match paper weight and type to project requirements
- Align edges precisely before creasing each fold
- Use a hard, flat surface for clean, sharp creases
- Test paper grain direction on scrap before cutting
- Take time to ensure accuracy at each folding stage
Professional Folder Tips
- Use a bone folder tool for extra-crisp creases
- Keep hands clean and dry to prevent paper staining
- Practice difficult folds on scrap paper first
- Work in good lighting to see fold lines clearly
- Store completed projects away from moisture and sunlight
- Build a library of folding techniques through repetition
- Join origami communities for technique troubleshooting
Accuracy Over Speed: The most common mistake is rushing. Precise folds in early steps prevent cascading errors later. Take time to align edges perfectly before creasing each fold.
Troubleshooting Specific Problems
Paper Tears During Folding
Tearing usually indicates paper that is too thin for the project or folding against the grain. Try heavier paper or rotate your sheet before starting.
- Switch to higher GSM paper for structural projects
- Test fold direction on scrap pieces first
- Avoid refolding the same crease multiple times
- Use gentler pressure on delicate papers
Folds Do Not Stay Crisp
Soft creases result from insufficient pressure or working on cushioned surfaces. Move to a hard table and use tools to reinforce folds.
- Work on hard, flat surfaces like wood or glass
- Run a bone folder along each crease
- Use fingernail or ruler edge for sharp lines
- Consider slightly heavier paper that holds shape better
Finished Project Looks Messy
Untidy results usually stem from imprecise early folds. Small misalignments compound through each subsequent step.
- Measure and mark fold lines with light pencil
- Align edges within 1mm accuracy before creasing
- Unfold and redo steps that seem slightly off
- Practice the same project multiple times
Complex Projects Feel Overwhelming
Advanced projects intimidate beginners attempting them too soon. Build skills progressively through easier designs first.
- Master basic folds before attempting complex projects
- Break long sequences into manageable sections
- Watch video tutorials for difficult steps
- Practice related techniques on simpler models first
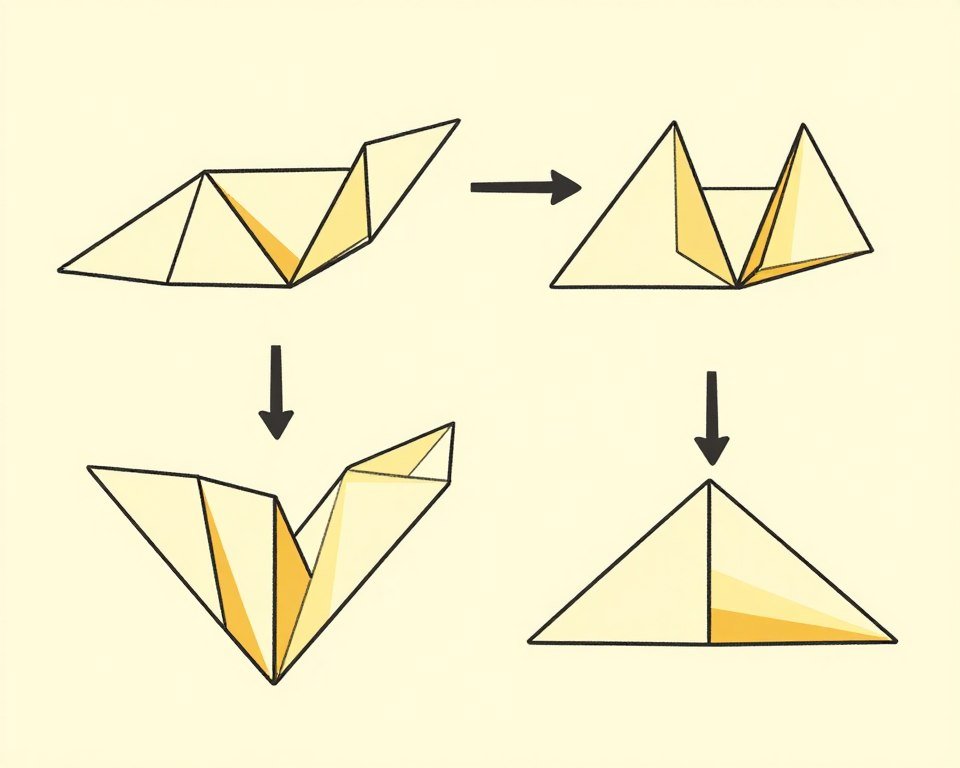
Essential Origami Folding Techniques
Mastering fundamental folds unlocks countless origami projects. These basic techniques appear repeatedly across different designs. Learn them thoroughly to accelerate your origami journey.
Foundation Folds Every Folder Should Know
Valley Fold
The valley fold represents the most basic origami technique. Fold the paper toward you, creating a valley shape. This fundamental fold appears in virtually every project.
Mountain Fold
Mountain folds crease away from you, forming a peak. Often combined with valley folds to create complex structures. Master both directions for versatile folding.
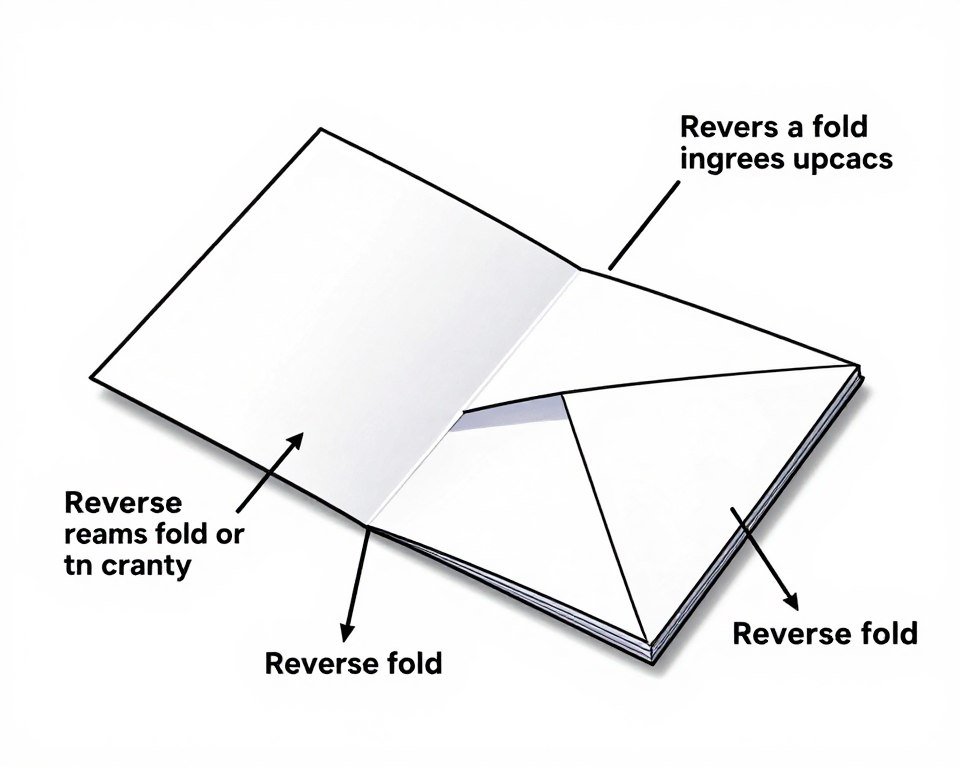
Reverse Fold
Reverse folds change a mountain fold to a valley fold or vice versa. This technique creates three-dimensional shapes from flat paper. Essential for boxes and containers.
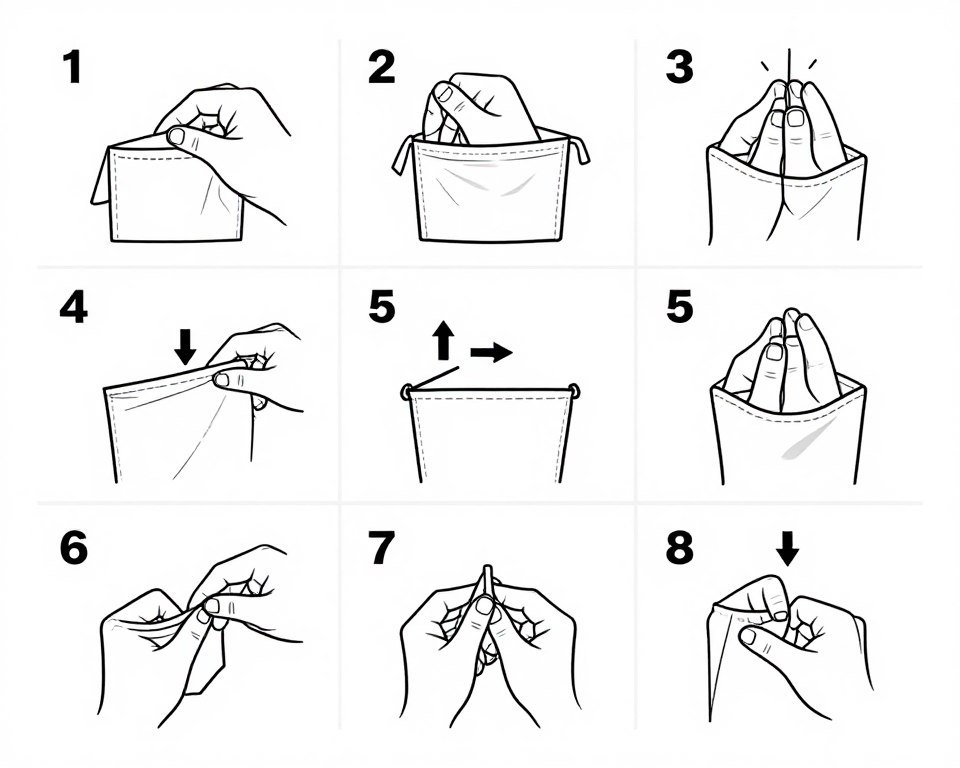
Squash Fold
Squash folds open a flap and flatten it into a new shape. This versatile technique appears in intermediate and advanced projects. Practice on simple models first.
Learning Progression: Start by perfecting valley and mountain folds on simple projects. Progress to reverse and squash folds as your confidence grows. Most useful origami projects use combinations of these four basic techniques.
Caring for Completed Origami Projects
Proper care extends the life of functional origami items. Paper creations require protection from moisture, sunlight, and physical stress. These preservation techniques keep your projects looking fresh.
Storage and Display Methods
Store origami projects in dry environments away from direct sunlight. Paper fades and becomes brittle when exposed to UV light. Use boxes or shelves in climate-controlled spaces.
Display pieces require protective measures. Consider glass cases for special items. Rotate displayed projects to prevent uneven fading. Dust regularly with soft brushes to prevent buildup.
- Store flat items in archival boxes with acid-free tissue
- Display dimensional pieces on stable, dry surfaces
- Rotate items in and out of direct sunlight
- Use museum wax to secure standing projects
- Keep paper away from heating vents and windows
Protecting Against Damage
Moisture represents the biggest threat to paper origami. Humidity causes paper to warp and mold. Use dehumidifiers in storage areas. Consider silica gel packets in enclosed storage.
Physical handling gradually weakens folds. Minimize touching completed projects. Handle with clean, dry hands when necessary. Support larger pieces from underneath to prevent stress on connection points.
Reinforcement Option: Apply clear acrylic spray to functional items that see heavy use. This protective coating adds water resistance and strengthens paper fibers. Test on scrap paper first to ensure it does not discolor your chosen material.
Frequently Asked Questions
New origami enthusiasts often have similar questions. These answers address the most common concerns about paper folding and useful projects.
Can I use regular printer paper for origami projects?
Yes, regular printer paper works for many beginner projects and practice folds. Standard copy paper weighs about 75-80 GSM, suitable for simple boxes and basic items. Cut sheets into perfect squares for best results.
However, printer paper has limitations. It is white on both sides, limiting color options. The paper may crack with complex folds or multiple refolds. For finished projects you plan to use regularly, invest in proper origami paper or cardstock.
How do I make my origami boxes stronger and more durable?
Increase box durability through several methods. First, use heavier paper between 90-120 GSM. Cardstock creates boxes that hold more weight without collapsing.
Second, apply clear acrylic sealer spray to finished boxes. This coating strengthens the paper and adds water resistance. Third, consider making double-walled boxes by folding two sheets together or inserting one completed box inside a slightly larger one.
What size paper should I use for specific projects?
Project size depends on desired finished dimensions and paper thickness. As a general rule, the finished project measures approximately one-third to one-quarter of the starting paper size.
For standard desk organizers, start with 8-10 inch squares. Gift boxes work well from 6-12 inch paper depending on gift size. Small items like bookmarks need only 3-4 inch squares. Practice with 6-inch paper when learning new folds.
Is origami paper worth the investment for beginners?
Quality origami paper benefits even beginners. Proper origami paper is already cut to perfect squares, saving preparation time. It comes in various colors and patterns, making projects more attractive.
Start with an inexpensive mixed pack of standard kami paper. This gives you practice material without significant investment. As you progress to projects you want to keep, upgrade to specialized papers like tant or kraft for better durability.
Can children make these useful origami projects?
Many useful origami projects suit children with adult guidance. Start young folders with simple projects rated 1-2 difficulty, such as bookmarks, seed packets, and basic boxes.
Children typically succeed with origami around age 6-7 when fine motor skills develop sufficiently. Choose larger paper sizes for small hands. Supervise steps requiring precise alignment. Celebrate completed projects by using them immediately to reinforce the practical value.
How can I prevent paper from tearing during complex folds?
Paper tears result from several factors. Using paper that is too thin for the project causes most tearing. Switch to heavier weight paper for complex designs with many layers.
Folding against the paper grain also causes tears. Test fold direction on scrap before starting. Avoid refolding the same crease repeatedly. If you must unfold and redo a step, do so gently. Consider the paper worn after multiple refolds and start fresh if necessary.
What tools do I need besides paper for origami?
Basic origami requires only paper and your hands. However, several tools improve results. A bone folder creates extra-crisp creases, especially important for functional items.
Additional helpful tools include a ruler for measuring and marking, scissors for cutting paper to size, and a cutting mat if you frequently prepare your own squares. Advanced folders use tweezers for tiny folds and clips to hold pieces during complex assembly.
How long do paper origami items typically last with regular use?
Lifespan varies dramatically based on paper quality, project type, and use intensity. Decorative items stored carefully last years. Functional items experiencing daily handling may last weeks to months.
Boxes made from cardstock and used for light items like paper clips can last 6-12 months. Wallets and phone stands see more stress and may need replacement after 2-3 months. Extend life by using quality paper, applying protective spray, and handling projects gently.
Building Your Origami Skills Progressively
Successful origami practice follows a logical skill progression. Start with simple projects and gradually attempt more complex designs. This approach builds confidence while developing technique.
Beginner Path (Weeks 1-4)
- Master valley and mountain folds on simple squares
- Create basic boxes and bookmarks repeatedly
- Practice with inexpensive paper until folds feel natural
- Learn to create crisp, accurate creases
- Complete 2-3 projects from the beginner section
- Experiment with different paper types and sizes
Intermediate Path (Months 2-3)
- Attempt multi-step projects like gift boxes with lids
- Learn reverse fold and squash fold techniques
- Work with cardstock and specialty papers
- Create projects that combine multiple pieces
- Focus on precision in complex fold sequences
- Start planning custom sizes for specific uses
Advanced Path (Months 4+)
- Tackle wallets, jewelry holders, and vases
- Modify existing designs for personal needs
- Experiment with unconventional materials
- Design your own useful origami projects
- Teach techniques to friends and family
- Share completed projects and patterns online
Environmental Benefits of Useful Origami
Choosing origami solutions over manufactured products reduces environmental impact. Paper folding creates functional items without plastic packaging, factory production, or shipping emissions. This sustainable approach aligns with eco-conscious living.
Reducing Waste Through Paper Folding
Origami transforms waste paper into useful objects. Old newspapers become party hats. Scrap craft paper converts to storage boxes. Magazine pages fold into unique envelopes.
This upcycling approach diverts paper from landfills while creating needed items. Unlike disposable plastic organizers, paper projects biodegrade completely when their useful life ends.
Reusable and Recyclable Solutions
Many origami projects serve multiple purposes across their lifetime. Gift boxes become storage containers after unwrapping. Organizers move between different rooms as needs change.
When projects wear out, the paper recycles easily. No special disposal required. Simply add worn origami to your regular paper recycling bin.

Eco-Advantages of Origami
- Uses renewable paper resources instead of petroleum-based plastics
- Requires no electricity or manufacturing equipment
- Creates zero packaging waste
- Produces no toxic byproducts during creation
- Completely biodegradable at end of life
- Encourages creative reuse of scrap materials
- Eliminates shipping emissions when made at home
Limitations to Consider
- Shorter lifespan than plastic alternatives in some applications
- Vulnerable to water damage without treatment
- Requires replacement more frequently with heavy use
- May need protective coatings for longevity
- Time investment needed to create items
- Some projects require specialty papers
Start Creating Useful Origami Today
These twenty projects demonstrate origami’s practical applications beyond decoration. From simple bookmarks to complex wallets, paper folding creates genuinely useful items. Each project combines functionality with the meditative pleasure of working with paper.
Begin your origami journey with beginner projects that build fundamental skills. Progress to intermediate designs as your confidence grows. Eventually tackle advanced creations that impress both visually and functionally.
The beauty of useful origami lies in its accessibility. You need only paper and patience to start. Projects scale from quick five-minute creations to contemplative hour-long folds. Each completed piece provides both satisfaction and utility.

Share your completed projects with family and friends. Teach children these valuable skills. Gift handmade origami items instead of purchasing mass-produced alternatives. Each fold connects you to centuries of paper-folding tradition while solving modern organizational challenges.
Remember that origami mastery develops through practice. Your first attempts may not match tutorial photos perfectly. Keep folding. Each project improves your technique and understanding. Soon you will modify designs to meet specific needs and create custom solutions.
Useful origami transforms ordinary paper into extraordinary solutions. Start with one project today. Experience the satisfaction of creating functional art from simple square sheets.